# Start here
AppFlowy is an open-source alternative to Notion. You are in charge of your data and customizations.
## Built for teams that need more control and flexibility
### 100% data control
* You can host AppFlowy wherever you want; no vendor lock-in.
### Unlimited customizations
* Design and modify AppFlowy your way with an open core codebase.
### One codebase supporting multiple platforms
* AppFlowy is built with Flutter and Rust. What does this mean? Faster development, better native experience, and more reliable performance.
## Built for individuals who care about data security and mobile experience
### 100% control of your data
* Download and install AppFlowy on your local machine. You own and control your personal data.
### Extensively extensible
* For those with no coding experience, AppFlowy enables you to create apps that suit your needs. It's built on a community-driven toolbox, including templates, plugins, themes, and more.
### Truly native experience
* Faster, more stable with support for offline mode. It's also better integrated with different devices. Moreover, AppFlowy enables users to access features and possibilities not available on the web.
## Community for hackers | Community for creators | Community for builders
### Let’s democratize the knowledge and wheels of making complex workplace collaboration tools
* It takes tremendous resources and expertise to build a great collaborative productivity tool. Don’t reinvent the wheels, let’s create the best open-source building blocks as infra to power others.
### We collaboratively create apps that suit others’ needs by developing a versatile toolbox of plugins, templates, and more
* Join us to build a toolbox that empowers anyone to create their own system - play and tweak without a glass ceiling on what’s possible.
# Welcome to AppFlowy Docs
AppFlowy is the first open-source Notion alternative. You are in charge of your data and customizations. Here you can access the complete documentation for AppFlowy.
AppFlowy Docs & Notes & Wikis
AppFlowy Databases for Tasks & Projects
AppFlowy Kanban Board for To-Dos
AppFlowy Calendar for Content Management
AppFlowy Open AI Opt-in Smart Write and Edit
### Overview
| Essential Documentation | Popular Topics |
| ----------------------------------------------- | ----------------------------------------------------------------------- |
| [Installation](/docs/appflowy/install-appflowy) | [Architecture](/docs/documentation/software-contributions/architecture) |
| [AppFlowy](/docs/documentation/appflowy) | [Translate AppFlowy](/docs/documentation/appflowy/translation) |
{% hint style="info" %}
**Help & Feedback**
***
**Docs**
Edit [**AppFlowy Docs**](https://github.com/AppFlowy-IO/docs) to fix an error or add an improvement in a merge request.\
[**Create an issue**](https://github.com/AppFlowy-IO/docs/issues) to suggest an improvement to our Docs.
**Product**
[AppFlowy Public Roadmap](https://github.com/AppFlowy-IO/AppFlowy/blob/main/ROADMAP.md)
[Propose functionality](https://github.com/AppFlowy-IO/appflowy/issues/new/choose) by submitting a feature request.\
[Join our Discord channel](https://discord.gg/9Q2xaN37tV) to help shape new features.
***
**Get Help**
Ask on the [forum](https://github.com/AppFlowy-IO/appflowy/discussions/new)
Join [Discord](https://discord.gg/9Q2xaN37tV) to get quick support
Email for specific problems
{% endhint %}
# How to get help
## Overview
We want your experience with AppFlowy to be smooth and positive from day one! We realise, though, that a bit of assistance at the right time can help, especially when AppFlowy is still at an early stage of the development.
To deliver an effortless onboarding experience, we've put together a list of resources designed to give the answers you need.
## Essential Documentation
What you are looking at - the AppFlowy Essential Documentation - is likely one of the best resources to start with. This wiki provides a wide range of instructions and how-tos for AppFlowy. Even if you don't have a specific question, this is a great place to start on your journey with AppFlowy. And we encourage you to continue to check it out as we are continuously updating and adding new documentation.
## Ask The Community
We encourage to join our community to make AppFlowy a world-class open-source project!
* Get quick help on [Discord](https://discord.gg/9Q2xaN37tV) along with 1000+ hackers and developers
* Open issues, PRs, feature requests and vote on them on [Github](https://github.com/AppFlowy-IO/appflowy)
## Contact Us
You can get assistance directly from AppFlowy team on [Discord](https://discord.gg/9Q2xaN37tV) or email
# Install AppFlowy
Welcome to the installation guide for AppFlowy! Whether you're on Windows, macOS, or Linux, we've got you covered. Follow the steps below to get started with AppFlowy on your preferred platform.
### Step 1: Choose Your Operating System
Select your operating system from the list below to find installation instructions tailored to your platform:
* **Windows**: For Windows users, we provide an easy-to-use installer.
* **macOS**: macOS users can choose between a universal DMG or a ZIP package.
* **Linux**: Linux users have options like AppImage, RPM, DEB, and more.
* **Other**: If you have a different setup, we also offer a generic tar.gz package.
Find the latest version on our [Github Release](https://github.com/AppFlowy-IO/AppFlowy/releases/latest) page.
### Step 2: Download AppFlowy
Once you've chosen your platform, download the appropriate package from our GitHub repository. Click on the link provided for your operating system to access the download page.
### Step 3: Install AppFlowy
If you downloaded an executable, open it up and follow the instructions shown on screen to complete the installation. Depending on your platform, there might be more/less steps.
In the case you chose to download an archive, simply extract the contents and run the executable `AppFlowy`!
### Step 4: Run AppFlowy
After successful installation, launch AppFlowy and start enjoying the benefits of our powerful task management tool.
That's it! You're now ready to experience the productivity and organization that AppFlowy brings to your daily tasks.
If you encounter any issues during installation or have questions, do not hesitate to [reach out for hep](/docs/appflowy/readme/how-to-get-help)!
# Installation
{% hint style="info" %}
These are instructions for an end user.
{% endhint %}
These are the installation instructions for an end user. If you wish to contribute to AppFlowy or if you just want to view and run directly from source code please visit the [Building from Source](/docs/documentation/appflowy/from-source) section.
You can view the [System Requirements](/docs/appflowy/install-appflowy/requirements)
You can go directly to the [Installation methods](/docs/appflowy/install-appflowy/installation-methods)
# System Requirements
help-wanted
* OS: **Windows 7/8/8.1/10 64-bit** // **Ubuntu 16.10 & Newer Versions** // **Mac Os X & Newer Versions**
* Processor: 64-bit 2.0 GHz
* Memory: 2 GB
* Storage: 500 MB
# Installation methods
Before you install AppFlowy, be sure to review the [System Requirements](/docs/appflowy/install-appflowy/requirements)
To get a local copy up and running, please choose an installation method.
## Choose the installation methods
Depending on your platform, select from the following available methods to install AppFlowy:
| Installation method | Description | When to choose |
| ------------------------------------------------------------------------------------------------------------------------------------------------------------------------------------------------------------------------------------------------------------------------------------------ | -------------------------------------------------------------------------------------- | -------------------------------------------------------------------------------------- |
| [Mac / Windows / Linux Packages](/docs/appflowy/install-appflowy/installation-methods/mac-windows-linux-packages) | Download the official package to use AppFlowy on your Mac / Windows / Linux right away | This is the recommended method for getting started. |
| [Building from Source](/docs/documentation/appflowy/from-source) | Install AppFlowy and all of its components from scratch. | Design and modify AppFlowy your way with an open core codebase. |
| [Docker](/docs/appflowy/install-appflowy/installation-methods/installing-with-docker) | The AppFlowy packages, Dockerized. | Use this method if you’re familiar with Docker. |
| [https://github.com/AppFlowy-IO/documentations/blob/main/appflowy/install-appflowy/installation-methods/installing-android-obtainium.md](https://github.com/AppFlowy-IO/documentations/blob/main/appflowy/install-appflowy/installation-methods/installing-android-obtainium.md "mention") | Install the AppFlowy Android App directly | Use this method if you want to install AppFlowy Android releases directly from GitHub. |
# Mac / Windows / Linux Packages
Download AppFlowy for Free 100% Open Source
## Packages
Download AppFlowy and use it right away -->
On the [release](https://github.com/AppFlowy-IO/appflowy/releases) page, you can find packages for MacOS, Windows, and Linux (see the screenshot below). Click on a suitable package to download. If you'd like to build the application from source, please refer to [Building from Source](/docs/documentation/appflowy/from-source)
For Linux users, please also refer to [Installing on Linux ](/docs/appflowy/install-appflowy/installation-methods/mac-windows-linux-packages/installing-on-linux)for optional steps.
## Linux Install
AppFlowy is available on [Flathub](https://flathub.org/apps/details/io.appflowy.AppFlowy):
```
flatpak install flathub io.appflowy.AppFlowy
```
Also available on Canonical Snapcraft's Snap Store:
## Mac Install
Download the application from [GitHub](https://github.com/AppFlowy-IO/AppFlowy/releases)
Alternatively
```
brew install --cask appflowy
```
## Windows install
You can download the executable directly from [GitHub](https://github.com/AppFlowy-IO/AppFlowy/releases)
# Installing on Linux
AppFlowy currently does not have a formal Linux installation process. However, the application can quickly and easily be installed by the end user.
**Note:** AppFlowy requires glibc >= 2.32 however this version is not yet available in some common linux distributions. For the record, glibc 2.33 is available on Debian testing and Ubuntu 21.04:
**Note:** The following steps have been verified on the following Linux distributions:
* [x] lubuntu 20.04 - x86\_64
* [x] Arch Linux - x86\_64
* [x] Ubuntu 20.04 - x86\_64
* [x] Linux Mint 20.3 x86\_64
Any Linux distribution not listed here has not been tested, and the following steps may not work. If you are trying to install AppFlowy on a Linux distribution not listed here, let us know how it went so that we can add it to the list or fix any bugs that may occur.
### Steps to install AppFlowy on Linux
1. Download the latest archive file from the [Releases](https://github.com/AppFlowy-IO/appflowy/releases) page.
2. Extract the archive in a location of your choice (e.g. `/opt/`).
**note:** Performing read/write operations in folders such as `/opt` may require root access. If a command fails due to missing permissions, try running it as the root user (this may be done by switching to the root user or using programs such as sudo and doas).
**note:** The application will be extracted into a folder named AppFlowy.
```shell
tar -xzvf AppFlowy-linux-x86.tar.gz
```
3. Go to the AppFlowy directory.
```shell
cd AppFlowy
```
4. Run the application.
```shell
./app_flowy
```
### Emoji Font Installation
AppFlowy will look for the **Noto Color Emoji** font on your system when trying to display emoji unicode characters. Please make sure that the font is configured so that emoji characters are displayed correctly.
**note:** Certain distributions (e.g. Fedora Linux) already have this set up by default. In that case, you can safely ignore this section.
1. Install the the font:
* On Arch and Manjaro Linux, install `noto-fonts-emoji` using pacman.
* On Ubuntu Linux and Linux Mint, install `fonts-noto-color-emoji` using apt.
2. Configure the font:
* First, run `fc-cache -v` to reload the system font cache.
* Then, create a file in `/etc/fonts/local.conf` with root privileges or `~/.config/fontconfig/fonts.conf` with the following content:
```
sans-serifSansNoto Color EmojiserifSerifNoto Color EmojimonospaceMonospaceNoto Color Emoji
```
3. Log out and log back in, or reboot to see your changes.
### Optional steps to add AppFlowy to your system menu
{% hint style="danger" %}
The current documentation may be out of sync with the development.
{% endhint %}
Adding an application to Linux's system menu requires some extra steps. In the steps below we assume that you have extracted the archive file contents into the `/opt/` directory and that your present working directory is `/opt/AppFlowy`.
#### Add a Linux desktop file to your system
* Rename the icon file.
```shell
mv flowylogo.svg app_flowy.svg
```
* Copy the icon file so that the system will pick it up.
```
cp app_flowy.svg ~/.local/share/icons
```
* Copy the temporary desktop file to a usable Linux desktop file. Notice the underscore in `app_flowy`.
```shell
cp appflowy.desktop.temp app_flowy.desktop
```
* Edit the following lines in the `appflowy.desktop` file so that they point to the correct files.
```shell
Icon=[CHANGE_THIS]/AppFlowy/flowy_logo.svg
Exec=[CHANGE_THIS]/AppFlowy/app_flowy
```
For example, if you installed in `/opt`, this becomes:
```shell
Icon=app_flowy.svg
Exec=/opt/AppFlowy/app_flowy
```
* Move the desktop file so that the system will pick it up.
```shell
mv app_flowy.desktop ~/.local/share/applications
```
# Installing & Setting up Flutter on Linux from Source
This guide provides step-by-step instructions to install and set up Flutter on Linux from source. It is primarily targeted at Debian-based distributions but should work for the majority of them.
Update your system by running the following command:
```shell
sudo apt update
```
Install the necessary packages using the command:
```shell
sudo apt install curl file git unzip xz-utils zip libglu1-mesa clang cmake \ ninja-build pkg-config libgtk-3-dev
```
Optionally, you can choose to install cmake and ninja-build from source. This step is not recommended but provided for advanced users. You can download cmake from [here](https://cmake.org/download/) and ninja-build from [here](https://github.com/ninja-build/ninja/). Note that installing cmake is required to install ninja-build or Python.
Create a new folder for Flutter by running the following command:
```shell
mkdir projectfolder
```
Download the [latest Flutter SDK tarball file](https://docs.flutter.dev/development/tools/sdk/releases?tab=linux)
## Installation
Change into the project folder you created earlier:
```shell
cd projectfolder
```
Extract the Flutter tarball file using the command:
```shell
tar xvf ~/Downloads/flutter_linux_*-stable.tar.xz
```
Add Flutter to your environment PATH by executing the following command:
```shell
export PATH="$PATH:[path-to-flutter-directory]/bin"
```
Optionally, you can add the PATH by opening the .bashrc file using the command:
```shell
nano ~/.bashrc
```
Add the PATH configuration there.
Replace \[path-to-flutter-directory] in the above command with the actual path to the folder where you extracted the Flutter SDK. For example, if you extracted Flutter in a folder called projectfolder, the command will be:
```shell
export PATH="$PATH:~/projectfolder/flutter/bin"
```
**Save the file by pressing Ctrl+O and then Ctrl+X.**
### **Reload Terminal Session**
Reload your terminal session by either reopening the terminal or running the following command:
```shell
/bin/bash
```
Check if the Flutter PATH is correctly added to your shell by running:
```shell
echo $PATH
```
Once you have confirmed that Flutter is installed and the PATH is set, run the following command to check the Flutter version:
```shell
flutter --version
```
You should see a welcome screen along with the installed version of Flutter.

# Docker
A simple way of running AppFlowy is with the use of a Docker container. And we have one for you at [Docker Hub](https://hub.docker.com/r/appflowyio/appflowy_client)!
```
docker run --rm \
-v $HOME/.Xauthority:/root/.Xauthority:rw \
-v /tmp/.X11-unix:/tmp/.X11-unix \
-v /dev/dri:/dev/dri \
-v /var/run/dbus/system_bus_socket:/var/run/dbus/system_bus_socket \
-v appflowy-data:/home/appflowy \
-e DISPLAY=${DISPLAY} \
appflowyio/appflowy_client:main
```
Using the `main` tag you will run the latest Appflowy version (from the `main` branch). You can also use specific releases using the tags (such as `0.0.5.3`). Check out the [available tags](https://hub.docker.com/r/appflowyio/appflowy_client/tags).
**Note:** Appflowy inside docker needs access to your X server. In case of lack of permissions, it's recommended to build the docker image yourself. The least recommended option is running `xhost +` before running the container, but this command is [considered dangerous](https://stackoverflow.com/questions/63884968/why-is-xhost-considered-dangerous)! So make sure you run `xhost -` after it.
## Building the docker image
## First thing to do
Make sure you already have Docker and docker-compose fully working before attempting this procedure.
For more information, check out:
* [Docker official documentation](https://docs.docker.com/engine/install/)
* [Docker Arch linux docs](https://wiki.archlinux.org/title/Docker)
In order to run Docker without `sudo` you must add your username to the docker group. To do this use the following command and then logout and login for it to take effect.
```bash
sudo usermod -aG docker yourusername
```
## Building without cloning the repository
There is no need to clone the whole repository. You can simply create a directory and download the required Docker files into that directory.
```bash
wget https://raw.githubusercontent.com/AppFlowy-IO/appflowy/main/frontend/scripts/docker-buildfiles/Dockerfile
wget https://raw.githubusercontent.com/AppFlowy-IO/appflowy/main/frontend/scripts/docker-buildfiles/docker-compose.yml
```
Now you are ready to build the docker image (this can take some time)
```bash
docker-compose build --build-arg uid=$(id -u) --build-arg gid=$(id -g)
```
Lastly, run the docker container
```bash
docker-compose up
```
## Building with the repository installed
If you already have the repository installed then you're halfway there!
```bash
cd ./frontend/scripts/docker-buildfiles
docker-compose build --build-arg uid=$(id -u) --build-arg gid=$(id -g)
```
Lastly, run the docker container
```
docker-compose up
```
# Community
**Welcome to the AppFlowy Community!**
At AppFlowy, we believe that community is at the heart of everything we do. Our passionate community members are the driving force behind our success, and we're thrilled to have you join us on this journey. This is your space to connect, learn, contribute, and grow together.
**Explore Our Community:**
1. **Get in Contact**: Have a question, or suggestion, or just want to say hi? Our community is here for you! Learn about the different ways you can get in touch with us and fellow AppFlowy enthusiasts.
2. **AppFlowy Mentorship Program**: Ready to level up your skills? Discover our mentorship program, where experienced members guide newcomers in their AppFlowy adventures.
3. **Write for AppFlowy**: Do you have insights, tutorials, or stories to share with our community? Contribute to our blog and help others by sharing your knowledge and experiences.
4. **Hacktober**: Join us during Hacktober and be a part of the global open-source celebration. Contribute to our projects, collaborate with fellow developers, and make a positive impact on the tech world.
Our community is a place of collaboration, creativity, and camaraderie. We're excited to have you here, and we can't wait to see the incredible things we'll achieve together. Dive into the sub-pages to explore each initiative in detail, and let's make the AppFlowy community even more awesome!
Remember, this space is for you, and we're here to support and empower one another. Your ideas, feedback, and contributions are what make our community thrive. So, let's embark on this exciting journey together! 🌟🚀
# Get in contact
We're thrilled to have you here and can't wait to connect with you. Whether you have questions, ideas, feedback, or just want to say hello, there are multiple ways to reach out to us.
[**1. GitHub (Issues and Discussions)**](https://github.com/AppFlowy-IO/AppFlowy)
Looking to report a bug, request a feature, or discuss a project in-depth? GitHub is the place to be! Head over to our repository and dive into the issues or discussions. We're always eager to hear your thoughts and collaborate on exciting projects.
[**2. Discord**](https://discord.gg/appflowy-903549834160635914)
Fancy some real-time chatting with fellow enthusiasts and our friendly team members? Join our Discord server! It's a vibrant hub for community discussions, troubleshooting, and connecting with like-minded folks.
[**3. Reddit**](https://www.reddit.com/r/AppFlowy/)
For those who prefer the charm of Reddit, we've got you covered. Visit our subreddit and be a part of the conversation. Share your experiences, ask questions, or simply enjoy the amazing content our community shares.
***But wait, there's more!***
In addition to these primary channels, we have a couple of bonus ways to stay in touch and stay updated:
[**4. Twitter**](https://twitter.com/appflowy)
Want to catch the latest updates, news, and announcements in bite-sized tweets? Follow us on Twitter! It's the perfect way to stay in the loop and interact with us on a more casual level.
[**5. AppFlowy Binary**](https://blog.appflowy.io/)
If you're a fan of in-depth articles, tutorials, and behind-the-scenes stories, check out our blog. We love sharing our knowledge and experiences with you, so be sure to bookmark it and stay tuned for exciting reads.
No matter which channel you choose, remember that we're here to make your experience with us as awesome as possible. Our friendly community and dedicated team are eagerly awaiting your messages and contributions.
So, what are you waiting for? Let's start chatting, sharing, and creating amazing things together. We can't wait to connect with you! 😄🚀
# AppFlowy Mentorship Program
# Program Guidance
## **Program Description**
The AppFlowy mentorship program is aimed at creating a hands-on learning opportunity for new developers who may otherwise lack the opportunity to gain exposure to real-world software practice and entry to the technical community.
**Benefits for Mentees:**
* Mentees gain exposure to real-world software development and entry to the open-source community.
* Mentees become more competitive in the job market by having more meaningful software development experience.
* Mentees have hands-on opportunities to do work related to their professional interests and to further the pursuit of their interests.
* Mentees expand their professional network by getting involved in the community and meeting other awesome contributors.
**Benefits for AppFlowy Community:**
* The mentorship program helps AppFlowy contributors to become AppFlowy core members and the voice of the community.
* The mentorship program helps identify and bring in new developers to our community.
* More source code gets written and used for the benefit of all.
We know how satisfied and excited people can be when they are a part of a community of dedicated developers in open source. We also understand how overwhelming it can be for newcomers to get started. We would love to offer a place for developers to get their foot in the door, improve their software development skills, and for mentorship to thrive.
## Program Schedule
*Applications* are accepted on a *rolling basis* and applicants are notified of the decision within 10 days of receipt of a complete proposal. Please use the [suggested proposal template](/docs/appflowy/community/appflowy-mentorship-program/proposal-template) when applying and email your application to
The program requires a commitment of 90 to 180 hours for 6 to 12 weeks. Once you receive the acceptance letter from us, you are required to create a page about your project under AppFlowy Docs, which will be marked as your official start date. A Final evaluation will be conducted at the earlier of the following dates 1) your choice 2) the end of week 6 or 12.
## Program Structure
You will develop both hard and soft skills required for a software engineer in the real world throughout the program. In addition, you will start playing a role as an AppFlowy core member and become the voice of our community. The program will provide you with the opportunity to:
* Collect and discuss business requirements cross-functionally
* Conduct a tech review to have your mentor and peers review your tech design doc
* Give and receive code reviews to/from your peers
* Offer help to the community
* Know your mentor and peers and participate in online hangouts
* Write an article related to your project and get it published to our newsletter - AppFlowy Binary
## **Getting Started**
Please use our [first-time AppFlowy developer guide](https://appflowy.gitbook.io/docs/essential-documentation/contribute-to-appflowy/contributing-to-appflowy#your-first-codebase-contribution) to get your AppFlowy development environment set up and find your first issue. If you have any trouble, please ask on our community channel.
Becoming an AppFlowy contributor is a prerequisite. Newcomers are encouraged to complete an issue tagged with the [“good first issue for devs”](https://github.com/AppFlowy-IO/AppFlowy/labels/good%20first%20issue%20for%20devs). This requires you to get familiar with our codebase and demonstrates your interest in contributing to AppFlowy. Don’t worry if you make mistakes in your first contribution. Instead, please see it as a great opportunity to get involved in our community, receive feedback, and iterate your work - a flavor of doing a project with the community.
## Application Instructions
Once your PR for an issue tagged with the “good first issue for devs” is merged, you can start developing a specific project plan. We recommend discussing your ideas with the community on [Discord](https://discord.gg/9Q2xaN37tV).
*Applications* are accepted on a *rolling basis* and applicants are notified of the decision within 10 days of receipt of a complete proposal. Please use the [suggested proposal template](/docs/appflowy/community/appflowy-mentorship-program/proposal-template) when applying and email your application to
You will need to do thorough research on the AppFlowy codebase, read documentation, and talk with potential mentors to put together a complete project proposal. It’s cool to come up with your own project idea as long as your idea falls under the umbrella of this year’s themes:
* Desktop features
* CI tools
* Tracing performance regressions
Please get in touch with a mentor early on if you want to work on your own idea and make sure it is realistic and within the scope of AppFlowy. We also welcome applicants to work on one of our ideas. Please see [Project Ideas](/docs/appflowy/community/appflowy-mentorship-program/mentorship-2022/project-ideas) for details.
We expect applicants to be excited about gaining real-world software experience and learning practical skills such as problem-solving and asking well-formed questions. We also expect applicants to either have experience with the technologies relevant to their project or have strong general programming experience. We are happy to accept both student and non-student participants.
Some key criteria for mentees:
* Existing AppFlowy contributor
* Likely to become a core community member
* Have a passion for AppFlowy
* Capable of completing at least 60% of the proposed project with limited technical guidance
## Stipends
Mentees are paid in two parts, with one payment after each successful evaluation. The first evaluation will occur at the halfway point of your project (e.g. For a 12-week project, the evaluation will occur after week 6).
For a 6-week project, the stipend amount is 1,000 USD
For a 12-week project, the stipend amount is 2,000 USD
##
## More info
* [AppFlowy’s official website](https://www.appflowy.io/)
* [GitHub](https://github.com/AppFlowy-IO/AppFlowy)
* [Discord](https://discord.gg/9Q2xaN37tV)
* [Twitter](https://twitter.com/appflowy)
# Proposal Template
## Project title
### The problem
Clearly defining the problem is the most critical part of your solution. Describe the current state of the issue. Use supported materials such as screenshots and data if needed.
### The solution
Write a few sentences describing how you plan on solving the problem.
### Goals
Describe up front what the success of your solution will look like. List the deliverables for your project such as code and documentation.
### Implementation design
Lay out the plan and how to execute it. It should match the achieved goals stated in your proposal. List all known dependencies.
### Timeline
Include milestones with estimated completion dates. Include tasks associated with each milestone. This is a good place to demonstrate that you have outlined a manageable project and that you have done enough research to successfully understand the scope of the problem.
### Risks & Mitigation
List risks that may prevent you from successfully completing your project and your mitigation for each risk. Include other commitments you have during the program (job, internship, etc).
### Links to your accepted PRs for AppFlowy
The applicants are required to complete an issue tagged with the “good first issue for devs” in order to be selected.
### About me
Write a few sentences about yourself, your experience, and what makes you a good candidate. We would also like to know what other open source projects you have participated in the past.
### Contact information
Please specify your contact details, time zone, and language familiarity. Optionally you can also provide links to your profiles on GitHub, LinkedIn, personal webpage, etc.
# Pull Request Template
\#Description
Please include a summary of the change and which issue is fixed. Please also include relevant motivation and context. List any dependencies that are required for this change.
Fixes # (issue)
\## Type of change
Please delete options that are not relevant.
\- \[ ] Bug fix (non-breaking change which fixes an issue)
\- \[ ] New feature (non-breaking change which adds functionality)
\- \[ ] Breaking change (fix or feature that would cause existing functionality to not work as expected)
\- \[ ] This change requires a documentation update
\# How Has This Been Tested?
Please describe the tests that you ran to verify your changes. Provide instructions so we can reproduce.
\- \[ ] Test A
\- \[ ] Test B
\# Checklist:
\- \[ ] I have performed a self-review of my own code
\- \[ ] I have commented on my code, particularly in hard-to-understand areas
\- \[ ] I have made corresponding changes to the documentation
\- \[ ] My changes generate no new warnings
\- \[ ] I have added tests that prove my fix is effective or that my feature works
\- \[ ] New and existing unit tests pass locally with my changes
\- \[ ] Any dependent changes have been merged and published in downstream modules
\
This template is adapted from [EmbededArtistry](https://embeddedartistry.com/blog/2017/08/04/a-github-pull-request-template-for-your-projects/)
# Mentorship 2023
# Mentee Projects
This is a home base for all the projects our mentees are working on.
{% content-ref url="/pages/ydAwX2MRbr8Pty04NxMG" %}
[Calendar View for AppFlowy Database](/docs/appflowy/community/appflowy-mentorship-program/mentorship-2022/mentee-projects/calendar-view-for-appflowy-database)
{% endcontent-ref %}
{% content-ref url="/pages/roINr41jZGgIv0nTGd5X" %}
[Custom Themes](/docs/appflowy/community/appflowy-mentorship-program/mentorship-2022/mentee-projects/custom-themes)
{% endcontent-ref %}
{% content-ref url="/pages/Nr2adhJ0WbtlNRYYAz3S" %}
[Shortcuts and Customized Hotkeys for AppFlowy](/docs/appflowy/community/appflowy-mentorship-program/mentorship-2022/mentee-projects/shortcuts-and-customized-hotkeys-for-appflowy)
{% endcontent-ref %}
{% content-ref url="/pages/sTYCVDKLXg8blx6uTam2" %}
[Table](/docs/appflowy/community/appflowy-mentorship-program/mentorship-2022/mentee-projects/table)
{% endcontent-ref %}
{% content-ref url="/pages/ov1UtIK5wesfr3j7HUUS" %}
[Favorites](/docs/appflowy/community/appflowy-mentorship-program/mentorship-2022/mentee-projects/favorites)
{% endcontent-ref %}
{% content-ref url="/pages/917Ki9TK37vJhj65EF8u" %}
[Code Block](/docs/appflowy/community/appflowy-mentorship-program/mentorship-2022/mentee-projects/code-block)
{% endcontent-ref %}
{% content-ref url="/pages/1cpxfIWdLus4NsRrVUTJ" %}
[Outlines](/docs/appflowy/community/appflowy-mentorship-program/mentorship-2022/mentee-projects/outlines)
{% endcontent-ref %}
{% content-ref url="/pages/6AemjV9D3DpPVGJEA8t3" %}
[Importers](/docs/appflowy/community/appflowy-mentorship-program/mentorship-2022/mentee-projects/importers)
{% endcontent-ref %}
{% content-ref url="/pages/VqyX3qaT8NDvpHJFx8jE" %}
[AI Writers](/docs/appflowy/community/appflowy-mentorship-program/mentorship-2022/mentee-projects/ai-writers)
{% endcontent-ref %}
{% content-ref url="/pages/03ORN95S0vw3kYz4G2IY" %}
[Templates](/docs/appflowy/community/appflowy-mentorship-program/mentorship-2022/mentee-projects/templates)
{% endcontent-ref %}
# Calendar View for AppFlowy Database
Richard Shiue
## Introduction
AppFlowy's database is an extremely powerful feature that allows users to store data in a structured manner. Each database can be customized to contain multiple fields, each of a different type, such as text, date and single-selection tags. For more information about the terminology used in AppFlowy's database, please check out [Grid](/docs/documentation/software-contributions/architecture/frontend/frontend/grid). While the most common way to view the database is in the table-view, alternative views can present the data better depending on the use case. For example, the kanban board groups entries into columns according to a status tag, and is a popular choice for project progress tracking. It also allows for new ways to interact with the entries, such as dragging a card from one column to another in kanban.
## Goal
The goal of this project is to introduce a calendar view so that users can grasp upcoming (or past) scheduled events at a glance. Users will be able easily identify the duration of an event, if and when events overlap, or how much spacing is between two events. This feature will be especially useful for task scheduling and event planning.
### Scope
By the completion of this project, users will be able to:
* Create a calendar page from the left sidebar
* See events laid out in a calendar view
* Switch between one month to the next
* Choose whether Monday or Sunday is the first day of the week
* Jump to current day
* Jump to a particular month or year
* Add a new event by clicking on a day
* Click an `add` button to create a new event on a specific day
* Edit a particular event a popup window triggered by clicking on the event in the calendar view (actions include changing its title and adding/removing/modifying other fields)
* Specify which additional properties are shown in each entry in the calendar view.
* Reschedule an event without changing its duration by dragging it from one day to another
* See a list of events that have not been yet scheduled from a menu or popup. They can be scheduled (and thereby viewed on the calendar) by editing the event in a popup window as described above, dragged from the menu onto a day, or middle-clicked to schedule to today
* Increase or decrease the duration of an event by dragging the event's edges
* Delete an event
* Group events together by specifying an extra single-select field. Events belonging to the same group are characterized by a common background color and will also be customizable by the user
* If there are more than one date fields in the entries, allow the user to specify which date field will be used to arrange the events in the calendar view
* Filter visible events according to the entry's group or another field
* Show alternative views that are more time-oriented (week, work week, 3 day, day)
* Set up recurring events and choose when editing one to either edit all the events set up in the same way or just that specific one
## Design Architecture
For more details on the design architecture, please see [Calendar](/docs/documentation/software-contributions/architecture/frontend/database-view/calendar).
## Schedule
At the midterm evaluation, many of the features have been implemented.
April 28, 2023
* Calendar supports date ranges:
* In all database views (grid, kanban and calendar), users can now select an end date and time in addition to the original date and time to specify a duration of time.
* These ranges will appear on the calendar as well.
* Calendar supports events being deleted from the "open as page" overlay.
* Calendar supports de-scheduling an event by removing the date data from the relevant date cell.
* Calendar supports displaying which events are unscheduled.
May 5, 2023
* Calendar supports displaying other properties in the calendar cards
* These may include properties such as multi-select option tags.
* The user is able to choose which fields to display from the calendar settings.
* Calendar supports dragging an event from one day to another to re-schedule it.
# Custom Themes
Chirag Bargoojar
## Introduction
* As Appflowy's user base increases, users want more control over the app.
* Adding custom themes to Appflowy can significantly enhance the user experience and productivity. Allowing users to personalize the app's appearance can help them create a more comfortable and visually appealing work environment.
* Custom themes can also provide a sense of ownership and control for users, which can increase their motivation and engagement with the app.
* Users may also be able to reduce eye strain and fatigue by choosing themes that are optimized for their specific lighting conditions and visual preferences. Moreover, custom themes can help users to maintain a consistent aesthetic across different apps and tools they use, which can improve their overall workflow and productivity.
## Goal
* The goal is to implement a feature where users are able to create their own set of themes and also able to change themes from predefined themes.
* Predefined Themes: These kinds of themes will already be present in the app, the user just needs to change the theme just by clicking on it.
* Custom Themes: This functionality is provided in the app to day-to-day users where they can create their own themes. They can set the color and style of any elements i.e. Color of links, fonts, sizes, etc, to their individual needs.
* Overall, this feature can help to create a more enjoyable and efficient user experience, providing a more engaging and personalized interface that aligns with individual preferences and workflow.
## Design Architecture
TBD
### How to add a new theme (Developer Specific)
1. Go to app\_flowy\packages\flowy\_infra\lib\colorscheme.
2. Start by creating a file and naming it with your theme name.
3. Then create a class and give your theme name followed by ColorScheme (to follow the code pattern) Eg. If your theme name is Aqua give your class name AquaColorScheme.
4. Extend your ColorScheme with FlowyColorScheme to override all the item colors needed to change your theme.
5. Here you need to define 2 kinds of themes:\
\- Light: How your custom theme will look in light mode.\
\- Dark: How your custom theme will look in dark mode.
6. Follow the default\_colorscheme.dart file to take reference.
7. Now go to app\_flowy\packages\flowy\_infra\lib\theme.dart and inside BuiltInTheme create a string variable with your theme name. Example: static const String aqua = “aqua”;
8. Now go to app\_flowy\packages\flowy\_infra\lib\colorscheme\colorscheme.dart and inside the themeMap variable add your theme config like this
9. Now at last go to app\_flowy\lib\workspace\presentation\settings\widgets\settings\_appearance\_view\.dart inside ThemeSetting class and inside popupBuilder add your theme to the popup which will show in settings like this
10. Now run the app and go to Settings to see your new custom theme.
## References
# Shortcuts and Customized Hotkeys for AppFlowy
Mayur Mahajan
#### Introduction
* Appflowy is now my favorite knowledge management tool and there are many who share my opinion. Appflowy provides many useful features.
* But it currently lacks in one area. Although many useful functionalities can be achieved using AppFlowy, there are many widely accepted shortcuts that appflowy currently does not support.
* Shortcuts are key combinations that allow users to quickly achieve some functionality. They improve the users' productivity. Using keyboard shortcuts is much faster than using the mouse.
* One of the main edges AppFlowy has over its competitors is the ability to have a customizable user experience. Many applications offer users a way to customize keyboard shortcuts to their desired functionality but currently, there is no such mechanism in AppFlowy.
#### Goal
* We need to implement a bunch of functionalities based on some key combinations or single key presses. These shortcuts can be classified into two types:
1. Predefined Shortcuts
2. Customizable Shortcuts
* Predefined Shortcuts will be a set of commonly used key combinations that help in simple text editing, cursor movement, element selection, etc. These shortcuts will be inspired by other desktop applications, which will give our users a uniform experience across their desktop apps. Thus through this project, our goal is to support many standard shortcuts.
* Customizable Shortcuts is an advanced functionality that will allow users to customize key combinations to achieve their desired functionality with AppFlowy. This feature truly aligns perfectly with the vision of AppFlowy in providing a customizable user experience. Through this project, our goal is to allow users to customize key combinations.
#### Implementation Design
Let us talk about how the Apps UI might change after we achieve the aforementioned changes.
Users will see a Shortcuts tab in the settings
In the settings, a Shortcuts option will appear which shows all the custom shortcuts
Predefined shortcuts link
In the Shortcuts tab, users can customize some shortcuts and through a link, they can also see a list of predefined shortcuts(this link will open up in a browser).
Add Custom Shortcut option
Clicking any existing key combination will open a popup for assigning a new key combination to that functionality. This popup will contain an input field where users can enter the key, the keys pressed will be caught by the Keyboard Listener service. That key event will be assigned for that shortcut. Finally selecting done will save this key combination to achieve the desired functionality.
### Halfway Evaluation:
* **Week 1** \~ 30th January 2023
- [x] Discussed the project plan with my mentor Lucas
- [x] I researched existing shortcuts and how they are implemented in the codebase.
- [x] Added new key bindings to existing shortcuts. (PR: [1786](https://github.com/AppFlowy-IO/AppFlowy/pull/1786))
* **Week 2** \~ 6th February 2023
- [x] Created shortcuts for toggling checkbox, tested it, and got it merged. (PR: [1817](https://github.com/AppFlowy-IO/AppFlowy/pull/1817))
- [x] I started working on shortcuts for creating sub-todos using the Tab key.
- [x] I started working on improving editing using Ctrl/Meta.
* **Week 3** \~ 13th February 2023
- [x] Merged shortcuts for creating sub-todos using the Tab key (PR: [1847](https://github.com/AppFlowy-IO/AppFlowy/pull/1847))
- [x] Merged PR that allows editing with Ctrl/Meta (PR: [1845](https://github.com/AppFlowy-IO/AppFlowy/pull/1845))
* **Week 4** \~ 20th February 2023
- [ ] Implement the Find with Ctrl+F plugin.
- [ ] Implement the Find and Replace with Ctrl+H plugin.
- [x] Created hardcoded UI for Customize Shortcuts Settings page.
* **Week 5** \~ 27th February 2023
- [x] Designed the BLoC for handling Customize Shortcuts Settings page. (See [here](#bloc-design-for-customized-shortcuts))
- [x] Researched about KeyboardListener, RawKeyboardListener, etc in flutter, to better capture user actions.
- [x] Discussed doubts about implementing Customize Shortcuts Settings page with Mentor.
#### BLoC Design for Customized Shortcuts
BLoC Design use case
#### Next steps and schedule
* **Week 6** \~ 6th March 2023
- [ ] Implement a completely functioning Customize Shortcut feature and test it.
- [ ] Gather feedback about Customize shortcut feature and improve upon it.
* **Week 7** \~ 13th March 2023
- [ ] Finish work for Find and Replace plugins in the editor.
- [ ] Write an article about my mentorship experience.
- [ ] Continue maintaining and improving my work.
# Table
Mohammad Zolfaghari
## Introduction
Being able to add and modify tabular content is an important feature in any document writing/editing application.
Table is one of Appflowy suggested project ideas which aims implementing basic tabular content feature for Appflowy document pages. Currently, nothing related to tabular content is supported, So it will be implemented from scratch. Probably similar to other appflowy editor plugins.
## Goal
Appflowy will have a table plugin which could get added as a selection menu item (available with slash '/' command) and through Markdown syntax. Also with all related features like resizing, adding modifying rows/cols enabled and basic rich-text support in cells.
## Scope
On completion of this the user will be able to:
* Insert table command which can get added as selection menu item
* Basic table which also can get duplicate or deleted
* Being able to add/delete/duplicate/update rows and columns of existing table
* Resize column/row feature
* Support rich-text editing in table cells (basic markdown features like bold, italic, checkbox, ...)
* Drag and Drop feature for rows and columns
* Enable text color and background color for rows and columns
* Support Markdown table creation `|Col A|Col B|` should convert to a table
## Implementation design
First I have to decide using a base dart package for table or writing it from scratch. Until now after some digging for using a base package my suggested options are [DAVI](https://pub.dev/packages/davi) package and [flutter table](https://api.flutter.dev/flutter/widgets/Table-class.html). DAVI seems promising, But I'm not sure that all intended features and goals are achievable with it in a good way. Will start with DAVI and see how it goes.
After this and having a basic table the features should get implemented one by one. A table mainly consist of three parts Row, Column, Cell and all desired features are related to one or multiple of these parts.
For markdown support regarding converting a Markdown syntax table to appflowy table I will implement it within appflowy editor Markdown plugin. There will be both decoder and encoder for table.
All the way most of the code will have tests for each feature and action.
# Favorites
Mihir Singh
## Introduction
* Managing and organizing vast amounts of data can be a daunting task. Whether it's navigating through numerous files and folders or trying to locate specific information within a page, the process can often become overwhelming.
* As users of productivity tools like AppFlowy, we often find ourselves grappling with the challenge of efficiently accessing and prioritizing the content that matters most to us.
* A favorite mechanism can alleviate this problem of navigating through a vast database by offering users a simple and effective go-to mechanism.
## Goal
Goal of this project is to provide users with efficient mechanism for managing and accessing their most important and frequently used content by allowing users to mark views as favorites, the feature aims at advanced navigation, organization and productivity within the app.
## Scope
1. Favorite a Page: Users can easily mark a page as a favorite by navigating to the desired page and clicking a dedicated button at the top-right corner. This action signifies the user's preference for quick access to the selected page.
2. Favorites Section: A dedicated Favorites section will be introduced in the left sidebar of the AppFlowy interface. Once the user has favorited their first page, this section will automatically appear. It provides users with a centralized location to find their pinned pages and related subdirectories, ensuring easy access to their most important and frequently accessed content.
3. Remove from Favorites: Users have the flexibility to unpin or remove a page from their Favorites section, allowing them to update their prioritization and keep the Favorites section relevant to their current needs and preferences.
## Implementation Design
To implement the favorites feature in AppFlowy, a comprehensive approach involving changes in both AppFlowy's rust and flutter components is proposed. AppFlowy's persitence logic which was previously part of rust-lib in AppFlowy is now separated to a different repository AppFlowy-Collab, current plan is to introduce following changes:
1. Changes to Existing Persistence Structs (Rust):
* Each item displayed in the left sidebar will be represented as a `View` struct. The concept of an 'App' is deprecated.
* The `View` struct is defined in the `folder-collab` crate and exposed using the `ViewPB` struct.
* A new variable named `is_favorites` will be introduced in the `View` and `ViewPB` structs. This variable will indicate whether a specific view is a favorite without the need to iterate through all favorited views.
2. Introduction of New Structs (Rust):
* Two new structs, `FavoritesInfo` and `FavoritesArray`, will be introduced in the `collab` module.
* `FavoritesInfo` will only hold the `view_id` of the favorited view. This will allow separate persistence of the favorite views.
* `FavoritesArray` will utilize `ArrayRefWrapper` and `ViewsMap` as underlying constructs to persist all the favorite views.
3. Calculation of Favorite Views and Data Transfer (Rust):
* The handlers in the Rust library (`rust-lib`) will handle requests from the frontend to calculate the views marked as favorites based on user interactions.
* On every new launch of AppFlowy, a `FolderEvent` named `ReadFavorites` will be sent to `rust-lib`. This event will be handled by a `read_favorites_handler` function, which will retrieve all the favorite views from persistence, map them to `RepeatedViewPB` (a list of `ViewPB`), and return them to the frontend for display under the favorites section.
* When a favorite is toggled for a view, a `FolderEvent` named `ToggleFavorite` will be triggered, carrying the `viewId` of the designated view. This event will be handled by the `toggle_favorites` function in `rust-lib`.
* If the view is not currently marked as a favorite, it will be added and persisted to the list of favorites.
* If the view is already marked as a favorite, it will be removed from the list of favorites, effectively unfavoriting it.
* Furthermore, a `ViewPB` will be created and returned to the frontend. This `ViewPB` object will represent the updated view and can be appended to the visible list of views in the favorites section. This ensures that the UI accurately reflects the updated favorite status of the view.
4. Notification Handling (Rust):
* A notification system will be implemented to handle updates to the favorite status of views.
* When the favorite status of a view is updated, a notification named `DidUpdateView` under `FolderNotification` will be triggered to update the favorite status of the individual view.
* A `FolderNotification` named `FavoritesUpdated` will be sent every time favorite status of a view is updated. This notification will carry a list of the updated favorite views, which will be displayed under the favorites section in Flutter.
5. Integration with UI (Flutter):
* The Flutter component will incorporate a dedicated bloc and service to handle the favorites functionality.
* This module will be responsible for sending events to `rust-lib` and processing the notifications received with those events to appropriately update the views in the UI.
6. Handling Edge Cases (Flutter):
* Additional notifications will be handled when a view's data is updated in the menu. For example, if a view is renamed, deleted, or its icon is updated, these changes will be propagated to the associated view under the favorites section.
## Expected Schedule
By July 6th (Estimated)
* [x] Update the view struct in AppFlowy-Collab to deal with persistence of favorites.
* [x] Create appropriate notifiers, events and handlers to map events and notifications.
* [x] Expose a new method that calculates the views marked as favorite
* [x] Expose a new method to toggle favorites for the views
By 12th July (Estimated)
* [x] Introduce favorite service which sends event to retrieve all favorite views in appropriate structure which can be displayed under favorites section
* [x] Favorite service will be capable of sending events to toggle favorites.
* [x] Favorites BLoC will be introduced to handle state updates for favorite changes.
By 20th July (Estimated)
* [ ] Add unit / integration tests in flutter
* [ ] Add tests in collab and rust-lib
* [ ] Handle edge cases for other possible events
* [ ] Code cleanup and optimization in rust-lib and collab.
# Code Block
### Introduction
Code Block is a feature that allows you to write and display code snippets within your notes taken in the AppFlowy Editor. It provides a distinct format for code, typically using a monospaced font and syntax highlighting to enhance readability. Code blocks are helpful for developers, programmers, and anyone who wants to include code snippets or technical instructions within their notes while maintaining the visual integrity and readability of the code.
### Goal
The goal of this project is to develop a Code Block in Flutter as a standalone package that AppFlowy and other Flutter applications can use. Right now AppFlowy uses a Code Block plugin that extends BlockComponentBuilder along with a third-party open-source package called[ highlight.dart](https://github.com/git-touch/highlight.dart) for Syntax Highlighting. Our goal is to create a standalone package that extends the functionalities of the existing solution and serves as a building block for AppFlowy and the Flutter Community.
### Scope
The following will be the deliverables by the end of this project:
* A standalone flutter package for Code Block.
* Support for the following features in Code Block:
* Syntax Highlighting
* Support for Multiple Programming Languages
* Copy All Code
* Copy the entire Code Block
* Line numbering
* Auto-Indentation
* Export/import functionality
### Existing Solution
At the moment we have a Code Block plugin which depends on the[ flutter highlight](https://github.com/git-touch/highlight.dart) package for syntax highlighting, along with the BlockComponentBuilder API of AppFlowy Editor. This current solution only provides the following features we want from our Code Block:
* Syntax highlighting
* Support for multiple programming languages
We are looking to extract our Code Block plugin code and create a separate package for it. We aim to extend its functionalities to support all the features we want in our Code Block solution.
### Proposed Solution Design
This is what we expect from our implementation. We want the line numbering to appear in the left edge of our codeblock. Our actions relating to the CodeBlock will go in the top right corner as a row of icons.
UI mock for Code Block features
### Implementation Plan
Following is a set of action plans for each proposed new feature:
**CodeBlock Action Menu:**
* Currently, our existing solution only has the Switch Language option at the top:
Existing code for Code Block
* We will have to add a method that will return an Action Menu which will contain various action buttons, this will contain the Switch Language button, Export Code, and Import Code options.
**Copy All Code:**
* Copy All code will be one of the actions possible in CodeBlock. It will allow the user to copy the entire code inside the CodeBlock.
* The form of copy will be plain text.
**Copy and Paste CodeBlock Component:**
* The CodeBlock component is a child of BlockComponent which is a part of the AppFlowy Editor package.
* Already there is a way to duplicate a CodeBlock component in AppFlowy, but there is no way to copy-paste the CodeBlock. This is because there is no way to save a CodeBlock through the Clipboard API.
* We will have to work with AppFlowy Editor API and facilitate a new Clipboard API which will be capable of copying a CodeBlock and pasting it wherever the user wants inside the AppFlowy Editor.
**Line Numbering:**
* Line Numbering can be implemented by calculating the number of lines we have inside the CodeBlock, the line height of each line, and then showing a vertical bar of digits starting from 1 with a vertical difference in the line height.
* The vertical bar will be placed left-adjacent to the CodeBlock. This can be done if we wrap the Padding widget shown below with a Row widget with the first child being a new widget called LineNumberBar.
**Auto Indentation:**
* Although automatic indentation based on the programming language is a heavy feature, in terms of its cost of implementation, we can provide a clever workaround for indentation.
* We can add a Tab space whenever the user presses an Enter key after the following character: ‘{’, ‘(’, ‘\[’, ‘:’. So whenever a bracket open character is followed by an Enter key, we will insert a Tab space on the newline and we will also keep track of the Tab size value as well.
* We will need to handle some edge cases and then, this feature can help the overall user experience.
**Export/ Import Code:**
* Export: Users will be able to export the code inside the CodeBlock as a program file into their local device.
* To facilitate this, we will create a new file in the user’s application directory and give it an extension of the respective language that is selected in the CodeBlock.
* Import: Users will be able to add code to a CodeBlock from an existing program file. This time we will have to allow users to submit a local program file to our CodeBlock.
Import a Program file into the Code Block dialog design
* Once we receive a file we will check its extension for setting the language of the CodeBlock. Then we will extract the text program and input it inside our CodeBlock.
### Schedule
At the midterm evaluation: on 12 August 2023,\
we plan to achieve the following:
* Line Numbering feature
* Import Program into CodeBlock
* Export Program into CodeBlock
* Auto Indentation
At the time of completion: on 12 September 2023, \
we plan to have:
* A separate package for CodeBlock which can be plugged into AppFlowy
* All the mentioned features in the scope will be implemented.
# Outlines
Aman Negi
### Introduction
**AppFlowy** is a versatile tool with a wide range of use cases. As a result, documents created in AppFlowy can vary significantly in length and complexity. To address this, it would be beneficial to develop an **Outline Plugin** that would display all of the headings in a document at the beginning, making it easier for users to scan and navigate the document.
### Goals
The goals of the AppFlowy Outline Plugin are to:
* Provide a quick and easy way to navigate through long and complex documents
* Help users to find specific information in a document more quickly
* Provide a visual overview of the document's structure
* Help users to understand the document's content
### Scope
The AppFlowy Outline Plugin will add the following new actions to the AppFlowy application:
* Users will be able to add an outline to a document using the slash (`/`) menu.
* The content of the outline will be automatically generated based on the document.
* Clicking on the content of the outline will take users directly to the corresponding heading.
* In the outline different levels of headings will be indented differently. For example, H1 will have no indentation, while H2 will be indented once, and so on.
* Only H1, H2, and H3 headings will be shown in the outline. Other elements will not be displayed or represented.
### Implementation
To keep the encapsulate the Outline feature, we created it as an `editor_plugin` and simply plugged it into the editor.
Example of Outline Block
### Schedule
The AppFlowy Outline Plugin has been released on 2nd July 2023 in [v0.2.5](https://github.com/AppFlowy-IO/AppFlowy/releases/tag/0.2.5).
# Importers
Mukund Tandon
### Introduction
AppFlowy is a powerful knowledge management tool that empowers users to organize their work, take notes, ideate and plan effectively. To enhance the onboarding experience and facilitate a seamless transition for new users, Importers project will allow users to migrate their existing data from Third-party applications(eg -Notion) to AppFlowy. This will contain a number of features which would help in importing data. This aims to simplify the migration process and enable users to continue working with their valuable content within AppFlowy.
### Goals
The goal of this project is to make it easy for AppFlowy users to migrate their data from Third-party applications like Notion. First I would be focusing on Notion-
* [ ] Convert Notion document page to AppFlowy document page
- Allow notion user to easily import a complete page to AppFlowy .When the user clicks on export on Notion page it gives us a zip file which user can import to AppFlowy . This will import the page along with the subpages of that pages and the assets of that page.
- Also fix the current implementation of importing using markdown to support all elements which are supported in AppFlowy but are missing in import example codeblocks, images.
- Enable appflowy-editor users to effortlessly convert their custom Markdown syntax into custom nodes using the `markdownToDocument` function, with the assistance of custom parsers. With custom parsers, users can specify how they want a particular Markdown syntax to be transformed into a specific node.
- Importing a large file may take a significant amount of time. If the app crashes during the import process, it can result in an incomplete import. If the user initiates another import, it may lead to the creation of duplicate files, as some files have already been imported before and are being imported again. Thus we have to handle this edge case. Also we want to perform this importing in background, so the user can continue to work while the importing is happening.
- Add a option on Import panel to import calendar from notion
* [ ] Convert Notion calendar to AppFlowy calendar
- Rust -> Support populating the Calendar page from the imported folder which contains a CSV file and a folder containing markdown file of notes for each date.
- Flutter -> Add a option on Import panel to import calendar from notion
* [ ] Convert Notion board to AppFlowy Board
- Rust -> Populating the board with the data from the CSV file which contains information regarding the column under which each card should be placed on the board. Then there is a folder containing the contents of each card. So we need to populate the cards with their respective contents.
- Flutter -> Add an option on Import panel to import board from notion
* [ ] Convert Notion Database to AppFlowy Grid
- Rust -> AppFlowy currently supports importing CSV , So we can import the grid contents from Notion but in Notion each row is a page and can contain more information than that given in the grid so have to also import those pages. When we export the Notion Database we get a folder containing a CSV file and and number of markdown files .We can use the CSV file to populate AppFlowy grid and can import the each page from the markdown files from the folder
- Flutter -> Add a option on Import panel to import Database from notion.
* [ ] Option to upload the contents of complete workspace from notion to AppFlowy
- Rust -> When we export our workspace we get a folder which contains many sub folders having information regarding each page. So we need to populate all the pages and subpages in the correct manner including all databases calendars and boards
- Flutter -> Add a option on Import panel to import workspace from notion.
### Scope
On completion of this -
* There will be an option in the Import panel that says "Import from Notion." Upon clicking on it, users will be able to select what they want to import, such as boards, grids, calendars, pages, or the entire workspace.
* Users will be able to import a single page from Notion and all contents from that page which are supported in AppFlowy will get imported
* Users will be able to import their calendars from Notion
* Users will be able to import their board from Notion
* Users will be able to import their database from Notion including the subpages.
* Users will be to import their complete workspace from Notion. There would be an option to select the folder(provided by Notion) which contains all the exported contents, and all the contents(supported by AppFlowy) from that folder will be imported into AppFlowy with all the pages and subpages in correct manner including all databases calendars and boards
## Implementation Details
### Importing Page from Notion-
#### What does a page look like when exported from Notion-
We get a zip file containing the the main page markdown and a folder containing assets of the main page and also markdown files of subpages of the main page and folders containing the assets of the subpages and the sub-sub pages markdown files and so on.
#### How our main page markdown file look
We can see on line 5,6 we have two images inside the round brackets is the path where images are located and on line 19,21,23 are sub-pages
#### Markdown file of sub-page
Here we have to look at the image path it starts with AppFlowy Subpage 1 instead of instead of AppFlowy Test which is the parent folder. This is because it’s asset lies in AppFlowy Sub 1 folder which is at the same level where the subpage markdown file is . This fact will be used late while importing.
***
#### How is the Importing working
* First we iterate through the unzipped files list and store all files and assets in there respective level in the `levels` list
* Next step will be importing all the pages present starting from the last level.we are importing from the last level to handle the case of subpages . For parent page to show `MentionBlock` of the subpage it requires the SubPage viewID which can only be generated once it is imported so we import the lowest level sub page first and then go up storing each page viewID in a map (**nameToID**) which has key as the page name and value as the page viewID.
* Next once we have all page imported we would move them under their respective parent
This class contains details of each page to be imported and the parent of that page which will be used for moving the page under correct parent in later steps
This class contains details of each level of the files. Like For example the main page will be level one , if it has a subpage it will be level 2 and if that subpage will have another subpage that would belong to level 3
#### When we are importing a markdown page how are we dealing with images
* To deal with images we take all contents of a markdown file and pass it through `_preProcessMarkdownFile` function which returns us a string which is the contents of the markdown file but with changes. The changes this function performs are related to images . It will iterate through each line and if it finds something like `` this is how a image is represented in markdown . When we get this line is detected we get the path from this this path is actually the file name of image from the above list of unzip images so with the help of path we will get the image file and save it locally and change the current path to the path where the image is saved locally
* Now the problem we can see here is as discussed before the path name in a sub page starts with AppFlowy Sub page instead of Appflowy test which is the root . In the above list also you can see that all the file name are starting from AppFlowy Test so if we directly pass this list to `_preProcessMarkdownFile` it wont be able find the image file.So this issue was solve by only passing the assets of a particular level to the \_preProcessMarkdownFile function instead of all the assets and also during the process of adding files/assets in the levels list if a file is not added in the particular level then the first part(parent) from it name would be removed
#### How does Subpages are handled while importing a page ?
We are imported from level 3 to level 1. This is done because to handle the subpages . We use `markdownToDocument` function of appflowy-editor package to chick we pass the markdown contents of our page and it return us a Document. We also pass a custom-parser to this function which handles our subpage. Whenever it detects a subpage it replace the part with a `MentionBlock`(It contains the pageID of the page that is being Mentioned) . This is reason we are importing the lower level page first . We will import them and store their viewID in a map where the key is pageName and value is the pageID. When above level are being imported and there contents are passed through `_preProcessMarkdownFile` function this map(nameToId) is also passed in the function , whenever it finds a subpage which looks like name to `{{AppFlowy-Subpage}}{$subpageName}{$subPageID}` , this pattern is used in custom parser to detect the subpage part and convert it to mention block. We have stored the pageIds with name as key so we can easily get the pageID of subpage by using name from name .
## What all have been implemented
* Support for code block to imported from markdown ([PR](https://github.com/AppFlowy-IO/appflowy-editor/pull/197), [PR](https://github.com/AppFlowy-IO/appflowy-editor/pull/347))
* Users can upload images from their local system ([PR](https://github.com/AppFlowy-IO/appflowy-editor/pull/232))
* Support importing image assets from markdown file ([PR](https://github.com/AppFlowy-IO/appflowy-editor/pull/316))
* Support Number List being properly imported from markdown ([PR](https://github.com/AppFlowy-IO/appflowy-editor/pull/335))
* Custom parsers support in appflowy-editor for importing custom nodes ([PR](https://github.com/AppFlowy-IO/appflowy-editor/pull/403))
* importing a complete page from Notion along with all its assets and subpages ([PR](https://github.com/AppFlowy-IO/AppFlowy/pull/3146) is still under review)
* Small Bug Fixes([PR](https://github.com/AppFlowy-IO/appflowy-editor/pull/371) , [PR](https://github.com/AppFlowy-IO/appflowy-editor/pull/349) )
# AI Writers
Yatendra Kumar
### Problem
Writing can often be time-consuming, tiring, and occasionally frustrating. Whether it's composing an email, jotting down a to-do list, or drafting a blog post, the challenge lies in the mental effort required to organize thoughts and ideas coherently. Moreover, prevalent issues like writer's block can compound these difficulties. There is a clear need for intelligent tools that can assist in generating and organizing content efficiently.
***
### Solution
AI-powered writing assistant using Flutter and the GPT-4 model from OpenAI. The assistant, tentatively named "AI Writers", will assist users in generating and organizing content efficiently. This includes automatic to-do list generation, blog post drafting, and outline creation.
Similar to the notion AI, we can keep a button or just press space for "ask AI" 
***
### Goals
The successful completion of this project will involve:
* A fully functional API wrapper using Rust that uses AI to generate to-do lists, create outlines, and draft blog posts.
* A user-friendly interface that encourages engagement and facilitates ease of use.
* Comprehensive documentation covering the architecture of the application, functionality, usage instructions, and the integration process of the GPT-4 model.
* A well-structured thoroughly commented codebase for easy understanding and future development.
***
### Implementation Design
* The application will be developed using Rust & Flutter, which allows for cross-platform compatibility.
* OpenAI's GPT-4 model will provide AI-powered writing assistance.
* Rust will be used for network requests to the OpenAI API.
***
### Timeline:
**Week 1 (19/06/2023):**
Tasks:
* [x] Research and Understand GPT-4
* [x] Understand appflowy coding practices.
* [x] Research if there are existing Rust libraries that wrap GPT-4
Milestones:
1. Gain a comprehensive understanding of GPT-4 capabilities and functionalities
2. Gain in depth understanding of appflowy best coding practices integrated in CI/CD.
3. Determine if there are existing Rust libraries available for GPT-4 integration
**Week 2 (26/06/2023):**
Tasks:
* [x] Develop first working version of Rust wrapper for OpenAI API
* [x] Initiate exploration of AppFlowy backend system
Milestones:
4\. Develop a basic Rust wrapper for OpenAI API with minimal functionality.
5\. Understand the basic structure and components of the AppFlowy backend.
**Week 3 (03/07/2023):**
Tasks:
* [x] Gain deeper understanding of Creating Systems with OpenAI API
* [x] Gain deeper understanding of prompt engineering to develop applications
Milestone:
5\. Build an end-to-end demo system using gpt-4 with proper prompting
**Week 4 (10/07/2023):**
Tasks:
* [x] Enhance Rust wrapper for OpenAI API with additional features
* [x] Delve deeper into the complexities of AppFlowy backend
* [x] Fix issue #2937 row banner overlay.
Milestones:
7\. Upgrade Rust wrapper for OpenAI API with advanced features.
8\. Gain a deep understanding of AppFlowy backend, including data flows and dependencies/
9\. Raise a PR for issue. (raised pr: #3009).
**Week 5 (17/07/2023):**
Tasks:
* [x] Finalize application design and user interface
* [x] Start integration of GPT-4 Rust Wrapper with backend
* [x] Complete the integration of GPT-4 Rust Wrapper with backend
* [x] Begin development of auto-generating to-do list feature
Milestones:
10\. Finalize application design and UI.
11\. Begin the process of integrating GPT-4 Rust Wrapper with rust backend structure.
12\. Successfully integrate GPT-4 Rust Wrapper with rust backend structure.
13\. Initiate the development of the to-do list feature.
**Week 6 (24/07/2023):**
Tasks:
* [x] Continue development of the to-do list feature
* [x] Start development of the outline creation feature
Milestones:
14\. Complete the development of the to-do list feature
15\. Initiate the development of the outline creation feature
***
### Midterm Valuation
* Gained comprehensive understanding of GPT-4 and AppFlowy's coding practices.
* Identified potential Rust libraries for GPT-4 integration.
* Developed a basic Rust wrapper for OpenAI API.
* Explored AppFlowy's backend structure.
* Built a demo system using GPT-4 with proper prompting.
* Enhanced Rust wrapper for OpenAI API with advanced features.
* Delved deeper into AppFlowy's backend complexities.
* Resolved a bug in AppFlowy (PR: #3009).
* Finalised application design and UI (similar to Notion AI).
* Initiated and completed GPT-4 Rust Wrapper integration with backend.
* Began development of auto-generating to-do list feature and completed it.
* Initiated development of outline creation feature.
***
**Week 7 (31/07/2023):**
Tasks:
* [x] Make Rust wrapper API code modular and scalable.
* [x] Write comprehensive tests for the API with 100% coverage.
Milestones:
16\. Achieve modular and scalable Rust wrapper API code.
17\. Completed tests for the API with 100% coverage.
**Week 8 (07/08/2023):**
Tasks:
* [ ] Build the frontend Flutter interface.
* [ ] Write thorough tests for the complete interface.
* [ ] Gain a clear understanding of the backend-to-frontend integration flow.
Milestones:
18\. Completed and polished frontend Flutter interface.
19\. Full test coverage for the entire frontend interface.
20\. Deep understanding of the integration flow from backend to frontend.
**Week 9 (14/08/2023):**
Tasks:
* [ ] Address and resolve the Evernote importer issue (#2971).
* [ ] Integrate the Rust wrapper API with the Flutter frontend interface.
* [ ] Write comprehensive tests for the integrated system.
Milestones:
21\. Successfully fixed the Evernote importer issue (#2971).
22\. Successful integration of the Rust wrapper API with the Flutter frontend.
23\. Completed tests for the integrated system.
**Week 10 (21/08/2023):**
Tasks:
* [ ] Test the complete project end-to-end to ensure seamless functionality.
* [ ] Address and fix any bugs or issues that may arise during testing.
* [ ] Begin migration of current OpenAI features on Flutter side to using Rust wrapper
Milestones:
24\. Complete the project documentation.
25\. Address and fix any bugs or issues that may arise during testing.
26\. Initiate the migration of current OpenAI features to using Rust wrapper.
**Week 11 (28/08/2023):**
Tasks:
* [ ] Finalize migration of current OpenAI features on Flutter side to using Rust wrapper
* [ ] Continue comprehensive testing and debugging of the application
* [ ] Resolve any remaining issues identified during final testing
Milestones: 27. Successfully migrate all current OpenAI features to use Rust wrapper 28. Continue comprehensive testing and debugging of the entire application 29. Ensure all identified issues are resolved and application is fully functional
**Week 12 (04/09/2023):**
Tasks:
* [ ] Finalize and review the entire project, ensuring all tasks are completed satisfactorily.
* [ ] Prepare the application for live deployment.
* [ ] Document the complete project in a detailed blog, covering architecture, development process, and usage instructions.
Milestones:
30\. Successful project review and preparation for final live deployment.
31\. Successfully prepare the application for deployment, with all features working as expected
32\. Completion of a comprehensive blog documenting the entire project.
***
### Impact
The successful implementation of this project will provide a powerful tool for users who require assistance with various writing tasks. By automating these tasks, users can focus more on their ideas and less on the mechanical aspects of writing.
Given the increasing demand for AI-powered tools and the widespread use of mobile devices, this project can potentially benefit a wide range of users.
***
### Risks and Mitigation
* **Risk:** Unfamiliarity with the GPT-4 model.
* **Mitigation:** My recent completion of a course on prompt engineering from OpenAI gives me a solid foundation to understand and utilize the GPT-4 model effectively.
* **Risk:** API limitations, changes, or costs associated with using GPT-4.
* **Mitigation:** For cost mitigation, the application will require the users to provide their API keys to access GPT-4, allowing the usage costs to be borne by the user directly.
* **Risk:** Time management due to other commitments.
* **Mitigation:** Adherence to a strict schedule and prioritization of tasks will be key in managing this project alongside other responsibilities.
# Templates
Aman Negi
## Introduction
AppFlowy is a powerful Open-Source Notion alternative, and we are rapidly improving the application to provide a seamless experience. As of writing this doc, we support nested documents, grids, boards, calendars, and referenced documents/grids. Using these tits and bits you can combine and create your own perfect workspace. While having all these features is excellent, creating your ideal workplace from scratch every time can be cumbersome.
## Goal
The goal of this project is to provide a template feature, where users can create templates from a `Zip` File, and can also export a template. Users can use a template created by the community or reuse their own templates. Later, we plan to have a Template Marketplace where users can share their templates with others. However, that would be out of the scope of this project and a different feature altogether.
## Scope
By the completion of this project, the user will be able to:
* [x] Export existing pages as templates in ZIP format.
* [x] Import templates by selecting the ZIP file, which will recreate the original structure with its content.
* [x] Import/Export nested pages and databases.
* [ ] Maintain references between referenced databases and Linked Pages while importing/exporting.
* [ ] Support exporting assets, while exporting a document.
## Implementation Design
To implement the template feature, we came ahead with a simple but efficient solution. Further, we will discuss the implementation of the import and export templates separately.
### Export Template:
In AppFlowy, we previously provided the following features for exporting:
* Export a document as `.json` or `.md` file.
* Export a database as `.csv` file.
In the export template feature, we wanted to provide the user with the capability of exporting multiple pages and documents as a whole package. Another critical decision was to decide how to save the data regarding the structure of the pages, which could be then used as a reference to import the pages in the same structure.
To store the document structure and configuration, we decided to generate a `config.json` file during exporting that would contain all the details about the template. During, importing a template the same config file would be used to understand the structure of the template.
Example of config.json
* To generate the config file we created a `ConfigService` which does all the heavy lifting i.e. generating `config.json` using the current `ViewPB`.
* Once, the config file is generated we then use `TemplateService` to simply export all the pages, databases, and the config file.
> By default the exported files are stored in `documents/template/` folder.
The export process is completed at this point and the exports can be Zipped into a single `.zip` file which is then ready to be imported!
Flow of export template
### Import Template:
Importing documents and databases was previously supported in AppFlowy, however, under this feature, we would support importing a complete structure of documents and databases. Previously we created a `config.json` file while exporting, we would now use it for importing the template.
* Click on the add button and select the template option as shown.
Select the template option
* Now the file picker will be opened and you can now select the `tempate.zip` generated in the export section. Once you select the template ZIP it will be added to your editor.
Flow of importing a template
## Schedule
This project is expected to be completed halfway by Mid-September, the features to be expected by then are:
* [ ] Generate `config.json` from the view structure, which should support nested structure as well.
* [ ] Support exporting templates and importing them as ZIP.
The final version of this project will be completed by September, and the features to be expected are:
* [ ] Support exporting assets used in the pages that are being exported.
* [ ] Maintain references between databases, while importing/exporting.
* [ ] Some Demo Templates are pre-loaded into the application for first-time users.
# Project Ideas
You might notice that the ideas listed are sometimes vague or incomplete. This is on purpose, as in real-world development, you often need to define the problem and scope your solution before coding officially begins. If you wish to submit a proposal based on these ideas, you are encouraged to contact the mentors on Discord and find out more about the particular suggestion you're looking at.
### Desktop features
1. ~~**Table (it's taken)**~~
Add simple tabular content to a page
Expected Outcome:
* The user can insert a table into a page via the slash '/' command
* The user can delete and duplicate an existing table
* The user can add/delete/duplicate/update rows and columns to an existing table
* Each table cell supports rich-text editing
* Test covered
Difficulty: Medium to High
Skills Required: Flutter
Mentor: [Lucas](https://github.com/LucasXu0)
2. [~~**Calendar Database**~~](/docs/appflowy/community/appflowy-mentorship-program/mentorship-2022/mentee-projects/calendar-view-for-appflowy-database) ~~**(it's taken)**~~
Calendars are a great way to visualize how things connect to certain dates from any database in AppFlowy. Use them for task management and event planning.
* Expected Outcome: the user can create a calendar page and add an item to a certain date or a range of dates in the calendar.
* Difficulty: High
* Skills Required: Flutter
* Mentor: [Nathan.fooo](https://github.com/appflowy)
***
3. [~~**Themes**~~](/docs/appflowy/community/appflowy-mentorship-program/mentorship-2022/mentee-projects/custom-themes) ~~**(it's taken)**~~
Control the accent color used for interactive elements such as links, handles, and text selection. The editor cursor can also choose to use the same accent color.
Other customizations:
* Fonts
* Font sizes, font weights
* Font colors
* Text background colors
Difficulty: Medium
Skills Required: Flutter
Mentor: [Lucas](https://github.com/LucasXu0)
4. ~~**Shortcuts (it's taken)**~~
Add more shortcuts and enable users to customize hotkeys
Difficulty: Easy to Medium
Skills Required: Flutter
Mentor: [Lucas](https://github.com/LucasXu0)
5. ~~**AI writers (it's taken)**~~
Utilize AI models to assist in writing. For example, generate to-do lists, outlines, and blog posts.
Difficulty: Medium
Skills Required: Flutter
Mentor: [Lucas](https://github.com/LucasXu0)
6. **AI image generator**
Generate images from text and beyond
Difficulty: Medium
Skills Required: Flutter
Mentor: [Lucas](https://github.com/LucasXu0)
***
7. ~~**Code Block for AppFlowy Editor (it's taken)**~~
Develop a code block in Flutter as a standalone package that can be used by AppFlowy and other Flutter applications
Difficulty: Medium to Hard
Skills Required: Flutter
Mentor: Alex
***
8. ~~**Outline Plugin for AppFlowy Editor (it's taken)**~~
Adding the outline block to the document will automatically generate a list of anchor links to the headings within the document.
Expected Outcome:
* insert an outline via the slash '/' command
* convert highlighted lines into an outline
* the content of the outline will be generated automatically based on the document
* click on the content of the outline will take users directly to the corresponding heading
* different levels of headings are indented differently. For example, H1 will have no indentation, while H2 will be indented once, and so on.
Difficulty: Medium
Skills Required: Flutter
Mentor: [Lucas](https://github.com/LucasXu0)
9. ~~**Favorites (it's taken)**~~
Allow us to quickly access favorited pages via Favorites in the left navigation panel.
Expected Outcome:
* Favorite and unfavorite a page or subpage
* Favorited pages can be accessed from the "Favorites" list in the left panel
Difficulty: Hard
Skills Required: Flutter, Rust
Mentor: Mathias, Nathan
10. ~~**Importers (it's taken)**~~
Import data from third-party sources, eg: Notion importer, Joplin importer
Difficulty: Easy / Medium / Hard
Skills Required: Flutter, Rust
Mentor: Lucas
### CI tools
**1. Report Binary Size**
We consider binary size as an important metric, although it is easy to overlook. We would like to create some GitHub integrations that would automatically do a release build of a new PR and report the difference in binary size between that PR and the current main branch.
* Expected Outcome: an easy-to-use tool to report binary size
* Difficulty: Easy / Medium
* Skills Required: Flutter, Rust, GitHub API
* Mentor: [Nathan.fooo](https://github.com/appflowy)
**2. Speed up building the release package**
It takes almost 20 minutes to build the AppFlowy release package. It would be nice if we can speed it up using GitHub cache or matrix.
* Expected Outcome: the cost of the time of the PR’s GitHub actions should be reduced
* Difficulty: Easy / Medium
* Skills Required: Flutter, Rust, GitHub API
* Mentor: [Nathan.fooo](https://github.com/appflowy)
### Tracing performance regressions
**1. Tracing performance regressions**
Performance could become a key differentiator for AppFlowy. We’d like to keep tracking it. To track it, we need to come up with a metric system. The system includes a set of metrics and a running process that collects results and persists them for analysis.
* Expected Outcome:
* A metric system that measures the performance of AppFlowy
* A working tool that collects results and persists them for analysis
* Difficulty: Medium / High
* Skills Required: Rust
* Mentor: [Nathan.fooo](https://github.com/appflowy)
# Write for AppFlowy
## **Are you an AppFlowy enthusiast? Help other AppFlowy users and builders, get paid, and build your reputation as a writer.**
Whether you’re an AppFlowy power user, a software development expert, or just a student starting to get into open source, there is knowledge you can share that will benefit the entire AppFlowy community.
The types of articles we’re currently looking for include:
* How-tos
* Discussions about specific use cases
* Software development related to AppFlowy’s codebase
You will be paid for articles published on[ AppFlowy Binary](https://blog-appflowy.ghost.io/) and pages posted to[ the AppFlowy documentation](https://appflowy.gitbook.io/docs/essential-documentation/start-here/welcome-to-appflowy). We pay anywhere between $50 - $350 for content created.
Your work will be published under your name with a link to the relevant social profile of your choosing.
We are also looking for content writers and technical editors with a proven track record to help with style, grammar, and content. Please email your portfolio to
## How does it work?
#### Post to Discord About Your Topic
First, join our Discord[ channel](https://discord.gg/s9yQttsP53) and create a post. Your post should include the topic you want to cover and an outline. The topic can be your own or select an existing GitHub issue tagged with “[write-for-appflowy](https://github.com/AppFlowy-IO/AppFlowy-Docs/issues?q=is%3Aopen+is%3Aissue+label%3Awrite-for-appflowy)".
#### Wait for Approval on the Topic
Once you create a post, the AppFlowy team will review it. It may take a few days or weeks for us to review.
If we shortlist your topic, we will work with you to refine the scope and outline of the article to ensure the result is informative and engaging.
We will then create a GitHub issue for the topic and assign the issue to you.
#### Get Feedback
After you finish the first draft, you are encouraged to get feedback from the AppFlowy team and a few community members who are your article’s target audience.
You should be aware that not every submitted article will be published.
#### Publication of Your Article
Once your article is reviewed and published on our blog, you can submit your invoice to get paid via[ Deel](https://www.deel.com/).
But that’s not all — we’ll also promote your work on our social media channels, providing greater exposure for your work.
#### Ongoing Support
Ongoing support is required. You should promptly respond to queries about your published work. How-to guides should remain up-to-date.
We expect that you will provide support for at least 30 days after your article is published. Future engagements will be contingent on how well existing articles are supported.
We may archive your how-to guides if it’s not up-to-date given that our product is still under rapid development and may evolve pretty quickly.
## What kind of content are we looking for authors?
#### How-to-Guides
Write a how-to guide explaining one of AppFlowy’s features. This can be from the development or the end-user perspective.
Ideas:
* AppFlowy 101: Introduction to basic functionality
* Write and edit
* Database properties
* Table view
* Board view
* Take charge of our data
* ... more to cover as we ship new features
* Contribute to AppFlowy:
* How a certain feature is built
* How to make customizations
* How to add plugins
#### Specific Use Cases
Share the specific use cases you have for AppFlowy.
We are eager to know what you use AppFlowy for and how other people can borrow your ideas to gain similar benefits.
Ideas:
* Guides by use cases: write notes, manage tasks, documentation, wiki, engineering...
* AppFlowy for students, product, engineering, personal use...
#### Engineering Topics
Engineering topics related to AppFlowy always excite us.
We love deep dives or tutorials that lower junior developers' barriers to participating in our open-source projects.
Ideas:
* A guide to contributing with minimal project structure to start working on a feature
* More on the architecture and how to circumvent common pitfalls
* How AppFlowy uses Flutter Bloc
* How Rust and Flutter work through event-driven cooperation
* Reach out to annie\@appflowy on [Discord](https://discord.gg/9Q2xaN37tV) for more ideas
## FAQs
#### 1. Where Do I Share My Drafts?
We use GitHub to collaborate.
Once your topic is approved, a page will be created for you to work on in[ this repo](https://github.com/AppFlowy-IO/AppFlowy-Docs).
When you are ready to share your draft, submit a pull request to the page. We’ll provide feedback on your pull request.
If you are not familiar with GitHub, don’t worry. We’ll guide you through.
#### 2. How Much Do I Get Paid?
| Categories | Payment |
| ----------------------------- | ----------- |
| How-to guides for product | $50 |
| How to contribute to AppFlowy | $100 |
| Product use cases | $100 |
| Engineering topics | $100 - $350 |
#### 3. Can I Cross-Post the Article?
Yes, you can cross-post the article on other platforms like Medium or your blog as long as you can add a [canonical link](https://yoast.com/rel-canonical/) to the article in the AppFlowy project.
#### 4. Can I Write in Languages Other than English?
No, unfortunately, content published on our blog is currently in English only.
#### 5. Am I the Right Candidate for a Technical Deep Dive?
You are an experienced developer who has contributed to AppFlowy’s codebase with a deep understanding of its design.
You seek technical excellence and you value collaboration, honesty, and inclusiveness.
#### 6. What Rights Do AppFlowy Claim Over The Article?
After it is published and you have been compensated, your content will become part of the AppFlowy project and will be distributed under its license.
You can cross-post with a[ canonical link](https://yoast.com/rel-canonical/) pointing to the original AppFlowy post.
#### 7. How Many Articles Can I Submit Each Month?
There is no limit, and you can create a series if your articles fall under the same topic or theme.
# Drafts
This is a home base for WIP articles.
* [How to Contribute to AppFlowy](/docs/documentation/appflowy/draft-how-to-contribute-to-appflowy) ([issue](https://github.com/AppFlowy-IO/AppFlowy-Docs/issues/74))
* [Use Case: Software Engineer](/docs/appflowy/community/write-for-appflowy/drafts/draft-use-case-software-engineer) ([issue](https://github.com/AppFlowy-IO/AppFlowy-Docs/issues/72))
# \[Draft] Use Case: Software Engineer
## Introduction
Welcome, fellow software engineers! Today, I want to share with you how I use Appflowy to stay organized and productive in my work. As software engineers, we all know how important it is to keep track of our projects, deadlines, and tasks. That's where Appflowy comes in! With its simple and intuitive design, Appflowy makes it easy to stay on top of everything.

Prior to proceeding with the installation, it is essential to ensure that your machine meets the specified [System Requirements](https://appflowy.gitbook.io/docs/essential-documentation/install-appflowy/requirements).\
Here are the [Installation methods](https://appflowy.gitbook.io/docs/essential-documentation/install-appflowy/installation-methods) that provide clear guidance on how to successfully install Appflowy.\
Should you be interested in contributing to AppFlowy or accessing its source code, we encourage you to explore the dedicated [Contribute to AppFlowy section](https://appflowy.gitbook.io/docs/essential-documentation/contribute-to-appflowy). After installation, users can pick a folder for saving data on the quick start page.
Welcome Page
## Setting Up
Once you have AppFlowy installed, simply create a new page for your software engineering projects. This page will serve as your central hub, where you can structure and categorize your tasks. For example, when using AppFlowy for software engineering, you can create sections like "Project Planning" for goals, requirements, and milestones.
"Development Tasks" helps manage project-specific tasks. Use "Bugs and Issues" to log and address problems, and a "Project Completion" section to track final steps for successful delivery. By creating these sections within your page, you can easily navigate through your projects and find the information you need without any confusion. AppFlowy provides a clean and intuitive interface that allows you to stay focused and organized throughout the software engineering process.
Setting up
 
## Benefits of using AppFlowy as a Software Engineer
Before we dive into the details, let's talk about the benefits of using Appflowy as a software engineer. First and foremost, AppFlowy helps me stay organized. With its ability to create structured pages, I can keep all my projects, tasks, and notes in one place. Additionally, I can easily share my pages in Markdown(.md file) with my team and keep everyone on the same page.
## Project Planning
Now that we have our workspace set up, let's talk about how to use AppFlowy for project planning. To plan a project in AppFlowy, I create a new list for the project and add notes and tags as needed. For example, I might create a note for the project goal, a note for the requirements, and a note for each milestone. By tagging each note with the project name, I can easily find all the notes related to that project.

## Development Tasks:
Once I have my project plan in place, it's time to start working on the development tasks. To manage my development tasks, I create a new list for each task and add notes and tags as needed. For example, I might create a note for the task description, a note for any subtasks, and a note for the estimated time to complete. By tagging each note with the project name and task name, I can easily find all the notes related to that task.

## Bugs and Issues
Of course, no software project is without its bugs and issues. That's where Appflowy's bug tracking features come in. To track bugs and issues, I create a new list for each issue and add notes and tags as needed. For example, I might create a note for the bug description, a note for the steps to reproduce, and a note for the priority level. By tagging each note with the project name and issue name, I can easily find all the notes related to that issue.

## Project Completion
Once all the development tasks are completed and all the bugs are fixed, it's time to wrap up the project. To manage the project completion, I create a new list for the project and add notes and tags as needed. For example, I might create a note for the final deliverables, a note for any outstanding issues, and a note for the project status. By tagging each note with the project name, I can easily find all the notes related to that project.

## Other Exciting Features for Software Engineers
## Open AI Integration
Being a Software Engineer you must be tired of reading through long, technical documents and articles. Well, AppFlowy's got your back with their new OpenAI integration. With just a few clicks, you can now quickly summarize lengthy texts and extract key information using the power of OpenAI. All you have to do is highlight the text you want to summarize and click on the 'Summarize' option in AppFlowy's menu. And that's not it, it can fix spellings for you too. Before you get started, make sure to enter your OpenAI API key in the settings menu. Please visit [Appflowy AI Setup](https://appflowy.gitbook.io/docs/essential-documentation/appflowy-x-openai) to know how to integrate this feature. This feature can be a huge time-saver for busy software engineers who need to stay up-to-date on the latest industry news and trends. So what are you waiting for? Give it a try and make your life easy.

## Code Block
With AppFlowy's code block feature you can now save your code snippets directly in your AppFlowy documents, complete with an auto language specifier at the top. This means that you no longer have to worry about manually formatting and highlighting your code snippets - AppFlowy takes care of it all for you!

## Calendar View Databases
This latest version v0.1.4 of Appflowy includes a major feature launch - Calendar View Databases(much needed by Software Engineers), which lets you easily plan and manage your tasks and deadlines using Appflowy's calendar views. With this feature, you can quickly visualize your project timeline and meetings, and ensure you meet all your deadlines.

## Conclusion:
AppFlowy is an excellent tool for software engineers looking to manage multiple projects and tasks effectively. It provides a customizable workspace, makes project planning and management easier, and ensures that tasks and issues are not overlooked. I highly recommend AppFlowy to any software engineer looking for a project management tool that can help them stay organized and productive. Give it a try, and see how it can benefit you in your software engineering projects.
# \[Draft] Use Case: High School Students
## \[Draft] Use Case: High School Students
## Organize Your High School Tasks and Assignments with AppFlowy: A Path to Enhanced Productivity
### Introduction:
Hi, fellow students. Here I will dive into the ways in which high school students like myself can make the most of AppFlowy, to organize their tasks and assignments and boost overall productivity. We all know how important it is to keep track of our Assignments, Projects, tasks and Research works, that’s where AppFlowy comes in handy. AppFlowy offers tailored features to cater to my specific educational requirements, equipping me with the necessary tools to stay on track with my academic responsibilities.

By following this guide, you will gain valuable insights into the features and functionalities of AppFlowy and discover ways to optimize its usage to streamline your high school journey.
### Installation:
Before proceeding with the installation, it is essential to ensure that your machine meets the specified [System Requirements](https://appflowy.gitbook.io/docs/essential-documentation/install-appflowy/requirements).
Here are the [Installation Methods](https://appflowy.gitbook.io/docs/essential-documentation/install-appflowy/installation-methods), that clearly demonstrate the installation steps for successfully installing AppFlowy.
After successfully installing AppFlowy, Users can choose a folder to save their data on the Quick Start page.

### Getting Started:
Once you have AppFlowy installed, you can begin by creating a dedicated page specifically for your studies. This page will serve as your central hub, enabling you to structure and categorize your tasks effectively. For instance, you can create sections like "Coursework" to organize your subjects, lectures, and assignments. "Study Schedule" can be used to plan your study sessions and set goals. Utilize "Research and Resources" to gather and save relevant articles, papers, and study materials. Additionally, you can create a section for "Exams and Quizzes" to track important test dates and review materials. By incorporating these sections within your page, you can easily navigate through your studies and access the information you need without any confusion. AppFlowy offers a clean and user-friendly interface that allows you to stay focused and organized throughout your studies.

### Benefits For Using AppFlowy As A High School Student:
Before we delve into the specifics, let's explore the numerous advantages of incorporating AppFlowy into your workflow as a student. Firstly, AppFlowy serves as a powerful organizational tool, empowering you to maintain order amidst the demands of your studies. Its capability to create structured pages becomes your haven, where you can seamlessly consolidate all your subjects, lectures, assignments, and study materials. This centralized approach ensures that important information is readily accessible and conveniently organized.
Moreover, AppFlowy offers an invaluable feature for collaboration. By effortlessly sharing your pages in Markdown (.md file) format with your peers or study group, you foster a sense of unity and synchronization. This way, everyone can stay informed and aligned, as all team members can access and contribute to the shared pages. This collaboration feature enhances your efficiency and ensures that everyone is on the same page, figuratively and literally.
The combination of AppFlowy's organizational capabilities and its collaborative nature makes it an indispensable asset for students. It streamlines your study process, facilitates seamless teamwork, and ultimately elevates your academic journey to new heights.
### Study Specific Pages:
When utilizing AppFlowy for your studies, you have the incredible advantage of creating study-specific pages tailored to your needs. Let's explore the key sections that can revolutionize your study routine and enhance your academic performance:
1. Coursework: This section serves as your comprehensive hub for organizing all your subjects, lectures, and assignments. You can create dedicated sub-sections for each subject, allowing you to neatly categorize your course materials. Within each subject, you can further break down the content into lectures, readings, and assignments, ensuring that everything is structured and easily accessible.
2. Study Schedule: This section empowers you to take control of your study sessions and set clear goals. With AppFlowy, you can create a study schedule that outlines specific time slots for each subject or topic. By allocating dedicated study periods, you can effectively manage your time, maintain a consistent study routine, and optimize your productivity. Additionally, you can set goals within this section, allowing you to track your progress and ensure that you stay on track with your learning objectives.


5. Research and Resources: As a student, staying updated with the latest articles, papers, and study materials is crucial. This section in AppFlowy becomes your virtual library, where you can gather and save relevant academic resources. You can create subsections for different topics or subjects, making it easy to organize and retrieve the materials you need when studying or conducting research.

7. Exams and Quizzes: Tracking important test dates and preparing for exams is a vital part of your journey. This section enables you to stay on top of upcoming assessments and review materials. You can create subsections for each exam, where you can store study guides, practice questions, and any additional resources that will aid in your exam preparation. This section ensures that you have a clear overview of your assessment timeline and helps you allocate sufficient time for thorough review.

By incorporating these study-specific sections within your AppFlowy pages, you create a structured and organized study environment that supports your learning process. AppFlowy becomes your personal study assistant, enabling you to efficiently manage your coursework, plan your study sessions, gather resources, and track your progress. Embrace the power of AppFlowy to elevate your studies and excel in your academic endeavors.
### Calendar Timeline:
Creating a calendar timeline in AppFlowy to showcase your deadlines for assignments, exams, quizzes, and project works is a useful way to visually track and manage your workload. Here's a step-by-step guide on how you can set up a calendar timeline within AppFlowy:
1. Create a new page: Start by creating a new page specifically dedicated to your calendar timeline. You can title it as "Deadlines" or any other relevant name.
2. Set up the calendar structure: Within the "Deadlines" page, you can begin by creating sections for each month or semester. For example, you can have sections like "September," "October," or "Fall Semester." These sections will serve as containers for your specific deadlines.
3. Add tasks and events: Within each month or semester section, you can add individual tasks or events for your assignments, exams, quizzes, and project works. Create a new task for each deadline, specifying the due date and a brief description of the task. You can also add sub-tasks or notes for additional details if needed.
4. Prioritize deadlines: As you add tasks to your calendar, make sure to prioritize them based on their urgency and importance.
5. Regularly update and review: As new deadlines come up or changes occur, make sure to update your calendar timeline accordingly. Regularly review your calendar to keep track of upcoming deadlines and make any necessary adjustments to your study or work plan.
A calendar timeline in AppFlowy helps you to gain a visual overview of deadlines for assignments, exams, quizzes, and projects. It can manage your time effectively by allocating slots for each task. It can prioritize tasks based on urgency and importance. You can plan ahead and break down projects into manageable tasks. It will also reduce your stress by eliminating the need to remember multiple due dates.

### To-Do Lists:
Using a daily to-do list offers several benefits that enhance productivity and task management. It helps you stay organized by capturing and tracking all your tasks in one place. By prioritizing tasks based on importance and urgency, you can focus on what matters most and avoid getting overwhelmed. With a clear list, you gain clarity on your goals and stay focused, reducing distractions. Effective time management is facilitated as you allocate realistic time frames to each task, optimizing your productivity. As you check off completed tasks, you experience a sense of accomplishment and motivation. Additionally, a to-do list helps reduce stress by breaking down workload into manageable steps. It allows for adaptability and flexibility, enabling adjustments to changing priorities. By utilizing a daily to-do list, you can approach your day with structure, purpose, and increased productivity.

### Collaboration:
AppFlowy's collaboration feature allows you to share your pages in Markdown (.md) format, fostering unity and synchronization within your team or study group. By sharing pages, everyone can access and contribute to the shared content, promoting effective teamwork and knowledge sharing. This feature enhances efficiency, streamlines communication, and ensures that everyone is on the same page.
### Project Work:
AppFlowy is a valuable tool for high school project planning, providing a structured approach to stay organized and ensure project success. By creating lists and adding detailed notes, you can categorize different aspects of your project and capture important information. The ability to break down the project into manageable sections helps prevent tasks from being overlooked. As you progress, monitoring important deadlines within your notes ensures that you stay on track and complete tasks in a timely manner. Regularly reviewing and updating your project plan keeps you informed about your progress and allows for adjustments as needed. With AppFlowy, you have a reliable platform to plan and manage your high school projects effectively, helping you stay organized and achieve your goals.

### AI Integration:
As a student, conducting research work can be time-consuming and overwhelming. However, AppFlowy is here to assist you with their latest integration of OpenAI. Now, you can easily summarize extensive research articles and extract key information with just a few clicks, thanks to the power of OpenAI.
To benefit from this feature, simply highlight the text you wish to summarize and click on the 'Summarize' option in AppFlowy's menu. Additionally, AppFlowy can even help you correct spelling errors, ensuring accuracy in your research work.
Before you get started, make sure to set up your OpenAI API key in the settings menu. For detailed instructions on integrating this feature, please visit [AppFlowy AI Setup](https://appflowy.com/ai-setup). This integration can significantly save time for busy students, allowing you to stay updated on the latest research findings and trends. 
Don't miss out on this opportunity to simplify your research work. Give AppFlowy a try and make your academic life easier and more efficient.
### Conclusion:
In conclusion, AppFlowy offers immense value to students seeking to excel in their academic pursuits and research work. By utilizing AppFlowy's features, students can effectively coordinate their project progress, collaborate with research team members, and stay organized with their assignments and tasks. The ability to create research notes, categorize assignments, and set up workspaces for major subjects provides a comprehensive solution for managing the demands of a curriculum. AppFlowy's intuitive interface and productivity-enhancing features empower students to streamline their workflow, track deadlines, and stay on top of their academic responsibilities. Whether it's organizing research findings, managing study schedules, or coordinating with peers, AppFlowy proves to be a valuable tool in optimizing productivity and achieving success as a student.
# \[Draft] How to add a new property to appflowy database
One of the things you can do in Appflowy is work with structured data (it's called Appflowy databases) and view them in different layouts, such as Table, Board, Calendar.
 In this article, I will take a look at how the back-end part of Appflowy databases works overall and share a more detailed guide on how to create a new property type.
## Flowy-database
Flowy-database is a rust crate mainly responsible for the abstractions behind Appflowy databases, CRUD actions on data, storing, filtering and etc. Let's take a look at the code structure and dive in (the picture is only the directories you can take a more detailed look [here](https://github.com/AppFlowy-IO/AppFlowy/tree/e0ad364fa3e9da183698739e0661beef22b1728d/frontend/rust-lib/flowy-database2/src)).

### [Entities](https://github.com/AppFlowy-IO/AppFlowy/tree/e0ad364fa3e9da183698739e0661beef22b1728d/frontend/rust-lib/flowy-database2/src/entities)
Basic abstractions that Flowy-database uses to model the data and work with them behind the scene. I will describe some of them a bit.
#### [Cell](https://github.com/AppFlowy-IO/AppFlowy/blob/main/frontend/rust-lib/flowy-database2/src/entities/cell_entities.rs)
Most basic abstraction that encapsulates the raw data and determines its row and column.
#### [Row](https://github.com/AppFlowy-IO/AppFlowy/blob/main/frontend/rust-lib/flowy-database2/src/entities/row_entities.rs)
Multiple cells packaged together. In table view, it's the table row and in board view each card represents a row.
#### [Field](https://github.com/AppFlowy-IO/AppFlowy/blob/main/frontend/rust-lib/flowy-database2/src/entities/field_entities.rs)
Think of it as sort of table columns. Closely related to Property, It creates a link between different cells and determines their type. Each field has a type (not unique) for example Number, Text, Email, Date, etc. Will say more about fields on "How to add new property type" section.
#### [Sort](https://github.com/AppFlowy-IO/AppFlowy/blob/main/frontend/rust-lib/flowy-database2/src/entities/sort_entities.rs)
For sorting rows based on a specific field and condition, which will be based on one of the row's cells. This is mostly useful in Table layout.
#### [Filter](https://github.com/AppFlowy-IO/AppFlowy/tree/e0ad364fa3e9da183698739e0661beef22b1728d/frontend/rust-lib/flowy-database2/src/entities/filter_entities)
To filter out and show only some rows based on a condition you can use filters. Filter has a general part ([`FilterPB`](https://github.com/AppFlowy-IO/AppFlowy/blob/main/frontend/rust-lib/flowy-database2/src/entities/filter_entities/util.rs)), for example which field is this filter for and a custom part which is different based on mostly the field type. So for the Number field type, we can have [filter](https://github.com/AppFlowy-IO/AppFlowy/blob/main/frontend/rust-lib/flowy-database2/src/entities/filter_entities/number_filter.rs) which specifies the cell related to the Number field should be greater than the user-specified number. And for a Checkbox field type, we can have a filter that the cell should be checked.
**Where to start with adding new filter condition**
If you want to add new filter condition for your desired field type in Appflowy. First you have to find the specific field type filter entity or create it if doesn't exist. Second, add your filter condition name in the field type conditions enum. Third in [services->field->type\_option->field\_type](https://github.com/AppFlowy-IO/AppFlowy/tree/e0ad364fa3e9da183698739e0661beef22b1728d/frontend/rust-lib/flowy-database2/src/services/field/type_options), you have to determine how applying that filter condition should take effect. See the [`apply_filter`](https://github.com/AppFlowy-IO/AppFlowy/blob/e0ad364fa3e9da183698739e0661beef22b1728d/frontend/rust-lib/flowy-database2/src/services/field/type_options/type_option.rs#L116) method for each type option.
#### Group
This is for grouping multiple rows by a common field. This is used mostly in Board layout. For example, grouping your tasks (rows) by their priority which priority here is a field with single select type.
**Where to start with adding a new group by**
For enabling group by a specific field you should add its controller in [services->group->controller\_impls](https://github.com/AppFlowy-IO/AppFlowy/tree/e0ad364fa3e9da183698739e0661beef22b1728d/frontend/rust-lib/flowy-database2/src/services/group/controller_impls). The controller has to implement [`GroupCustomize`](https://github.com/AppFlowy-IO/AppFlowy/blob/e0ad364fa3e9da183698739e0661beef22b1728d/frontend/rust-lib/flowy-database2/src/services/group/action.rs#L16) trait.
### Events
There are two types of events in Flowy-database internal and external. Here I'm going to describe external events. This is the way Appflowy front-ends and back-end talk to each other. In the [event\_map file](https://github.com/AppFlowy-IO/AppFlowy/blob/e0ad364fa3e9da183698739e0661beef22b1728d/frontend/rust-lib/flowy-database2/src/event_map.rs), you can see the handler that each event will trigger. The handler will also usually fetch `DatabaseEditor` service and use it to do the job.
### Services
Services are where the core of the logic exists and it's the way to manipulate data. You can create, delete, update data (rows, cells, properties, ...) via services.
You can see more documentation on Appflowy databases [here](https://appflowy.gitbook.io/docs/essential-documentation/databases).
## How to add new property type
Now with some knowledge that how Flowy-database is structured, we can take a look at a practical example. Let's first see what is property and then go further.
### Property
You can create as many properties as you want for your database in Appflowy. Property is showed differently regarding the view of your database, In table view (layout) it's column of your table (each column is a separate property).
As I said properties are tightly related to Field entity abstraction. So on creating new property, you create a new `Field` in Flowy-database. Each `Field` data structure has `name` and `field_type`. The name is what you see as the property name and the type is something you select from available field types (e.g Number, Text, Checkbox, Select, etc).
If you want to introduce a new property type you have to add a new field type ([`FieldType`](https://github.com/AppFlowy-IO/AppFlowy/blob/e0ad364fa3e9da183698739e0661beef22b1728d/frontend/rust-lib/flowy-database2/src/entities/field_entities.rs#L479)) in Flowy-database. Here comes the "type option" data structure.
#### Type Option
`field_type` on `Field` is an enum type named `FieldType` it doesn't hold any data. Each `FieldType` is mapped to a specific type option which has to implement the [`TypeOption`](https://github.com/AppFlowy-IO/AppFlowy/blob/e0ad364fa3e9da183698739e0661beef22b1728d/frontend/rust-lib/flowy-database2/src/services/field/type_options/type_option.rs#L24) trait. This is done in type option service. So for example for a Checkbox field type, we have [`CheckboxTypeOption`](https://github.com/AppFlowy-IO/AppFlowy/blob/e0ad364fa3e9da183698739e0661beef22b1728d/frontend/rust-lib/flowy-database2/src/services/field/type_options/checkbox_type_option/checkbox_type_option.rs#L19) which includes a simple `is_selected` property with bool type.
Note that every field type should get linked to a type option but it's not necessarily a one-to-one relation, it can be many-to-one. As you will see multiple field types can link to the same type option.
#### Filter
If you want to enable filtering for your field type you also have to add a filter entity for it (in [entities->filter\_entities](https://github.com/AppFlowy-IO/AppFlowy/tree/e0ad364fa3e9da183698739e0661beef22b1728d/frontend/rust-lib/flowy-database2/src/entities/filter_entities)). See the samples in source code.
Now let's create a new property step by step.
### Let's create new property "Created At" and "Updated At"
I'm writing this closely after [my merge request](https://github.com/AppFlowy-IO/AppFlowy/pull/2572) on adding CreatedAt and UpdatedAt property type has got merged. So when you are reading this Appflowy has these two types as a property type. But here I will assume they are not implemented yet, and we will go through implementing them step by step, I won't go through detail every specifics but I will elaborate the parts which I think are essential.
Note that Appflowy code is changing constantly so the specific names and codes that I mention here may change in time and you may see differences when you are reading this, but the overall process of adding new property type will probably be more stable.
#### What do we want?
For CreatedAt we want a property type which gets set on creating new row. So it will record the time when the row is created.
UpdatedAt is similar in some ways. With this property type we want to record last time the row has been modified. So it should get set each time the row is modified.
#### Adding the new field type
For every property type it is a must to create new field type on `FieldType` enum. So we have to add two new field type CreatedAt and UpdatedAt. Now that I'm writing this beside these two that we are adding, there are 8 field types in Flowy-database. Among them Date field type which is close to our desired field types CreatedAt and UpdatedAt.
#### Deciding to introduce new type option or not
After adding two new field types we should decide about type option. As I said before we have Date field type which has [date type option](https://github.com/AppFlowy-IO/AppFlowy/blob/e0ad364fa3e9da183698739e0661beef22b1728d/frontend/rust-lib/flowy-database2/src/services/field/type_options/date_type_option/date_type_option.rs#L23). If you think through you may agree with me that CreatedAt and UpdatedAt are the same as Date regarding the data they contain.
There is a timestamp which records the date (it's not in date type option but in [date cell data](https://github.com/AppFlowy-IO/AppFlowy/blob/e0ad364fa3e9da183698739e0661beef22b1728d/frontend/rust-lib/flowy-database2/src/services/field/type_options/date_type_option/date_type_option_entities.rs#L49)), time format, date format and timezone for customizing the display. All four are also applicable to CreatedAt and UpdatedAt. The difference is the way the data gets set which is not related to the type option.
So we will use date type option for our new field types. With some tweaks this is possible (adding `field_type` on the date type option), you can see them in the merge request.
#### Connecting field types to type option
We decided to use date type option for our new field types. Still we should connect date type option to these new field types. This is done in:
1. type option service in [`type_option_data_from_pb_or_default`](https://github.com/AppFlowy-IO/AppFlowy/blob/e0ad364fa3e9da183698739e0661beef22b1728d/frontend/rust-lib/flowy-database2/src/services/field/type_options/type_option.rs#L137) function to create date type option from raw data and in `type_option_to_pb` function which date type option to raw data.
2. Again the type option service in [`default_type_option_data_from_type`](https://github.com/AppFlowy-IO/AppFlowy/blob/e0ad364fa3e9da183698739e0661beef22b1728d/frontend/rust-lib/flowy-database2/src/services/field/type_options/type_option.rs#L219) function for creating date type option with default values.
3. In `get_type_option_cell_data_handler` and `get_type_option_transform_handler` function for getting `TypeOptionCellDataHandler` and `TypeOptionTransformHandler`. Also for filters it's done in implementing from `Filter` to `FilterPB`.
#### Hooking into events and modifying services
Now that we are done with field type, type option we should implement what makes CreatedAt and UpdatedAt distinguish from Date field type, and that is how they get filled.
We want to set each cell with CreatedAt and UpdatedAt field type when a new row is created and keep updating the cell with UpdatedAt field type whenever the row gets modified.
There is a [`CreateRow`](https://github.com/AppFlowy-IO/AppFlowy/blob/e0ad364fa3e9da183698739e0661beef22b1728d/frontend/rust-lib/flowy-database2/src/event_map.rs#L35) database event which is connected to `create_row_handler` there we see that cells are created by [`CellBuilder::with_cells`](https://github.com/AppFlowy-IO/AppFlowy/blob/e0ad364fa3e9da183698739e0661beef22b1728d/frontend/rust-lib/flowy-database2/src/services/cell/cell_operation.rs#L308) method. In the first part row cells are filled based on data received. The data is parsed based on cell field type. Here we can decide to enable setting cells with UpdatedAt and CreatedAt field type manually or not (for example allowing user to change cell with CreatedAt field type).
After the first part, we should change the method so it checks if the row has cells with UpdatedAt or CreatedAt field types and set them to the current timestamp. So every time a row is created these cells will get filled automatically. This is enough for CreatedAt field type. But for UpdatedAt we need to do more.
The cells with UpdatedAt field type should get updated whenever any other cell of the row is modified. If we look at the event map there is an [`UpdateCell`](https://github.com/AppFlowy-IO/AppFlowy/blob/e0ad364fa3e9da183698739e0661beef22b1728d/frontend/rust-lib/flowy-database2/src/event_map.rs#L44) database event connected to `update_cell_handler`, This is the lead we should follow. We can see `update_cell_handler` calls `update_cell_with_changeset` method of `DatabaseEditor` which also at the end calls `update_cell`. What we want to implement here is to update UpdatedAt cells and set them to the current timestamp after the requested cell is updated.
#### Enabling the new property types in front-end
This is it.
1. We added the new field type
2. Made connections from new field types to the date type option
3. We modified the necessary services to change the cells with our new field type as we desire.
Now for seeing our new property type in action. We have to build Flowy-database again. Choose one of Appflowy front-ends and make some changes (which are mostly just mentioning the field type enum). And at last build the front-end.
## Contribute to Appflowy by implementing new property types
You can start contributing to Appflowy by implementing new property types. Look at what we currently have. Create an issue for your desired missing property type and start implementing it after it's accepted.
# Hacktoberfest
Welcome to Hacktoberfest, a month-long celebration of open source contributions! At AppFlowy, we're excited to be part of this global event, and we invite you to join us in making a positive impact on our project.
### What is Hacktoberfest?
Hacktoberfest is an annual event that encourages individuals to dive into the world of open source software development. It's an excellent opportunity for developers, both beginners and veterans, to contribute to meaningful projects, improve their skills, and connect with the open source community.
Here's how it works:
* **Duration**: Hacktoberfest runs throughout the month of October.
* **Goal**: Participants are encouraged to make at least four pull requests (PRs) to open source repositories on platforms like GitHub.
* **Rewards**: Complete the challenge, and you'll receive a limited-edition Hacktoberfest T-shirt (provided you meet the participation criteria).
### Getting Started with AppFlowy for Hacktoberfest
AppFlowy is excited to be part of Hacktoberfest, and we welcome your contributions to our open source project! Here's how you can get started:
#### Step 1: Set Up Your Development Environment
1. **GitHub Account**: If you don't have one already, [create a GitHub account](https://github.com/join) – it's free!
2. **Git**: Install [Git](https://git-scm.com/) on your computer if you haven't already. Git is a version control system that you'll use to manage your contributions.
3. **Fork AppFlowy**: Visit the [AppFlowy GitHub repository](https://github.com/appflowy/appflowy) and click the "Fork" button in the top-right corner. This creates a copy of our repository under your GitHub account.
#### Step 2: Explore the AppFlowy Project
Take some time to familiarize yourself with the AppFlowy project. Here are a few ways to get started:
* **Read the Software Contribution Guidelines**: Check out our guidelines for software contributions, and familiarise yourself with our conventions.
* **Run the Project:** A good starting point is getting the project to build and run.
* **Issues**: Browse our [GitHub issues](https://github.com/appflowy-io/appflowy/issues?q=is%3Aopen+is%3Aissue+label%3Ahacktoberfest) to find tasks that interest you. We label beginner-friendly issues as "Hacktoberfest" to help you get started.
#### Step 3: Make Your Contribution
Once you've identified an issue you'd like to work on:
1. **Claim the Issue**: Comment on the issue to express your interest in working on it. This helps us avoid duplicate efforts, and a team member will assign you the issue as soon as possible.
2. **Fork and Clone**: If you have not already, click the "Fork" button on the repository to create a copy of the repository under your account. Then, clone your forked repository to your local machine using Git.
3. **Create a Branch**: Create a new branch for your work, keeping your main branch clean.
4. **Code and Test**: Make your code changes, and test them thoroughly.
5. **Commit and Push**: Commit your changes to your branch, and push them to your forked repository on GitHub.
6. **Open a Pull Request**: On GitHub, open a pull request from your branch to the original AppFlowy repository. Reference the issue you're addressing in your PR.
7. **Collaborate**: Engage in discussion with our maintainers and other contributors to refine your PR and address any feedback.
### Join Us in Making a Difference
Hacktoberfest is not just about coding; it's also about learning, collaborating, and giving back to the open source community. We look forward to your contributions and hope you find your experience with AppFlowy and Hacktoberfest rewarding.
If you have questions, need guidance, or want to chat with fellow contributors, check out the [Get in contact page](/docs/appflowy/community/get-in-contact) . Let's make Hacktoberfest 20XX a memorable one together!
Happy hacking!
# Roadmap
## View the official [AppFlowy public roadmap](https://github.com/orgs/AppFlowy-IO/projects/5/views/12)
Our [roadmap](https://github.com/orgs/AppFlowy-IO/projects/5/views/12) is where you can learn about the features we’re working on, their status, when we expect to release them, and how you can help us. Have any questions or comments about items on the roadmap? Or feedback about the roadmap itself, such as how issues are presented? Share your feedback via the [discussions](https://github.com/AppFlowy-IO/AppFlowy/discussions).
### Guide to the roadmap
#### Labels
Every item on the roadmap is an issue, with labels that indicate each of the following:
* `AI`: features built on top of artificial intelligence technology
* `bug`: something needs fixing
* `calendar`: features related to the calendar database
* `ci`: tasks related to continuous integrations
* `data sync`: features related to syncing data across devices and tools
* `dependencies`: pull requests that update a dependency file
* `documentation`: this is a documentation task
* `duplicate`: the issue or pull request already exists
* `editor`: features related to the rich-text editor
* `export`: features related to exporting data from AppFlowy
* `good first issue for devs`: for the community members to claim
* `good first issue for experienced devs`: for the experienced community developers to claim
* `grid`: features related to the table-view database
* `help-wanted`: for the community members to claim
* `improvements`: improvements on an existing feature
* `infra`: engineering tasks that are not related to UX/UI features
* `install`: tasks related to installing AppFlowy
* `integrations`: features related to integrating third-party services
* `kanban board`: features related to the board-view database
* `mobile`: features related to AppFlowy Mobile
* `needs design`: this requires a design spec
* `new feature`: this is something new for the end user
* `notes`: something to remember
* `organization`: features related to organizing information in AppFlowy
* `plugins`: this is a plugin task
* `program`: this is a community program task
* `react`: related to React
* `Rust-only`: to complete this task only requires Rust
* `Rust-starter`: friendly to Rust beginners
* `shortcuts`: features related to keyboard shortcuts
* `tauri`: features or tasks related to AppFlowy Tauri
* `tests`: tasks related to writing tests
* `translation`: tasks related to translating AppFlowy into different languages
#### Item Status
“Status” indicates the stages that the feature goes through, from “Need triage” to “Done”. Most of the options are self explanatory.:
* Need triage
* Need test for Windows / Linux / macOS
* Wait for reporter
* Ready for assess
* Planned: included in our plan
* Not Planned: decided against it
* ToDo: in the queue of the upcoming development (next two releases)
* In progress: currently in development
* Blocked: have started but can’t proceed as it is blocked by something
* Done: the development is finished and merged into the main branch
#### Milestones
The roadmap is arranged on a project board to give a sense of how far out each item is on the horizon. If a feature is planned, it is already or will be added to a particular milestone, aka release. For example, “Implement FlowyEditor’s RichText component” is added to v0.0.7. You will also find issues that are not planned for which no milestone is yet available. In addition, you can see a list of milestones that are already planned and track their progress [here](https://github.com/AppFlowy-IO/AppFlowy/milestones).
#### Views
To easily track the project based on your interest, we organize issues into different views as follows:
* [Roadmap](https://github.com/orgs/AppFlowy-IO/projects/5/views/12)
* [v0.1.x](https://github.com/orgs/AppFlowy-IO/projects/5/views/1)
* [Upcoming](https://github.com/orgs/AppFlowy-IO/projects/5/views/3)
* [Help Wanted](https://github.com/orgs/AppFlowy-IO/projects/5/views/4)
* [Editor](https://github.com/orgs/AppFlowy-IO/projects/5/views/5) - the rich-text editor
* [Grid](https://github.com/orgs/AppFlowy-IO/projects/5/views/6) - the table-view database
* [Bug Tracker](https://github.com/orgs/AppFlowy-IO/projects/5/views/9)
If you are interested in contributing to AppFlowy, please have a look at the “[Help Wanted](https://github.com/orgs/AppFlowy-IO/projects/5/views/4)” tab where we maintain a list of issues open to the community.
### Disclaimer
The roadmap is subject to change, especially further out on the timeline. Any statement in this repository that is not purely historical is considered a forward-looking statement. The forward-looking roadmap does not represent a commitment, guarantee, obligation, or promise to deliver any product or feature, or promise to deliver any product and feature by any particular date, and is intended to outline the general development plans.
### Acknowledgments
This article is adapted from GitHub public roadmap’s [README.md](https://github.com/github/roadmap)
# Product
Please visit [appflowy.com/guide](https://appflowy.com/guide)
# Software Contributions
Here, we delve into the technical aspects of our software projects. This space is dedicated to providing you with in-depth insights, conventions, architecture details, debugging techniques, testing methodologies, and more. It's your resource for all things technical in our software development world.
Whether you're a seasoned developer or just getting started, you'll discover valuable information to help you navigate our projects with ease.
We have organized specific sections for each of our flagship projects, [AppFlowy ](/docs/documentation/appflowy)and [AppFlowy Editor](/docs/documentation/appflowy-editor), so you can dive even deeper into the technical intricacies of these projects, and become skilled at navigating them.
# Get started
Hello, and welcome! Whether you are trying to report a bug, proposing a feature request, thinking about getting involved in the project, or submitting a patch, this document is for you! It intends to be both an entry point for newcomers to AppFlowy's community *(with various backgrounds)*, and a guide/reference for contributors.
## Contributing
There are various avenues for contributing to the project, allowing you to participate as much or as little as you like. Every contribution, regardless of its size, is genuinely valued and greatly appreciated by our entire community. Your involvement, no matter how modest, makes a meaningful difference to us all.
### Feedback
Not feeling quite up to working on the project yet? Share your suggestions with us!
* Submit [feature requests](https://github.com/AppFlowy-IO/appflowy/issues). We'd love to hear your ideas!
* Report [bugs](https://github.com/AppFlowy-IO/appflowy/issues). This really helps a lot!
* Provide your suggestions on the [forum](https://github.com/AppFlowy-IO/appflowy/discussions)
* Review [Pull Requests](https://github.com/AppFlowy-IO/appflowy/pulls)
* Provide feedback on [proposed features](https://github.com/AppFlowy-IO/appflowy/issues)
### Non-coding Contributions
You want to help out with the project, but you're not a developer? You can help in multiple ways - even if you don't write code! You can still give back your love as part of our community. Here are a few ideas:
* Answer questions having "General help wanted" or "Technical help wanted" labels on the [forum](https://github.com/AppFlowy-IO/appflowy/discussions)
* Improve the documentation.
* Be an AppFlowy ambassador or evangelist! Proprietary software companies often have dedicated marketing teams to get more users, but luckily we have something better: you! Share your experience with AppFlowy! This can be anything:
* Write a life-hacks-style blog post on how you or your company use AppFlowy to get things done.
* Spread the word on all social media platforms to get more people to join the community. To name a few channels, Product Hunt, Hacker Noon, Quora, Reddit, and Stack Overflow are good choices.
* Give a lightning talk at your local hackerspace on why you love AppFlowy.
* Write a review of the pros and cons of similar open-source apps.
### Coding Contributions
So you want to submit code, documentation, or graphical expertise? Welcome to the club! We will try to give you all the help you need to get up and running.
* Join our [Discord](https://discord.com/invite/9Q2xaN37tV). Here you will be able to chat with all of our contributors and the heads of the project.
* Read the documentation. You should start at the main README.md where you will find information on how to set up your computer to develop with Flutter and Rust.
* Read the technical wiki. This is where you will find all of our design documentation. (TBD)
* Submit a Patch. We love to receive Pull Requests. If you are a beginner or a newcomer, here are some tasks for you to get ramped up:
* Fix a typo in the code.
* Fix a typo in the documentation.
* Awesome issues for [beginners or newcomers](https://github.com/AppFlowy-IO/appflowy/issues?q=is%3Aissue+is%3Aopen+label%3A%22good+first+issue+for+devs%22).
* Provide feedback on [proposed features](https://github.com/AppFlowy-IO/appflowy/issues)
* Review [Pull Requests](https://github.com/AppFlowy-IO/appflowy/pulls)
* If you are ready to code (maybe a lot), please submit a [patch](https://github.com/AppFlowy-IO/appflowy/pulls)!
* (WIP: guidelines)
* (WIP: Code Style)
We require a CLA (Contributor License Agreement). This is a one-time process, which you will encounter when you submit your first PR to any of AppFlowy’s open-source software projects.
### Your First Codebase Contribution
This section has a step-by-step guide to starting as an AppFlowy codebase contributor. Don’t worry if you make mistakes in your first contribution; no one gets it right the first time.
* First, make an account on the [AppFlowy community server](https://discord.gg/9Q2xaN37tV), and pay attention to the community norms.
* Set up your [AppFlowy development environment](/docs/documentation/appflowy/from-source/environment-setup), getting help [on the forum](https://github.com/AppFlowy-IO/appflowy/discussions) or in #general on [the community server](https://discord.gg/9Q2xaN37tV).
* Familiarize yourself with using the development environment
* Check out [How we built AppFlowy with Flutter and Rust](https://blog-appflowy.ghost.io/tech-design-flutter-rust/)
* Read the [Submitting Code](/docs/documentation/software-contributions/submitting-code) guide if you are new to GitHub or development in general
* Now you are ready to pick your first issue
#### Where to look for your first issue
* You can look through unclaimed issues [here](https://github.com/orgs/AppFlowy-IO/projects/5/views/4).
* Issues tagged with the "good first issue for devs” label is used to indicate the issues that are especially approachable for new contributors.
* We also use the "good first issue for experienced devs" label to tag issues that are recommended to developers who have relevant expertise or extensive general software development experience.
* Additionally, there are issues tagged with the "help wanted"-label which is ready to be picked up.
* If there is not already an issue covering the work you are interested in doing, then file a new issue to describe the problem/feature you are addressing.
#### Claim an issue
* Post a comment to the issue thread that you would like to claim. Someone with Member access will assign you to the issue and label the issue as “Todo”, once triage is completed
* If you need a mentor, please mention @annieappflowy. We will assign you a mentor who is familiar with your task. We strongly recommend newcomers have a mentor in place.
* We also recommend new contributors to only claim one issue until their first pull request is merged. This is to encourage newcomers to get familiar with the codebase and finish ongoing work before starting something new.
#### Working on an issue
* We encourage early pull requests for work in progress.
* It's normal and totally okay if your first PR takes you a while.
* Please update your progress on the issue regularly. If you no longer work on this issue, please comment on the issue so that other people can take over it.
#### Guidelines for Triage (For Contributors)
* Ensure that the title is meaningful, and edit if not
* If the report is unclear, add a comment asking for the required details and add the `waiting for user response` label
* If the issue describes something that was implemented/fixed in a later build, add a comment saying so and close the issue
* If you recognize that this issue is a duplicate, comment a link to the original issue and close this one
* Add appropriate labels to the issue and add the issue to [AppFlowy's Project](https://github.com/orgs/AppFlowy-IO/projects/5/views/3)
## Sponsor
Sponsoring is another great way to contribute to the community.
* Buy us a coffee on [ko-fi](https://ko-fi.com/appflowy)
* For more extensive sponsorship, please contact Annie at
## Contributor T-Shirt
If your Pull Request is accepted as it fixes a bug, adds functionality, or makes AppFlowy's codebase significantly easier to use or understand, congratulations! If your administrative and managerial work behind the scenes sustains the community as a whole, congratulations! You are now an official contributor to AppFlowy. Get in touch with us ([link](https://tally.so/r/mKP5z3)) to receive the very special Contributor T-shirt!
Proudly wear your T-shirt and show it to us by tagging [@appflowy](https://twitter.com/appflowy) on Twitter.
DSCF3560
## Code of Conduct
Please report a code of conduct violation to . Let's encourage the behavior we want to see in the world and constantly foster a welcoming environment!
[Contributor Covenant](https://www.contributor-covenant.org/version/2/0/code_of_conduct/)
# Architecture
Skeleton architecture provides a foundational structure for a software system without specifying the full details. It serves as a high-level framework, defining the essential components and their relationships, allowing developers to build upon it and flesh out the system's functionality as needed. It's a flexible and adaptable starting point for software development.
**Why the Skeleton Architecture?**
Skeleton architecture serves as a crucial starting point for our software development projects.
Here's why we choose to implement it:
1. **Efficiency:** Skeleton architecture jumpstarts development, reducing setup time and accelerating the initial stages of the project.
2. **Adaptability:** It provides a flexible foundation that can easily evolve to meet changing project requirements and new features.
3. **Reliability:** Defining the basic structure helps avoid architectural oversights, leading to a more dependable system.
4. **Scalability:** As the project grows, the skeleton architecture accommodates the addition of more detailed components and functionality.
5. **Consistency:** It fosters code uniformity and design patterns across the project, improving readability and maintainability.
6. **Cost-Effectiveness:** Using skeleton architecture saves resources by streamlining the development process.
7. **Communication:** It facilitates clear communication and project visualization, helping all stakeholders understand the project's foundational structure.
There are other reasons as well, but these are some of the more prominent ones as to why Skeleton Architecture could be preferred.
# Frontend
# Tauri
# CodeMap
This code map introduces the folder hierarchy of AppFlowy. **`appflowy_tauri`** the [tauri](https://tauri.app/) working directory.
## src
Contains all the React source code
### 1. appflowy\_app
1. components
> Contains all the `React` components.
1. grid
2. board
3. editor
2. home
> Implements the application skeleton that including the sider, header, and footer.
### 2. services
1. backend:
> Contains all the backend bridge files that including the auto-generated events,protobuf, and etc.
### 3. assets
## [src-tauri](https://tauri.app/v1/guides/getting-started/setup/html-css-js)
Contains all the Rust source code
1. Cargo.toml
> Cargo's manifest file. You can declare Rust crates your app depends on, metadata about your app, and much more. For the full reference see Cargo's Manifest Format.
2. tauri.conf.json
> This file lets you configure and customize aspects of your Tauri application from the name of your app to the list of allowed APIs. See [Tauri's API Configuration](https://tauri.app/v1/api/config/) for the full list of supported options and in-depth explanations for each.
3. src/main.rs
> This is the entry point to your Rust program and the place where we bootstrap into Tauri.
4. src/request.rs
> Defines `invoke_request` function to handle how to send the Event to AppFlowy core
# Web
## 🌐 Project Background
**AppFlowy Web** is a key project designed to 🚀 fully support and extend the capabilities of the AppFlowy client. By providing an efficient, flexible, and user-friendly web platform, AppFlowy Web makes it easier for a broad audience to access the functions and services of AppFlowy. The core objectives of AppFlowy Web include:
* **📢 Publishing Features**: Users can quickly publish and share their content through the web interface, whether it be personal notes, team projects, or publicly displayed materials. Everything can be online with simple operations.
* **🔌 Browser Plugins**: Customized for commonly used browsers, AppFlowy Web integrates seamlessly with the tools users employ daily, enhancing work efficiency and user experience.
* **🚪 Quick Login and Registration Portals**: AppFlowy Web features a streamlined login and registration process, making it easy for new users to join while ensuring platform security and confidentiality of user data.
* **📂 Online Mailbox and Document Management**: The platform provides robust online document management capabilities. Users can access and edit their documents on any device and manage emails through an integrated mailbox, making communication and file management more efficient.
## 🌟 Design Philosophy
In this project, we implement a three-tier architecture: **Data Fetching Layer**, **Data Processing Layer**, and **Data Rendering Layer**. This structured approach is designed to enhance our development efficiency and simplify problem-solving by focusing on key principles:
1. **Simplicity is Efficiency** 🚀: We prioritize straightforward solutions to support rapid development and facilitate easier understanding, which helps in maintaining a low error rate and reducing complexity.
2. **Reducing Heavy Dependencies** 🔗: Our architecture promotes high cohesion and low coupling through a modular design where each layer handles specific functions independently. This structure minimizes inter-layer dependencies, enhancing flexibility and maintainability.
3. **Functional Programming Principles** 🔄: By applying functional programming techniques, we emphasize immutable data structures and pure functions. This approach not only simplifies data handling and state management but also makes the code more predictable and easier to test.
4. **Simplifying Complex Problems** 🧩: We break down complex issues into smaller, manageable parts by clearly defining layer responsibilities. This method ensures that developers are not bogged down by the intricacies of the code, fostering a more enjoyable and effective problem-solving environment.
Our goal with this architecture is to create a development environment that not only meets the current technical demands but also remains manageable and enjoyable for our team. By adhering to these principles, we aim to produce a robust system with fewer bugs and higher overall productivity.
## 🛠️ Technology Stack
* **React.js**: A JavaScript library for building user interfaces, React.js is the foundation of AppFlowy Web's frontend development. It provides a robust framework for creating interactive and dynamic web applications.
* **Yjs**: A framework for building collaborative editing applications, Yjs enables real-time collaboration features in AppFlowy Web. It allows multiple users to work on the same document simultaneously, making it ideal for team projects and shared documents.
* **Node.js**: A JavaScript runtime environment, Node.js is used to run the backend services of AppFlowy Web. It provides a scalable and efficient platform for handling server-side logic and data processing.
## 📦 Module Composition
AppFlowy Web is architected around three key modules, ensuring efficient data handling and flexible frontend rendering:
1. **Data Fetching**: Responsible for obtaining data from backend APIs or other external data sources. This layer focuses on the initial reception of data, including user inputs and external API calls.
2. **Data Processing**: Handles necessary data manipulation and state management before rendering. This layer leverages Yjs to manage data states, ensuring synchronization and real-time updates in multi-user scenarios.
3. **Data Rendering**: Builds and renders the final user interface. Utilizing React, this module constructs responsive UIs that dynamically update based on user interactions and data changes.
These modules work together to facilitate a smooth data flow from acquisition to presentation, optimizing user experience and system responsiveness.

### 🔄 Data Fetching
In AppFlowy Web, the Data Fetching module employs a WebAssembly (WASM) library provided by AppFlowy, instead of traditional HTTP methods. This choice is based on practical reasons:
1. **Code Reusability**: Using the same WASM library as the desktop client allows for a consistent and reusable codebase across platforms. This uniformity aids in maintaining and updating the software more efficiently.
2. **Technical Exploration**: Choosing WASM is part of an effort to learn and integrate newer technologies within the project. This provides the development team with experience in newer web development practices.
The adoption of WASM, despite its potential to increase bundle sizes, reflects an interest in exploring how emerging technologies can be fitted into and benefit the project.
### 🔄 Data Processing
The Data Processing module in AppFlowy Web links the data fetching and rendering stages, focusing on preparing data for use:
1. **Service Layer Connection**: Connects to the fetching module and implements caching strategies to speed up data availability for rendering. The service provides access to the original data (YDoc) for the rendering layer.

2. **Data Manipulation Methods**: Raw data obtained from the service is not immediately suitable for rendering and requires processing:
* **Publish Provider**: Manages publishing-related data operations, providing interfaces and hooks for data access.
* **Document Transfer**: Handles the conversion between Slate data and Yjs data, manages update listeners, and performs granular updates necessary for document synchronization.
* **Database Operations**: Monitors YDoc updates to facilitate data querying, sorting, grouping, and fetching specific rows and columns. This layer controls component updates based on the data fetched from various interfaces.
This module ensures data is correctly processed and ready for rendering, supporting the application's operational flow.
### 🎨 Data Rendering
The Data Rendering module in AppFlowy Web is primarily responsible for rendering components within the application. This module utilizes the React framework to manage and update the user interface based on data changes:
1. **Integration with Data Processing**: Although data handling is often separated for maintenance purposes, data processing and rendering are inherently linked. This separation helps in maintaining clarity and manageability in the codebase but recognizes that some level of data processing is necessary directly at the rendering stage.
2. **React Framework**: Components are rendered using React, which relies on data-driven updates through props and state management. React's context mechanism is also employed to pass down data and provide accessibility across different components without prop-drilling.
This approach ensures that the application remains responsive and efficient, updating only the necessary parts of the user interface when data changes occur.
# Flutter
# Project Structure: CodeMap
This code map introduces the folder hierarchy of AppFlowy.
1. **`appflowy_flutter`** : The flutter working directory, includes all the Dart code of AppFlowy.
1. **`assets`**:
The directory contains all the resources that AppFlowy uses.
1. **`fonts`**
2. **`images`**
3. **`translations`**
2. **`lib`**
1. **`core`**:
2. **`startup`**:
This directory includes the initialized tasks when the application is launched.
3. **`user`**:
This directory contains all the user-related components.
1. **`application`**
Defines the tasks the **`user`** is supposed to do. (Shouldn't find any UI code or network code)
2. **`presentation`**
Consists of Widgets that are used by the **`user`** and also the state of the Widgets.
4. **`workspace`**:
This directory includes the codebase that is used to describe the user workspace.
1. **`application`**
Defines the tasks the **`workspace`** is supposed to do. (Shouldn't find any UI code or network code)
2. **`presentation`**
Consists of Widgets that are used by the **`workspace`** and also the state of the Widgets.
3. **`packages`**
1. **`appflowy_board`**:
This directory contains all the codes that are used to build the BoardView.
2. **`appflowy_editor`**:
This directory contains all the codes that are used to build the FlowyEditor.
3. **`flowy_infra`**:
This directory contains the shared Dart code that is used by AppFlowy. Such as the shared text-style configuration, and theme configuration. etc.
4. **`flowy_infra_ui`**:
This directory contains the shard Flutter widget that is used by AppFlowy. You can reuse the widgets here before designing to write a new widget.
5. **`appflowy_backend`**:
This directory contains the codes that are used to communicate with the backend. Such as the Dart protobuf class definitions, FFI interface, and the dispatch event definitions.
2. **`rust-lib`**
This directory is the backend code base that is written in Rust.
1. **`dart-ffi`:**
This crate defines the FFI interfaces that are used to communicate with the frontend.
2. **`dart-notify`**
This crate defines how to send a notification from backend to frontend.
3. **`flowy-database`**
This crate contains the SQLite database definition.
4. **`flowy-folder`**
This crate defines each workspace struct. A workspace contains a list of Apps, each App contains a list of Views, and each View can be a TextEditor, Grid, or Board.
5. **`flowy-grid`**
This crate handles all the Grid operations, such as creating a grid or deleting a row in a grid.
6. **`flowy-document`**
This crate help to save the text editor data to disk.
7. **`flowy-user`**
This crate handles all the user-related operations.
8. **`flowy-core`**
This crate is used to initial each crate including resolving their dependencies. It encapsulates all the abilities provided by the other crates.
3. **`scripts`**
# Grid
## Introduction
This document explains how the grid works on the Dart side. Also, it can be a development guide when you want to be a grid contributor. This document will be continuously updated, and any suggestions would be helpful.
### Definitions
Below you will find some quick definitions to help you read through the document.
| | |
| ------------- | -------------------------------------------------------------------------------------------------------------------------------------------------- |
| Cache classes | Aim to reduce the time cost of getting data from the backend. |
| Cell | A Cell is one individual cell in a grid. You can see more in the [Cell](#cell) section. |
| Column | A column is a theoretical representation of data, however, there is no Column class. |
| Field | A Field represents the configuration of a column. You can see more in the [Field](#field) section. |
| Grid | A Grid type is a simple representation of items placed in columns and rows. It is not a spreadsheet. You can see more in the [Grid](#grid) section |
| Row | A Row represents a group of related data |
{% hint style="info" %}
Classes with a PB suffix are generated in protobuf format. You could check the [Events](/docs/documentation/software-contributions/architecture/backend/event) document out if you are interested in how the protobuf classes are generated.
{% endhint %}
## Grid
At its core, a Grid type is a simple representation of items placed in columns and rows. It is not a spreadsheet.
Another name for a column is Field. A column's configuration is defined in the [Field](#field) class. It is important to note though that although a grid has the concept of columns, there are no actual Column classes.
A user can add a Row, and then define the data in each of the cells created for the Grid's Fields in that row.

## Cache

When you open a grid, a `GridBloc` will be initialized. There are four cache classes, as shown in the diagram above.
1. `GridRowCache`
* Caches the `grid`'s `Row`s in memory.
* A `Row` contains many `Cells, each` Cell`will be cached in the`GridCellCache\`.
* Allows to insert/delete/update `Row`s.
2. `GridCellCache`
* Caches each `Cell` by `GridCellCacheKey` in memory.
* Allows to remove/insert `Cell`s.
## Field
### Field
A `Field` represents a column's configuration. It will contain the column's name, id, width, type (as defined in [FieldType](#fieldtype)), etc.
### FieldType
A `Field` has a `FieldType`. The `FieldType` defines the kind of data contained in a column. For example, a column may contain dates, numbers, text, multi-select list, etc.
Certain field types have user-defined options such as color, date format, number format, or a list of values for a multi-select list. These options are defined within a specialization of the `FieldTypeOption` class.
Each field has its `TypeOptionBuilder` in the backend that is used to parse the bytes into corresponding FieldTypeOption.

### **FieldEditor**

**FieldEditor**
A `FieldEditor` is a widget that is used to edit the field's shared properties. Such as the name of the field, etc. It uses the `FieldTypeOptionEditor` to customize the UI for each field.
**FieldEditorBloc**
`FieldEditorBloc` uses a `TypeOptionDataController` to listen for changes to a `Field` or perform a rename operation. It will notify the widget to rebuild if its state has changed.
**TypeOptionDataController**
Defines how to update a `Field`'s properties. Such as the name, the field, and the type option data.
**IFieldTypeOptionLoad**
Defines how to load a `Field`'s type option data. For example, when we create a new `Field`, we use `NewTypeOptionLoader`. We use `FieldTypeOptionLoader` to load the existing `Field`'s type option data.
**FieldTypeOptionEditor**
`FieldTypeOptionEditor` is a widget that provides a custom UI for each `Field`. You can provide a custom UI by extending the `TypeOptionWidgetBuilder` As the image below shows, we have many `TypeOptionWidgetBuilder` implementations.

The widget returned by `TypeOptionWidgetBuilder` use `TypeOptionWidgetContext` as its data model. For example, `DateTypeOptionWidget` uses `DateTypeOptionContext` that extends the `TypeOptionWidgetContext`.
`TypeOptionWidgetContext` uses `TypeOptionDataParser` to parse the generic data, List, to specific data type. As the image below shows, each `TypeOptionContext` must have a corresponding `TypeOptionDataParser`.

## Row
A `Row` represents a group of related `Cells`.
**RowService**
`RowService` handles up the logic to interact with the backend. It allows creating, duplicating, deleting, and moving the row operations.
**GridRowCache**
Caching the rows in memory to reduce the cost of getting data from the backend. (as defined in the [Cache](#cache))
**GridCellBuilder**
* A `Row` has a list of `Cell`s. It uses the `GridCellBuilder` to build the custom `Cell` according to the field type. Each cell should extend the `GridCellWidget` interface.

## Cell
A `Cell` is one individual cell in a grid. The number of `Cell`s in a `Row` is equal to the number of `Field`s in the `Grid`. We define the `GridCellWidget` that defines the shared behaviors. Such as `CellAccessory`, `CellEditable`, and `CellShortcuts`.

Let's look at the select `GridSingleSelectCell` and find out how it works. When a user clicks a cell, the `SelectOptionCellEditor` will show up.

* `SelectOptionCellEditor` is a widget that defines the UI when editing the cell.
* `SelectOptionCellEditorBloc` binds the UI and the data, the `SelectOptionCellEditor` will be rebuilt if the bloc state changes.
* `SelectOptionService` handles up the logic for deleting, updating the select option with the backend.
* `GridSelectOptionCellController` use `GridCellController` to implement the cell's operations.

**GridCellController**
* Allows getting Read/Write cell data.
* Listens to the cell date change.
* Allows getting the corresponding field type option data that is parsed by the `TypeOptionDataParser`.
* Listens to the field event and loads the cell data if needed. For example, the numbered cell should reload when the number format is changed.
**GridCellDataParser**
Allow getting the cell data and then parsing into a specific type.
**GridCellDataParser**
The implementation of `GridCellDataParser` will parse the `List` into specific cell data. For example, the `SelectOptionCellDataParser` will parse the List into `SelectOptionCellDataPB`.
**GridCellDataPersistence**
We can use CellDataPersistence that implements the `GridCellDataPersistence` to perform normal save operation.
Also, implement the `GridCellDataPersistence`to provide custom data saving operation. Just like the `DateCellDataPersistence` does.
**CellService**
Handling the logic for reading and writing the cell data with the backend.
# Setting
# Inter-Process Communication
AppFlowy uses a particular style of Inter-Process Communication called [Asynchronous Message Passing](https://en.wikipedia.org/wiki/Message_passing#Asynchronous_message_passing), where processes exchange requests and responses are serialized using the **Protobuf** representation.
Message passing is a safer technique than shared memory or direct function access because the recipient is free to reject or discard requests as it sees fit. For example, if the Flowy Core determines a request is invalid, it simply discards the requests and never executes the corresponding function. This article is going to explain how the event process works.
## Events
AppFlowy's backend defines all the events and generates the event's [foreign function interface](https://en.wikipedia.org/wiki/Foreign_function_interface). Currently, AppFlowy supports **Dart** and **TS** event call.
Events are emitted in the frontend and are processed in the backend. Each event has its own handler in the backend. Each event can carry a payload that is serialized using protobuf. This payload will be deserialized in the backend using the corresponding protobuf struct.
Please check out [this](https://appflowy.gitbook.io/docs/essential-documentation/contribute-to-appflowy/architecture/backend/event) if you want to know the details of the events.

For example, using `UserEventSignIn` to trigger event with passed-in parameter in the backend.
```typescript
async function sendSignInEvent() {
let make_payload = () =>
SignInPayloadPB.fromObject({
email: nanoid(4) + "@gmail.com",
password: "A!@123abc",
name: "abc",
});
await UserEventSignIn(make_payload());
}
```
## Notifications
Notifications one-way messages that are best suited to communicate lifecycle events and state changes. Notifications are triggered in the backend and received in the frontend. Each notification can carry payload that is serialized using protobuf. This payload will be deserialized in the frontend using the corresponding protobuf struct.

For example, using `UserNotificationListener` to receive notifications when new user signs in.
```typescript
let listener = await new UserNotificationListener({
onUserSignIn: (userProfile) => {
console.log(userProfile);
},
onProfileUpdate(userProfile) {
console.log(userProfile);
// stop listening the changes
// listener.stop();
}}
);
listener.start();
```
# User
# User Data
The user data is stored locally using SQLite. The name of the folder is different between development and production.
| Mode | Flutter | Tauri |
| ----------- | ---------- | -------- |
| development | flowy\_dev | dev/data |
| production | flowy | data |
# Events & Notifications
## Events
| UserEvent | |
| -------------------- | ------------------------------------------------------------------------- |
| SignIn | Logging into an account using a register email and password |
| SignUp | Creating a new account |
| SignOut | Logging out fo an account |
| UpdateUserProfile | Update the user information |
| GetUserProfile | Get the user information |
| CheckUser | Check the user current session is valid or not |
| InitUser | Initialize resources for the current user after launching the application |
| SetAppearanceSetting | Change the visual elements of the interface, such as theme, font and more |
| GetAppearanceSetting | Get the appearance setting |
| GetUserSetting | Get the settings of the user, such as the user storage folder |
## Notifications
| UserNotification | |
| -------------------- | --------------------------------------- |
| DidUserSignIn | Trigger after the user sign in |
| DidUpdateUserProfile | Trigger after updating the user profile |
# Folder
### Definitions
AppFlowy uses `workspace`,`app`,`view` to organize user data. These concepts are used in the frontend and backend.
As you see in the below picture, A `workspace` represent as the user root folder. The `workspace` contains a list of apps. The`app` represents as the sub-folder. It can be nested into another sub-folder. Currently, AppFlowy only supports one layer document structure. A `app` contains a list of `view`s.

# Events & Notifications
Events are used in the [communication](https://appflowy.gitbook.io/docs/essential-documentation/contribute-to-appflowy/architecture/frontend/inter-process-communication) between the frontend and the backend. If you interested in the process about generating the events files, please check [this](https://appflowy.gitbook.io/docs/essential-documentation/contribute-to-appflowy/architecture/backend/event) out.
This document explains the events and notifications defined in the Folder scope.
## Events
| FolderEvent | |
| -------------------- | ----------------------------------------------------------------- |
| CreateWorkspace | Create a new workspace |
| ReadCurrentWorkspace | Read the current opening workspace |
| OpenWorkspace | Open the workspace and mark it as the current workspace |
| ReadWorkspaceApps | Return a list of apps that belong to this workspace |
| CreateApp | Create a new app |
| DeleteApp | Delete the app |
| ReadApp | Return the app info |
| UpdateApp | Update the app's properties including the name,description, etc. |
| CreateView | Create a new view in the corresponding app |
| ReadView | Return the view info |
| UpdateView | Update the view's properties including the name,description, etc. |
| DeleteView | Move the view to the trash folder |
| DuplicateView | Duplicate the view |
| CloseView | Close and release the resources that are used by this view |
| SetLatestView | Set the current visiting view |
| MoveItem | Move the view or app to another place |
| ReadTrash | Read the trash that was deleted by the user |
| PutbackTrash | Put back the trash to the origin folder |
| DeleteTrash | Delete the trash from the disk |
| RestoreAllTrash | Put back all the trash to its original folder |
| DeleteAllTrash | Delete all the trash from the disk |
## Notifications
| FolderNotification | |
| ------------------------- | ----------------------------------------------------------------------------------------------------------- |
| DidCreateWorkspace | Trigger after creating a workspace |
| DidDeleteWorkspace | Trigger after deleting a workspace |
| DidUpdateWorkspace | Trigger after updating a workspace |
| DidUpdateWorkspaceApps | Trigger when the number of apps of the workspace is changed |
| DidUpdateWorkspaceSetting | Trigger when the settings of the workspace are changed. The changes including the latest visiting view, etc |
| DidUpdateApp | Trigger when the properties including rename,update description of the app are changed |
| DidUpdateView | Trigger when the properties including rename,update description of the view are changed |
| DidDeleteView | Trigger after deleting the view |
| DidRestoreView | Trigger when restore the view from trash |
| DidMoveViewToTrash | Trigger after moving the view to trash |
| DidUpdateTrash | Trigger when the number of trash is changed |
# Document
# Database View
## Introduction
This document explains how the Grid, Board, and Calendar shares the same data structs defined in the backend. It can be a development guide when you want to contribute to the Grid, Board or Calendar feature. This document will be continuously updated, and all suggestions are appreciated.
## View Definitions
Below, you will find some quick definitions to help you read through the document.
| | |
| -------- | ---------------------------------------------------------------------------------------------------- |
| Database | AppFlowy self-defined database that manages the relation between columns, rows and cells. |
| Grid | A Grid type is a simple representation of items placed in columns and rows. |
| Board | A Board is an project management tool designed to help visualize work, limit work-in-progress. |
| Calendar | A Calendar allows you to display data associated with dates and times in day, week or month formats. |
## Relations
Currently, AppFlowy has three types of views that share the same database. A single database can have multiple views and these views can be converted to each other.

## Events and notifications
The database views use [events and notifications](https://appflowy.gitbook.io/docs/essential-documentation/contribute-to-appflowy/architecture/frontend/inter-process-communication) to exchange the data between the frontend and backend. When triggering an event, there may be notifications sent to the frontend asynchronously. The database events are defined [here](https://appflowy.gitbook.io/docs/essential-documentation/contribute-to-appflowy/architecture/frontend/database-view/events).

## Database Definitions
Below you will find some quick definitions about the database.
| | |
| ------------ | ----------------------------------------------------------------------------------------- |
| Database | A Database struct that contains a list of fields and rows |
| Field | A Field represents a column of the database. Different fields have different `FieldType`s |
| FieldType | A `FieldType` represents the type of column. |
| TypeOption | A `TypeOption` represents the configuration of the `Field`. |
| Row | A `Row` represents a group of related cells. |
| Cell | A `Cell` contains the data of the corresponding `FieldType` |
| TypeCellData | Same as `Cell` but carry the `FieldType` when the `Cell` create |

### Database
A database is a collection of rows and columns, as shown in the picture below. It allows for the creation of more rows and columns. Each row contains a list of cells and each cell corresponds to a specific column. The number of cells is equal to the number of columns in a row. Each column, aka a `Field`, contains the configuration of how to format the cell.

### Field
A Field represents a column in the database. It has a property called `field_ty`, which is an enum defined in FieldType. The `FieldType` defines the kind of data contained in a column. Such as date, number, text, multi-select, etc. This data is stored in the `typeOptions` property, which is a Map. The key is the `FieldType`, and the value is the `TypeOption`.
The current field type of the column is determined by the `field_ty` property. As shown in the picture below. There are two Fields in the database.

### FieldType
A `FieldType` represents the type of the `Field`. Currently, AppFlowy supports `text`, `numbers`, `date`, `select`, `multi-select`, `checkbox`, `URL` and `checklist` as shown in the picture below.

### TypeOption
A `TypeOption` represents the configuration of the `Field`. Certain `TypeOption`s have user-defined options such as color, date format, number format, or a list of values for a multi-select list.

On the other hand, the `TypeOption` of a number `Field` contains the name and a list of format styles:

### Row
A `Row` contains a list of related cells, and each cell corresponds to a specific column. This means that the number of cells in a row is equal to the number of the `Fields` that are in the database.

### Cell
A `Cell` contains the data of the corresponding `FieldType`.

Most of the time, the cell data is not human-readable and requires the `Field`'s `TypeOption` to format the data. The following image describes how the cell data gets formatted step-by-step.

1. Get the corresponding `Database` with `database_id.`
2. Get the corresponding `Field` with `field_id.`
3. Get the corresponding `TypeOption` base on the current value of the `Field`'s `field_ty` property. Assuming the `field_ty` is `FieldType::Date`.
4. Get the corresponding `Row` with `row_id.`
5. Get the corresponding `Cell` with `field_id.`
6. Using the `DateTypeOption` to format the raw cell data.
7. Returns the formatted cell data.
The formatted cell data will be different depending on the `DateFormat` and `TimeFormat` of the `DateTypeOption`.
| DateFormat | TimeFormat | Raw cell data | |
| -------------- | -------------- | ------------- | ------------------- |
| month/day/year | TwelveHour | 1675083591 | 01/30/2023 01:00 PM |
| | TwentyFourHour | 1675083591 | 01/30/2023 13:00 |
| | | | |
| year-month-day | TwelveHour | 1675083591 | 2023-01-30 01:00 PM |
| | TwentyFourHour | 1675083591 | 2023-01-30 13:00 |
# Events & Notifications
Events are used in the [communication](https://appflowy.gitbook.io/docs/essential-documentation/contribute-to-appflowy/architecture/frontend/inter-process-communication) between the frontend and the backend. If you interested in the process about generating the events files, please check [this](https://appflowy.gitbook.io/docs/essential-documentation/contribute-to-appflowy/architecture/backend/event) out.
This document explains the events and notifications defined in the database scope.
## Events
| DatabaseEvent | |
| ----------------------- | ----------------------------------------------------------------------------------------------- |
| GetDatabase | Create the data including list of `Field` and list of `Row` of the database |
| GetDatabaseSetting | Get the settings including filters/sorts configuration of the database |
| UpdateDatabaseSetting | Update the settings of the database |
| GetAllFilters | Return all the filter configurations that the database has |
| GetAllSorts | Return all the sort configuration that the database has |
| DeleteAllSorts | Delete all the sort configuration of the database |
| GetFields | Get all the fields of the database |
| UpdateField | Update the field of the database |
| UpdateFieldTypeOption | Update the `TypeOption` of the field of the database |
| DeleteField | Delete the field of the database |
| UpdateFieldType | Modify the type of the field |
| DuplicateField | Duplicate the field of the database |
| GetTypeOption | Get the `TypeOption` for specific field type of the field |
| CreateTypeOption | Create `TypeOption` for specific field type |
| CreateSelectOption | Create a new option. It's used when the field type is SingleSelect, Multi-select, and Checklist |
| GetSelectOptionCellData | Get the cell data of the option |
| UpdateSelectOption | Update the option content |
| CreateRow | Create a new row in the database |
| GetRow | Get the data of the row |
| DeleteRow | Delete the row in the database |
| DuplicateRow | Duplicate a row |
| GetCell | Get the data of the cell |
| UpdateCell | Update the data of the cell |
| UpdateSelectOptionCell | Update the data of the cell when the field type is SingleSelect, Multi-select, and Checklist |
| UpdateDateCell | Update the data of the cell when the field type is Date |
## Notifications
| DatabaseNotification | |
| --------------------------- | ------------------------------------------------------------------------------------------------------------------ |
| DidUpdateViewRows | Trigger after inserting/deleting/updating a row |
| DidUpdateViewRowsVisibility | Trigger when the visibility of the row was changed. For example, updating the filter will trigger the notification |
| DidUpdateFields | Trigger after inserting/deleting/updating a field |
| DidUpdateCell | Trigger after editing a cell |
| DidUpdateField | Trigger after editing a field properties including rename,update type option, etc. |
| DidUpdateGroups | Trigger after the number of groups is changed |
| DidUpdateGroupRow | Trigger after inserting/deleting/updating/moving a row |
| DidGroupByField | Trigger when setting a new grouping field |
| DidUpdateFilter | Trigger after inserting/deleting/updating a filter |
| DidUpdateSort | Trigger after inserting/deleting/updating a sort |
| DidReorderRows | Trigger after the sort configurations are changed |
| DidReorderSingleRow | Trigger after editing the row that hit the sort rule |
| DidUpdateSetting | Trigger when the settings of the database are changed |
# Grid
# Calendar
DISCLAIMER: This page contains information about features that are work-in-progress (WIP).
## Definitions
* **Event**: An event in a calendar view is analogous to a row as define [here](/docs/documentation/software-contributions/architecture/frontend/database-view#database-definitions), with the added requirement of it must having at least one date field.
## Layout Settings
Several aspects of the calendar view UI can be customized in the settings menu. These settings are stored in the database's layout settings:
* Which layout to use: day, week or month.
* Whether to display weekends.
* Whether to display the week numbers.
* Which day is the first day of the week.
* Which date field should be used to arrange the events in the calendar.
The calendar layout settings are retrieved by [sending events](/docs/documentation/software-contributions/architecture/frontend/database-view#events-and-notifications) to the backend and then getting the resulting notification. The specific events and notifications of interest here are the `GetLayoutSetting` and `SetLayoutSetting` events, and the `DidUpdateLayoutSettings` and `DidSetNewLayoutField` notifications.
## Displaying Events
Events in the database are arranged in the calendar using the currently-specified date field. If the value of this date field for an event is empty, that event will not be displayed in the calendar, but rather in a list of other such events.
# Kanban Board
A kanban board is an project management tool designed to help visualize work, limit work-in-progress.
In AppFlowy, the kanban board is one of the ways by which a user can visualize the data stored in a database.

## Definitions
| | |
| -------------- | --------------------------------------------------------------------------------- |
| Board | contains multiple groups and each group represents as an independent state |
| Group | contains list of cards and each card represents as a record in database |
| Card | contains list of properties and each property belongs to a specific `FieldType` |
| Grouping field | using the grouping rules provided by the `Field` to organize all rows |
| Grouping cell | the `FieldType` of the cell in row equal to the `FieldType` of the grouping field |
| Grouping data | each group has its grouping data that represents as the group id |
## Group
The UML of the classes used in grouping shown in the following picture.

### Generation
The groups are generated by the selected `grouping_field`. Currently, AppFlowy supports these grouping fields. These groups are generated by its own rules shown below.
| FieldType | |
| ------------- | -------------------------------------------------------------------------------------------------------------------------------------------- |
| Single-Select | The number of groups equal to the number of options |
| Multi-Select | The number of groups equal to the number of options |
| URL | The number of groups equal to the number of different URLs in Cells |
| Checkbox | Only two groups |
| Date time | Splits up the range of date times into groups according to differing levels of recency. For example, last month, next seven days, next year. |
In all of the possible field types except for the checkbox, there exists a special, non-removable group called the `No Status` group. It contains the cards that the `grouping cell` doesn't contain the `grouping data` specified by the `grouping field`.
### Modifying Groups
Groups can be modified in several different ways:
* create a group when the grouping field is single select or multi select field type by clicking on the plus button located at the right-end of the kanban board and then submitting a name for the group.
* hide a group by clicking on the respective action in the more actions popup. The hidden group and its cards will no longer be shown in the board, but rather collapsed in the "hidden groups" section located at the left-end of the kanban board
* delete a group by clicking on delete button in the more actions popup. Note that deleting a group will also delete any cards which belong to it.
* rename a group when the grouping field is single select or multi select field type by clicking on the name of the group and then submitting a new name.
* groups can be reordered by drag and drop.
## Card
### Create
To create a card, either click on the plus button on the top-right corner of a group, or on the "Create New" button at the bottom of a group. The created card will automatically fill in the cell corresponding to the grouping field according to the group in which it was created. For example, when the grouping field is a Single-Select field, creating a card in a group whose option is "To Do" will fill the data of the `cell` with that option.
### Delete
Deleting a card from a group is analogous to deleting the entire row in the database.
### Update
Moving a card from Group A to Group B via a drag-and-drop will set the data of the `grouping cell` from A's `grouping data` to B's `grouping data`. And vice versa, updating the data of the `grouping cell` to the group data of a group other than the current one it is in, will move that card over to that group as well is equal to moving this row to that group.
## Shortcuts
A set of keyboard shortcuts are available to users to speed up their interaction with the kanban board.
* ⬆️ and ⬇️ for navigation. If this doesn’t work immediately, first click on the region within the kanban and try again
* `Shift` + ⬆️/⬇️ to expand the selection
* `Esc` to clear focus (deselecting the selected cards)
* `Backspace`/`Del` to delete when one or more cards are selected
* `Enter` when 1 card is selected to open it in the row detail page
* `E` when 1 card is selected to begin editing (then esc to complete as usual)
* `N` when 1 card is selected to begin adding a card to that group, characterized by the bottom text field gaining focus
* `Shift` + `Enter` to create a new card below the current one when a card is selected OR when a card is being edited
* `Cmd` + `Shift` + ⬆️ or `Ctrl` + `Shift` + ⬆️ to create a new card above the current one when a card is selected
* `,` (comma) to move the selected card to the previous stack, if it exists
* `.` (period) to move the selected card to the next stack, if it exists
# Backend
# Initialize
FlowySDK works as the AppFlowy application Backend. It will be initialized before the application launch. Check out the initialization sequence diagram shown below.
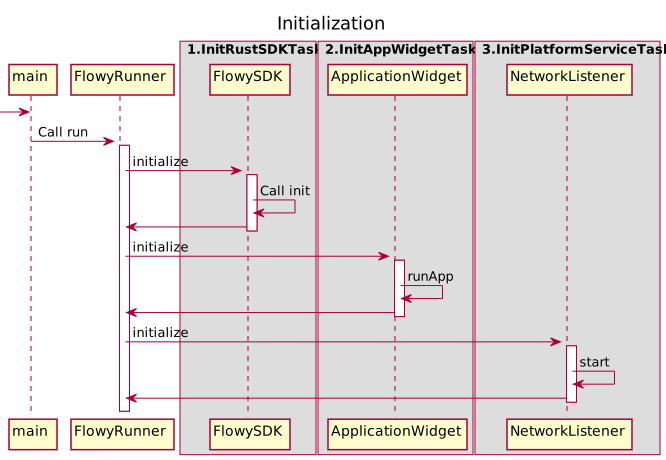
1. FlowyRunner will get called when the entry point, the `main` function, got called.
2. FlowyRunner call `initialize` function on each task that registers as a LaunchTask one by one.
3. `InitRustSDKTask` calls the init function and passes the working directory into FlowySDK.
```dart
getIt().init(directory)
```
The directory is different according to the `IntegrationMode`, which means running AppFlowy on developing mode will not alter the data on release mode.
1. IntegrationMode.release
```dart
Directory documentsDir = await getApplicationDocumentsDirectory();
final directory = Directory('${documentsDir.path}/flowy')
```
1. IntegrationMode.develop
```dart
Directory documentsDir = await getApplicationDocumentsDirectory();
final directory = Directory('${documentsDir.path}/flowy_dev')
```
1. IntegrationMode.test
```dart
final directory = Directory("${Directory.current.path}/.sandbox")
```
4. `InitAppWidgetTask` initialize the `ApplicationWidget` and call `runApp` function.
5. `InitPlatformServiceTask` start the `NetworkListener`.
## WIP
typing...💬️
# Events
AppFlowy's backend defines all the events and generates the event's [foreign function interface](https://en.wikipedia.org/wiki/Foreign_function_interface) that supports **Dart** and **TS** event call.
Events are emitted in the frontend and are processed in the backend. Each event has its own handler in the backend.This mechanism uses a Protobuf-RPC like protocol under the hood to serialize requests and responses, all arguments and return data must be serializable to **Protobuf**.
This article introduces how AppFlowy uses protobuf buffer to exchange the data between the frontend and backend. The pattern as shown below:

Different frontend uses the corresponding FFI interface to communicate with the backend. For example:
* Dart
```dart
class UserEventSignIn {
SignInPayloadPB request;
UserEventSignIn(this.request);
Future> send() {
final request = FFIRequest.create()
..event = UserEvent.SignIn.toString()
..payload = requestToBytes(this.request);
return Dispatch.asyncRequest(request)
.then((bytesResult) => bytesResult.fold(
(okBytes) => left(UserProfilePB.fromBuffer(okBytes)),
(errBytes) => right(FlowyError.fromBuffer(errBytes)),
));
}
}
```
* TS
```tsx
export async function UserEventSignIn(payload: pb.SignInPayloadPB): Promise> {
let args = {
request: {
ty: pb.UserEvent[pb.UserEvent.SignIn],
payload: Array.from(payload.serializeBinary()),
},
};
let result: { code: number; payload: Uint8Array } = await invoke("invoke_request", args);
if (result.code == 0) {
let object = pb.UserProfilePB.deserializeBinary(result.payload);
return Ok(object);
} else {
let error = pb.FlowyError.deserializeBinary(result.payload);
return Err(error);
}
}
```
So, just calling the corresponding function and then let the backend handle it. The result will be returned asynchronously.
## Code Generate Process
Let's introduce the generating process step by step.
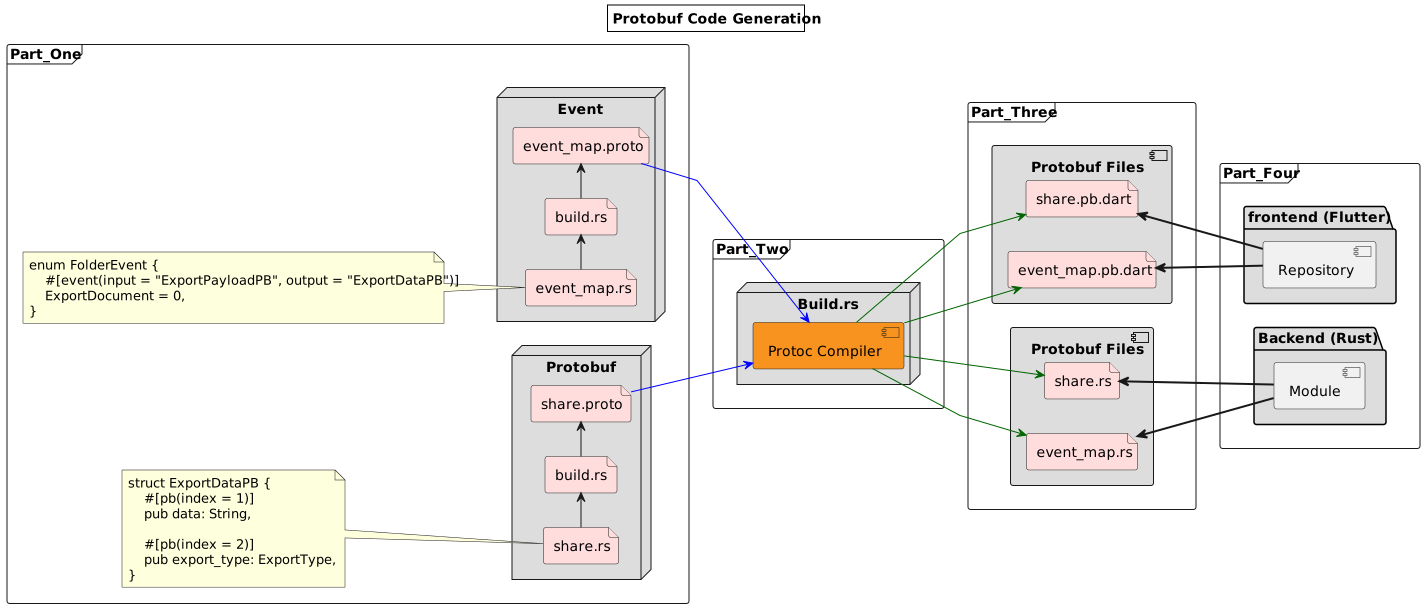
### Step One - Definitions
We define the `Event` and the `Protobuf data struct` in Rust, for example, the `DocumentEvent` defined in event\_map.rs and `ExportDataPB` defined in entities.rs.
```rust
// event_map.rs
#[derive(Clone, Copy, PartialEq, Eq, Debug, Display, Hash, ProtoBuf_Enum, Flowy_Event)]
#[event_err = "FlowyError"]
pub enum DocumentEvent {
#[event(input = "OpenDocumentContextPB", output = "DocumentSnapshotPB")]
GetDocument = 0,
#[event(input = "EditPayloadPB")]
ApplyEdit = 1,
#[event(input = "ExportPayloadPB", output = "ExportDataPB")]
ExportDocument = 2,
}
```
The annotation, `#[event(input = Input struct, output = Output struct)]` is used to generate the event FFI function.
* `Input struct` mean the function receive the input parameter's type.
* `Output struct` mean the function's return value's type
I think you noticed that there is a`PB` keyword appended to every struct. We use the `PB` keyword to identify this struct is in protobuf format.
```rust
// rust-lib/flowy-document/src/entities.rs
#[derive(Default, ProtoBuf)]
pub struct ExportDataPB {
// The annotation, index = 1, match the syntax that defines proto file.
#[pb(index = 1)]
pub data: String,
#[pb(index = 2)]
pub export_type: ExportType,
}
```
The procedural macro, `ProtoBuf`, is used to mark this struct is going to generate the protobuf struct.
> We use the [syn](https://docs.rs/syn/latest/syn/) to collect the [AST](https://en.wikipedia.org/wiki/Abstract_syntax_tree) information that will be used to generate the `proto file`. If you interest in how to collect the information in details, you should check out the [Procedural Macros](https://doc.rust-lang.org/reference/procedural-macros.html).
### Step Two - Configurations
We use [toml](https://en.wikipedia.org/wiki/TOML) to control which files should be included when doing the code generation. It supports specify a single file or a folder.
```toml
proto_input = ["src/event_map.rs", "src/entities.rs"]
event_files = ["src/event_map.rs"]
```
**proto\_input**
The proto\_input receives path or file. The `code gen` process will parse the proto\_input in order to generate the struct/enum.
**event\_files**
The event\_files receives file that define the event. The `code gen` process will parse the file in order to generate the corresponding language event class. The event class name consists of the Enum name and the Enum value defined in event\_map.rs.
### Step Three - Build configuration
[Build Scripts](https://doc.rust-lang.org/cargo/reference/build-scripts.html) is the perfect way to do the code generation. Let's check out some pseudocode. We use [features flag](https://doc.rust-lang.org/cargo/reference/features.html) to control generate process. If the **dart** feature is on then the **Dart** event FFI functions will be generated.
```
// build.rs
fn main() {
let crate_name = env!("CARGO_PKG_NAME");
flowy_codegen::protobuf_file::gen(crate_name);
#[cfg(feature = "dart")]
flowy_codegen::dart_event::gen(crate_name);
#[cfg(feature = "ts")]
flowy_codegen::ts_event::gen(crate_name);
}
```
### Step Four - Code Gen on Build
The `code gen` process is embedded in the AppFlowy build process. But you can run the build process manually. Just go to the corresponding crate directory(For example, frontend/flowy-text-block), and run:
`cargo build --features=dart`
or if you want to check the verbose output.
`cargo build -vv --features=dart`
The build scripts will be run before the crate gets compiled. Thanks to the cargo toolchain, we use `cargo:rerun-if-changed=PATH` to enable the build.rs will only run if the files were changed.
> [cargo:rerun-if-changed=PATH](https://doc.rust-lang.org/cargo/reference/build-scripts.html#rerun-if-changed)
>
> The rerun-if-changed instruction tells Cargo to re-run the build script if the file at the given path has changed. Currently, Cargo only uses the filesystem last-modified timestamp to determine if the file has changed. It compares against an internal cached timestamp of when the build script last ran.
After running the build.rs, it generates files in Dart/TS and Rust protobuf files using the same proto files.
Dart (with dart feature on):
* `dart_event.dart`
The file is located in `packages/appflowy_backend/lib/dispatch/dart_event/flowy-document`.
TS (with ts feature on):
* `event.ts`
The file is located in `appflowy_tauri/src/services/backend/events`.
## Message passing
Let's see how the message passing from the frontend to the backend. Let use dart for demonstration (It's the same in TS).
1. Repository constructs the `DocumentEventExportDocument` class, and call `send()` function.
2. Frontend's FFI serializes the event and the `ExportPayloadPB` to bytes.
3. The bytes were sent to Backend.
4. Backend's FFI deserializes the bytes into the corresponding `event` and `ExportPayloadPB`.
5. The dispatcher sends the `ExportPayloadPB` to the crate that registers as the event handler.
6. `ExportPayloadPB` will try to parse into `ExportParams`. It will return an error if there are illegal fields in it.
For example: the `view_id` field in the `ExportPayloadPB` should not be empty.
7. Crate's `export_handler` function gets called with the event and data.
8. At the end, `export_handler` will return 'ExportDataPB', which will be post to the frontend.
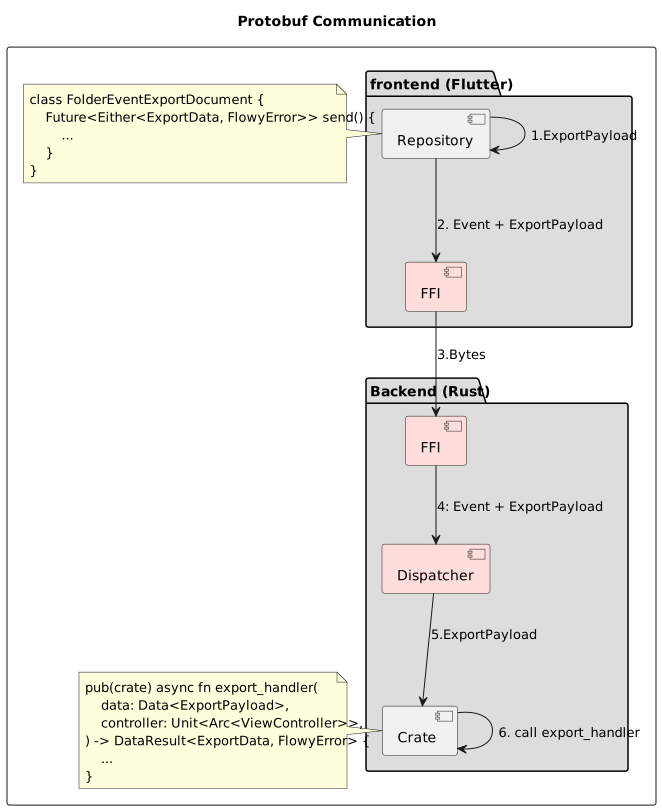
# Delta(WIP)
A `Delta` contains a list of operations, which describe the changes to a document. There are three kinds of operations, insert, delete, and retain. The implementation of Delta is located in the `lib-ot`(shared-lib/lib-ot) crate.The format of `Delta` is JSON based, and is human readable, it can describe any rich text document, includes all text and formatting information.
The picture shown below is a UML diagram that describes the relations between these classes. We're going to explain them on by one.

## DeltaIterator
```rust
let mut delta = RichTextDelta::default();
delta.add(Operation::insert("123"));
delta.add(Operation::insert("4"));
assert_eq!(
DeltaIterator::from_interval(&delta, Interval::new(0, 2)).ops(),
vec![Operation::insert("12")]
);
assert_eq!(
DeltaIterator::from_interval(&delta, Interval::new(1, 3)).ops(),
vec![Operation::insert("23")]
);
```
### DeltaCursor
```rust
let mut delta = RichTextDelta::default();
delta.add(Operation::insert("123"));
delta.add(Operation::insert("4"));
let mut cursor = DeltaCursor::new(&delta, Interval::new(0, 3));
assert_eq!(cursor.next_iv(), Interval::new(0,3));
assert_eq!(cursor.next_with_len(Some(2)).unwrap(), Operation::insert("12"));
assert_eq!(cursor.get_next_op().unwrap(), Operation::insert("3"));
assert_eq!(cursor.get_next_op(), None);
```
### DeltaBuilder
```rust
let delta = TextDeltaBuilder::new()
.insert("AppFlowy")
.build();
assert_eq!(delta.content().unwrap(), "AppFlowy");
let mut attribute = RichTextAttribute::Bold(true);
let delta = RichTextDeltaBuilder::new().retain_with_attributes(7, attribute.into()).build();
assert_eq!(delta.json_str(), r#"[{"retain":7,"attributes":{"bold":true}}]"#);
```
## Operation
Operation contains three types, **Insert**, **Delete**, and **Retain**.
### Insert
Insert operations have an insert key defined. A String value represents inserting text. an optional attributes key can be defined with an Object to describe additional formatting information. Formats can be changed by the retain operation.
### Delete
Delete operations have a Number delete key defined representing the number of characters to delete.
### Retain
Retain operations have a Number retain key defined representing the number of characters to keep An optional attributes key can be defined with an Object to describe formatting changes to the character range. A value of null in the attributes Object represents removal of that key.
## OTString
The length of strings behaves differently in different languages. For example: \[Dart] string's length is calculated with UTF-16 code units. The method \[utf16\_len] returns the length of a String in UTF-16 code units.
```rust
let utf16_len = OTString::from("👋").utf16_len();
assert_eq!(utf16_len, 2);
let bytes_len = String::from("👋").len();
assert_eq!(bytes_len, 4);
```
**OTUtf16CodePointIterator**
```rust
let s: OTString = "👋😁👋".into(); ///
let mut iter = s.utf16_code_point_iter();
assert_eq!(iter.next().unwrap(), "👋".to_string());
assert_eq!(iter.next().unwrap(), "😁".to_string());
assert_eq!(iter.next().unwrap(), "👋".to_string());
assert_eq!(iter.next(), None);
let mut iter = s.utf16_code_point_iter();
assert_eq!(iter.next().unwrap(), "👋".to_string());
assert_eq!(iter.next().unwrap(), "1".to_string());
assert_eq!(iter.next().unwrap(), "2".to_string());
assert_eq!(iter.skip(OTString::from("ab一二").utf16_len()).next().unwrap(), "👋".to_string());
```
## Attributes
Each operation can carry attributes. For example, the \[RichTextAttributes] has a list of key/value attributes. Such as { bold: true, italic: true }.
Because \[Operation] is generic over the T, so you must specify the T. For example, the \[TextDelta] uses \[PhantomAttributes] as the T. \[PhantomAttributes] does nothing, just a phantom.
### RichTextAttributes
```rust
pub type RichTextDelta = Delta;
pub type RichTextDeltaBuilder = DeltaBuilder;
```
### PhantomAttributes
```rust
pub type TextDelta = Delta;
pub type TextDeltaBuilder = DeltaBuilder;
```
## OperationTransform
````rust
pub trait OperationTransform {
/// Merges the operation with `other` into one operation while preserving
/// the changes of both.
///
/// # Arguments
///
/// * `other`: The delta gonna to merge.
///
/// # Examples
///
/// ```
/// use lib_ot::core::{OperationTransform, TextDeltaBuilder};
/// let document = TextDeltaBuilder::new().build();
/// let delta = TextDeltaBuilder::new().insert("abc").build();
/// let new_document = document.compose(&delta).unwrap();
/// assert_eq!(new_document.content().unwrap(), "abc".to_owned());
/// ```
fn compose(&self, other: &Self) -> Result
where
Self: Sized;
/// Transforms two operations a and b that happened concurrently and
/// produces two operations a' and b'.
/// (a', b') = a.transform(b)
/// a.compose(b') = b.compose(a')
///
fn transform(&self, other: &Self) -> Result<(Self, Self), OTError>
where
Self: Sized;
/// Returns the invert delta from the other. It can be used to do the undo operation.
///
/// # Arguments
///
/// * `other`: Generate the undo delta for [Other]. [Other] can compose the undo delta to return
/// to the previous state.
///
/// # Examples
///
/// ```
/// use lib_ot::core::{OperationTransform, TextDeltaBuilder};
/// let original_document = TextDeltaBuilder::new().build();
/// let delta = TextDeltaBuilder::new().insert("abc").build();
///
/// let undo_delta = delta.invert(&original_document);
/// let new_document = original_document.compose(&delta).unwrap();
/// let document = new_document.compose(&undo_delta).unwrap();
///
/// assert_eq!(original_document, document);
///
/// ```
fn invert(&self, other: &Self) -> Self;
}
````
## Serde
## Import and Export
### Markdown
We can use a Markdown parser to import the document into AppFlowy or export the data to a Markdown file. AppFlowy uses `Delta` to represent the document content.
# Profiling
AppFlowy uses [tokio-console](https://github.com/tokio-rs/console) to debug the Rust backend. It would be very useful when having the high CPU usage issues.
## Prerequisites
Install the tokio-console by running the following command
```shell
cargo install --locked tokio-console
```
and run locally
```shell
tokio-console
```
## Enable profiling
The `flowy-core` crate has a feature called `profiling`. Just enable this feature in the cargo.toml.
### Profiling with Tauri

The profiling data will be displayed in terminal after the application run.

### Profiling with Flutter
Using [Xcode instruments](https://github.com/cmyr/cargo-instruments) to profile the backend.
# Database
AppFlowy use [SQLite](https://www.sqlite.org/index.html) as database and [Diesel](https://diesel.rs/) as [ORM](https://en.wikipedia.org/wiki/Object%E2%80%93relational_mapping).
## The flowy-sqlite
The crate, flowy-sqlite, contains the logic for creating the SQLite [schema](https://www.sqlite.org/schematab.html) and providing a shared kv storage. It is located in `frontend/rust-lib/flowy-sqlite`.

The following section will guide you through how to create or update a schema. Before starting, I recommend checking out the [Diesel Getting Started](https://diesel.rs/guides/getting-started) if you don't know about diesel before. Make sure you install the diesel CLI tool. You can install it by running:
> cargo install diesel\_cli --no-default-features --features sqlite
### Create schema
Create a new schema.
```shell
/// Go to the working directory
cd frontend/rust-lib/flowy-sqlite/
/// Generate a new migration named user
diesel migration generate user
```
**Output**
* Creating migrations/2022-08-07-140433\_user/up.sql
* Creating migrations/2022-08-07-140433\_user/down.sql
Create a table named **user\_table**. Open the **up.sql**
```
CREATE TABLE user_table (
id TEXT NOT NULL PRIMARY KEY,
name TEXT NOT NULL DEFAULT '',
token TEXT NOT NULL DEFAULT '',
email TEXT NOT NULL DEFAULT ''
);
```
When doing revert operation, the **down.sql** will be applied. We drop the **user\_table** here.
```
DROP TABLE user_table;
```
Run the migration
```
diesel migration run
```
Migrations allow us to evolve the database schema over time. Each migration can be applied (up.sql) or reverted (down.sql). Applying and immediately reverting a migration should leave your database schema unchanged. It’s a good idea to make sure that down.sql is correct. You can quickly confirm that your down.sql rolls back your migration correctly by redoing the migration:
```
diesel migration redo
```
**Output**:
* Rolling back migration 2022-08-07-140433\_user
* Running migration 2022-08-07-140433\_user
Ok, here we go. Everything is fine. After running the migration, the schema is automatically added to the `schema.rs`
```rust
// flowy-sqlite/src/schema.rs
table! {
user_table (id) {
id -> Text,
name -> Text,
token -> Text,
email -> Text,
}
}
```
**Writing Rust**
```rust
#[derive(Clone, Default, Queryable, Identifiable, Insertable)]
#[table_name = "user_table"]
pub struct UserTable {
pub(crate) id: String,
pub(crate) name: String,
pub(crate) token: String,
pub(crate) email: String,
}
```
### Update schema
Update an existing schema.
```shell
cd frontend/rust-lib/flowy-sqlite/
diesel migration generate user-add-icon
```
**Output**
* Creating migrations/2022-08-07-140433\_user-add-icon/up.sql
* Creating migrations/2022-08-07-140433\_user-add-icon/down.sql
**up.sql**
```
ALTER TABLE user_table ADD COLUMN icon_url TEXT NOT NULL DEFAULT '';
```
**down.sql**
```
ALTER TABLE user_table DROP COLUMN icon_url;
```
```
diesel migration run
diesel migration redo
```
After running the migration, the icon\_url is added to the user\_table schema automatically.
```rust
// flowy-sqlite/src/schema.rs
table! {
user_table (id) {
id -> Text,
name -> Text,
token -> Text,
email -> Text,
icon_url -> Text,
}
}
```
## Write Rust
Let's write some Rust to read the database data. We're not going to explain how to use the `diesel` macros here, you can check [this](https://diesel.rs/guides/all-about-inserts.html) out for that.
We create a struct named `UserTable` to read the record of the `user_table`. The name of the properties should be the same as the user\_table. We can use `UserTable` to insert a new record or read the existing record from the database.
```rust
#[derive(Clone, Default, Queryable, Identifiable, Insertable)]
#[table_name = "user_table"]
pub struct UserTable {
pub(crate) id: String,
pub(crate) name: String,
pub(crate) token: String,
pub(crate) email: String,
pub(crate) icon_url: String,
}
```
Diesel provides lots of handy functions for reading and updating a record.
**Read**
```rust
// conn: the connection to the database
let user: UserTable = dsl::user_table
.filter(user_table::id.eq(&user_id))
.first::(conn)?;
```
**Insert**
Check out [this](https://diesel.rs/guides/all-about-inserts.html) for more information about inserting a record.
```rust
// user: instance of the UserTable
let _ = diesel::insert_into(user_table::table)
.values(user)
.execute(conn)?;
```
**Update**
We use`AsChangeset` macro that diesel provides to implement the AsChangeset trait. Check out [this](https://diesel.rs/guides/all-about-updates.html) for more information about updating a record.
```rust
#[derive(AsChangeset, Identifiable, Default, Debug)]
#[table_name = "user_table"]
pub struct UserTableChangeset {
pub id: String,
pub name: Option,
pub email: Option,
pub icon_url: Option
}
```
Apply the changeset to the database
```rust
// changeset: instance of the UserTableChangeset
diesel::update(user_table::table).set(&changeset);
```
## Architecture
We use dependency injection to forbid the other crates directly dependencies on the **flowy-sqlite** crate. Each crate defines their database [traits](https://doc.rust-lang.org/book/ch10-02-traits.html) to meet their need.
> Traits are a name given to a group of functions that a data structure can implement. I think using traits to isolate dependencies is a very good practice.
The `flowy-user` dependencies on the `flowy-sqlite` crate directly. It initializes the database connection when the Application launch or when the user switches account. The `flowy-grid` defines the `GridDatabase` trait and the `flowy-folder` defines the `WorkspaceDatabase` trait, these two traits are implemented in the `flowy-sdk` crate.
> `flowy-sdk` is a crate that aggregates all the crates and resolves each crate's dependencies. `flowy-sqlite` is a crate that handles all the grid operations
>
> `flowy-folder` is a crate that handles all the folder operations. The folder represents the concepts that include the workspace, app, and view.

# Domain Driven Design
For many architects, the process of data modeling is driven by intuition. However, there are well-formulated methodologies for approaching it more formally. We chose [Domain-Driven Design](https://en.wikipedia.org/wiki/Domain-driven_design) for AppFlowy's architecture.
## :boom: Layered architecture
The most common architecture pattern is the layered architecture pattern, known as the n-tier architecture pattern, where we partition the software into `layers` to reduce the complexity. Each layer of the layered architecture pattern has a specific role and responsibility.`DDD` consists of four layers.
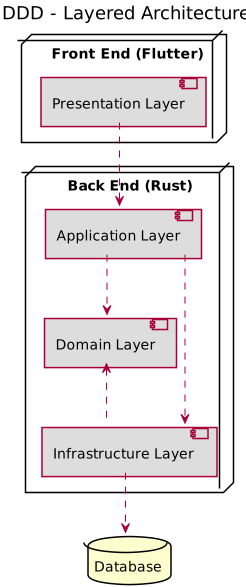
### **Presentation Layer**:
* Responsible for presenting information to the user and interpreting user commands.
* Consists of Widgets and also the state of the Widgets.
### **Application Layer**:
* Defines the jobs the software is supposed to do. (Shouldn't find any UI code or network code)
* Coordinates the application activity and delegates work to the next layer down.
* It doesn't contain any complex business logic but the basic validation of user input before passing it to the other layers.
### **Domain Layer**:
* Responsible for representing concepts of the business.
* Manages the business state or delegates to the infrastructure layer.
* Self contained and it doesn't depend on any other layers. The Domain layer should be well isolated from the other layers.
### **Infrastructure Layer**:
* Persists application data by implementing the repository interfaces provided by the Domain layer.
* Provides generic technical capabilities that support the higher layers. It deals with APIs, persistence and network, etc.
* Hides the complexity of the Domain layer.
AppFlowy is composed in layers, where higher layers use the facilities provided by lower layers. Each layer provides a different abstraction from the layer above and below it. As you can see, the `Complexity` and `Abstraction` of these layers are depicted in the following diagram. As developers, we should pull the complexity downwards. Simple interfaces and powerful implementations (Think about the [open](https://man7.org/linux/man-pages/man2/open.2.html) function). Another way of expressing this idea is that it is more important for a module to have a simple interface than a simple implementation.
```
▲
│
Level of ├───────────────────┐
Abstraction │ Presentation │
├───────────────────┴───────┐
│ Application │
├───────────────────────────┴─────────┐
│ Domain │
├─────────────────────────────────────┴────────┐
│ Infrastructure │
└──────────────────────────────────────────────┴─────▶
Complexity
```
### Data Model
DDD classifies data as referenceable objects, or entities, and non-referenceable objects, or value objects. Let's introduce some DDD terminology.
**Entity**
`Entities` are plain objects that carry an identity which allows us to reference them. e.g. user, order, book, etc. You use `entities` to express your business model and encapsulate them into Factory that provides a simple API to create Entities.
**Value Object**
`Value Object` can't be referenced. They can be only included into entities and serve as attributes. Value objects should be simple and treated as immutable. e.g. email, phone number, name, etc.
**Aggregate**
`Entities` and `Value objects` can be grouped into aggregates. Aggregates can simplify the model by accessing the entire aggregate. For instance, Table has lots of rows. Each row using the table\_id to reference to the table. TableAggregate includes two entities: Table and the Row.
```
TableAggregate
┌────────────────────────────────────────────────────────────────┐
│ │
│ ┌────────────────────┐ ┌─────────────────────────┐ │
│ │struct Table { │ │struct Row { │ │
│ │ id: String, │ │ table_id: String, │ │
│ │ desc: String, │◀▶───────│} │ │
│ │} │ │ │ │
│ └────────────────────┘ └─────────────────────────┘ │
│ │
└────────────────────────────────────────────────────────────────┘
```
**Service**
When a significant process of transformation in the domain is not a natural responsibility of an `Entity` or `Value object`, add an operation to the model as standalone interface declared as a Service. For instance: The `Value object` EmailAddress uses the function `validateEmailAddress` to verify if the email address is valid or not. `Services` exist in the Application, Domain and Infrastructure layers.
```
class EmailAddress {
final Either, String> value;
factory EmailAddress(String? input) {
return EmailAddress._(
validateEmailAddress(input),
);
}
const EmailAddress._(this.value);
}
Either, String> validateEmailAddress(String? input) {
...
}
```
**Repository**
Repositories offer an interface to retrieve and persist aggregates and entities. They hide the database or network details from the domain.
Repository interfaces are declared in the Domain Layer, but the repositories themselves are implemented in the Infrastructure Layer. You can replace the interface implementation without impacting the domain layer.
For instance:
```
// Interface:
abstract class AuthInterface {
...
}
// Implementation
class AuthRepository implements AuthInterface {
...
}
```
> More often than not, the repository interface can be divided into sub-repository in order to reduce the complexity.
### Relation
The diagram below is a navigational map. It shows the patterns that form the building blocks of Domain Driven Design and how they relate to each other.
## Operation Flow
```
presentation │ Application domain Infrastructure
│ │
7 Data Model
┌──────────────────────────────┐ │ ┌────────────────────────┐ │ ┌─────────────────────┐
│ │ │ │ ┌─────────────┐ │ │ Network Service │
▼ Bloc │ │ │ │ Aggregate │ │ │ └─────────────────────┘
┌─────────────┐ │ ┌─────────────────┴─────┐ │ └─────────────┘ │ ▲
────────▶ Widget │ │ ┌────────┐ ┌────────┐ │ 2 │ ┌────────┐ │ │ │ 6
└─────────────┘ │ │ │ Event │ │ State │ │────┬───▶│ │ Entity │ │ ┌─────────────────────┐
User │ │ └────────┘ └────────┘ │ │ │ │ └────────┘ │ │ │ Persistence Service │
interaction │ │ └──────▲────────────────┘ │ │ ┌─────────────────┐ │ └─────────────────────┘
│ │ │ │ │ │ Value Object │ │ │ ▲
└──────────┼────────┘ │ │ └─────────────────┘ │ │ 5
1 │ │ └────────────◈───────────┘ │ ┌─────────────────────┐
│ │ │contain │ Unit of Work │
│ │ ┌────────────────────┐ │ └─────────────────────┘
│ │ │ Service │ ▲
│ │ └────────────────────┘ │ │
│ │ │ 4
│ │ Repository │ │
│ │ ┌─────────────────────────────────────────────┴───────────────┐
│ │ │ ┌ ─ ─ ─ ─ ─ ─ ─ ─ ─ ─ ─ ┐ 3 ┌ ─ ─ ─ ─ ─ ─ ─ ─ ─ ─ ─ ─ ─ ┐ │
│ └───┤ Interface ────▶ Implementation │
│ │ └ ─ ─ ─ ─ ─ ─ ─ ─ ─ ─ ─ ┘ └ ─ ─ ─ ─ ─ ─ ─ ─ ─ ─ ─ ─ ─ ┘ │
│ └─────────────────────────────────────────────────────────────┘
│
```
1. Widget accepts user interaction and translates the interactions into specific Events. The events will be sent to the Application layer, handled by the specific `bloc`. The `bloc` sends the states changed by the events back to the widget, and finally the `Widget` updates the UI according to the state. The pattern is depicted in this diagram. (More about the flutter [bloc](https://bloclibrary.dev/#/coreconcepts?id=bloc))
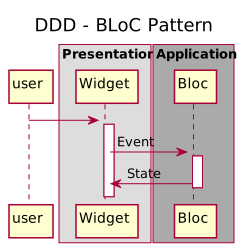
2\. The `bloc` processes the events using the services provided by the `Domain` layer.
1. Convert DTO (Data Transfer Object) to domain model and Domain Model to DTO.
2. Domain model is the place where all your business logic, business validation and business behaviors will be implemented. The Aggregate Roots, Entities and Value Objects will help to achieve the business logic.
3\. Calling repositories to perform additional operations. The repositories interfaces are declared in the `Domain` layer and are implemented in the `Infrastructure` layer. You can reimplement the repository interface with different languages, such as `Rust`, `C++` or `Dart`. etc.
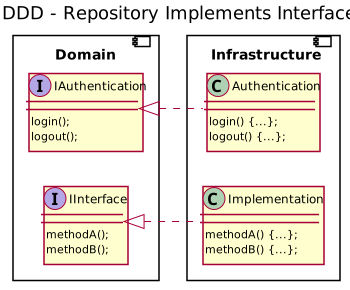
4\. The responsibility of [Unit of Work](https://martinfowler.com/eaaCatalog/unitOfWork.html) is to maintain a list of objects affected by a business transaction and coordinates the writing out of changes and the resolution of concurrency problems((No intermediate state)). If any one persistence service fails, the whole transaction will be failed so, roll back operation will be called to put the object back in initial state.
1. Handling operations (INSERT, UPDATE and DELETE) with SQLite to persis the data.
2. Saving or querying the data in the cloud to finish the operation.
# Proposals
# Conventions
# Naming Conventions
## Naming conventions
**UpperCamelCase**: For Classes, Enumerations, and Typedefs.
Good
Bad
class HomeLayout {}
class homeLayout {}
enum IntegrationEnv {
dev,
pro,
}
enum integration_env {
dev,
pro,
}
typedef NaviAction = void Function();
typedef naviaction = void Function();
**snake\_case:** Libraries, packages, directories, and file names.
Good
Bad
library appflowy_calendar;
library AppFlowy_Calendar;
import 'package:protobuf/protobuf.dart';
import 'package:protobuf/Protobuf.Dart';
appflowy_calendar_block.dart
AppflowyCalendar_block.dart
**lowerCamelCase:** Variables, constants, and parameters.
Good
Bad
let mut item;
let mut Item;
const testValue = 14.28;
const test_value = 14.28;
final urlScheme = RegExp(‘^([a-z]+):’);
final Url_Scheme = RegExp(‘^([a-z]+):’);
void sum(int testValue) { ... }
void sum_of(int test_value) { ... }
# Code Conventions
## Variables
In the AppFlowy codebase, we prioritise variable immutability and consistency. This approach is integral to our code conventions, enhancing code quality and maintainability.
As much as you can, prefer declaring variables as immutable. This is done in Flutter by the use of the \`final\` keyword, and in Rust by omitting the \`mut\` keyword.
In the case you prefer specifying the type of immutable variables, please do this consistently throughout your code. For immutable variables, **always** specify the type.
By adhering to these principles, we create a codebase that is not only functional but also comprehensible and maintainable for all team members.
## Use Cascade Notation
[Cascade notation](https://flutterbyexample.com/lesson/cascade-notation) allows you to perform a sequence of operations on the same object. It saves your number of steps and needs for a temporary variable.
### Flutter
```
Demo d1 = new Demo();
Demo d2 = new Demo();
// Bad - Without Cascade Notation
d1.setA(20);
d1.setB(30);
d1.showVal();
// Good - With Cascade Notation
d2..setA(10)
..setB(15)
..showVal();
```
### Rust
```
let mut person = Person::new();
let mut numbers = Vec::new();
// Bad - Without Cascade Notation
person.set_name("Alice");
person.set_age(30);
person.print_info();
numbers.push(1);
numbers.push(2);
numbers.push(3);
// Good - With Cascade Notation
person
.set_name("Alice")
.set_age(30)
.print_info();
numbers
.push(1)
.push(2)
.push(3);
```
## Use expression bodies
For functions that contain just one expression, you can use an expression function. The `=>` (arrow) notation is used for expression functions.
### Flutter
```
// Good
setState(() => performAction(someValue));
// Bad:
setState(() {
performAction(someValue);
});
```
### Rust
```
// Good
some_function(|| perform_action(some_value));
// Bad
some_function(|| {
perform_action(some_value);
});
```
## Inline TODOs
We prefer ***not*** including inline todos in the codebase, however, whilst you're developing feel free to add TODOs.
When opening a PR, please try to resolve the TODOs you created, if they need more attention or are more complex, then you can remove the TODO in favor of opening an issue on Github.
## Dependencies and Crates
# Flutter
# Git Conventions
The following page describes how you should prepare your code before submitting it for a PR. If you want information on how to create your PR please see [Submitting your first Pull Request](/docs/documentation/software-contributions/submitting-code/submitting-your-first-pull-request).
Before your code is merged into the main branch it will be peer reviewed so that it can be deployed for everyone to use. We go through your PR line by line and make sure that everything is on the up and up. You should always carefully craft your code submission in order for your reviewer to be able to more easily understand your changes.
## Commit message guidelines
We use [commitlint](https://github.com/wagoid/commitlint-github-action) to validate each commit message. It is automatically configured to validate your commit messages when you setup your AppFlowy repo.
The commit message consists of `type`:`subject`
* type must be one of \[build, chore, ci, docs, feat, fix, perf, refactor, revert, style, test]
* no space between type and the colon
* subject is the commit message
**For example:**
* git commit -m "fix: did something"
* git commit -m "feat: did something"
* git commit -m "refactor: did something"
## Committing Process
Make small commits. A commit should be a small chunk of logic that is easy to understand and follow.
Before committing you should do a file compare on every file that you want to commit. Here, you will check to make sure that you are not committing temporary code or test code. You will also check for warnings, code formatting, and unneeded included packages.
Commit often. The process of adding commits keeps track of your progress as you work. Commits also create a transparent history of your work that others can follow to understand what you’ve done and why.
Write clear, concise commit messages. Each commit has an associated commit message, which is a description explaining why a particular change was made.
Make PRs as soon as possible. In an open source project, we all depend on each others code. The faster you get your changes into the main branch, the less chances there are of conflicts.
## Before pushing your code
Before creating your Pull Request you must ensure that your code adheres to the [Broken mention](broken://pages/YZRLS2SDM5mnKldyAhIp).
### No warnings
There must be no warnings in the development or main branches. No developer can check-in code that contains warnings. This is to facilitate finding warnings and errors while **you** are coding. It would be extremely difficult for you to see that your code has warnings if the code base was already polluted with hundreds of warnings.
# Submitting Code
Here you will find everything you need to know, before you submit pull requests. We really appreciate our contributors learning about our code conventions and styles, to avoid unnecessary change requests from the team.
# Setting Up Your Repositories
Since changes contributed to open source projects will have to be peer reviewed, it's common to see a workflow which relies on git Pull Requests (PR). PRs are not allowed from a repository that is cloned directly from the original project. In order to create a PR, you must fork the project and then clone your fork. This process will be explained below. If you have cloned AppFlowy without forking first, you will have to restart the process.
## Terms
Here are the terms that are used when talking about git repositories.
* **repo:** A synonym for repository.
* **origin:** This is name of the git repository instance which is in your GitHub account. A repository in your account may have been created by you, or you may have forked it.
* **forked repo, fork**: An instance of a repository in your GitHub account that was created by using the forking mechanism.
* **upstream:** This is the name of the original project's repository which is located in their GitHub account.
* **cloned repo:** This is the clone that you create on your local machine.
* **local repo:** synonym of **cloned repo**
## Relationships between repositories
Working on an open source project can get a little complicated for new users. There are 3 code repositories that are involved in the process: AppFlowy's repo, Your GitHub fork, and your cloned repository on your local computer. You can see the location and links between these repositories in the following diagram :

## Initial Project setup
The steps in this section only need to be performed once in order to contribute to AppFlowy. You will have to repeat these steps to contribute to a different project.
Here are the steps to follow to create and maintain a healthy fork and contribute to AppFlowy periodically.
1. Create a fork of the AppFlowy project.
* You must work on your fork of the project rather than on a cloned repository pointing to AppFlowy's repository. In order to fork AppFlowy go to the [AppFlowy repository](https://github.com/AppFlowy-IO/appflowy) on GitHub, click on "Fork" and choose a suitable GitHub account for the fork eg. your personal Github account.
2. Clone the fork you just created onto your development machine
* In your GitHub account, in your Fork of AppFlowy, go the the "<> Code" tab which is in the upper left corner.
* Once there, click on the green "Code" button and a dropdown will appear.
* In the dropdown you will see choices for "HTTPS", "SSH", "GitHub CLI". We recommend using SSH, but that is beyond the scope of this tutorial. So we will be using HTTPS for simplicity. Click on HTTPS.
* You will see the link to your Fork. Click on the icon with two boxes to copy that URL to your clipboard.
* In a terminal, go to your preferred directory for code.
* Clone the Fork to your local machine:
```shell
git clone [URL TO YOUR FORK]
```
* and cd into that directory:
```shell
cd appflowy
```
3. Add the original project repo as an upstream repository in your forked project:
```shell
git remote add upstream https://github.com/AppFlowy-IO/appflowy.git
```
The AppFlowy project repo is now referred to as "upstream" Your GitHub project is now referred to as "origin"

You're all setup! If you haven't already, checkout our [Conventions](/docs/documentation/software-contributions/conventions) before you start hacking together new features and bug fixes!
# Submitting your first Pull Request
## Thank you for helping out!
So you want to contribute to AppFlowy, that's awesome! Thank you and welcome to the team!
At this point you have already forked the AppFlowy and cloned it to your local machine as described in the [Setting Up Your Repositories](/docs/documentation/software-contributions/submitting-code/setting-up-your-repositories) document. You've looked at the code, but you haven't made any changes. Now, you want to do some work!
## A complete flow of the PR process
This is the process to use for every feature or bug fix that you want to propose to AppFlowy:
### Synchronize your repositories
1. Before starting your work always make sure the main branch of your local repo is synchronized with the main branch of AppFlowy's repository (upstream):
* Switch to the main branch on your computer.
```shell
git checkout main
```
* Get all the new changes from AppFlowy's repository. This command will download all the changes in the AppFlowy repository, but will **not** merge them into your main branch.
```shell
git fetch upstream
```
* Merge the new changes into your main branch. This might cause conflicts, resolving conflicts is beyond the scope of this document.
```shell
git merge upstream/main
```
* Update your Github repository (origin) with the new changes
```shell
git push origin main
```
Now, all three repositories are synced! We're ready to start our bug fix.
### Setup a feature branch
1. Create a new branch in your local project for the fixes that you want to contribute to AppFlowy. This branch is referred to as a "feature branch". You should choose a branch name that is short, descriptive, and unique. Some examples of good branch names are *fix-install*, *docs-cleanup*, and *add-travis-ci*. Some examples of bad branch names are *feature*, *fix*, and *patch*. You should add the issue number if applicable. In this case we're going to fix issue #180.
* This command will create a branch in your local repository only. The command will also switch to that branch.
```shell
git checkout -b fix_setup_page_180
```
* Now push that branch to your origin repository.
```shell
git push origin fix_setup_page_180
```
### Work on the code
You will loop through the following actions over and over until your fix is finished
1. Work on your code
2. Commit
3. Keep your local repository up to date
4. Keep your origin repository up to date
#### Work on your code
Work in your new branch (eg. fix\_setup\_page\_180) and commit your changes as normal. You can commit as many times as you want but don't leave uncommitted changes in the branch. As you are working on your code you may want to periodically synchronize your local repo with any changes that have been added to the AppFlowy upstream repo. This will hopefully save you from any future merge conflicts. See below.
#### Commit
1. Commit often
#### Keep your local repository up to date
**Important.** While you were working on your fixes the original upstream project repository might have changed (due to other contributors working on it). So you'll have to bring in those changes by rebasing your current feature branch. In other words you need to replay your fixes on top of the latest work from upstream repository to make sure your commits are still compatible with the latest commits upstream. The following command will result in a fast-forward merge for the pull request which is what we want:
```bash
git checkout fix_setup_page_180
```
```shell
git pull --rebase upstream main
```
This can result in conflicts but this is normal. Fixing these conflicts is part of the process (this happens more often on very active projects.) Fixing conflicts is outside of the scope of this document.
#### Keep your origin repository up to date
After you have applied your fixes on top of the latest version of upstream main, it's now time to update your origin repository. Since the pull requests are initiated from your forked repository on Github you want to keep that one in sync too:
```shell
git push origin fix_setup_page_180
```
#### Return to Work on your code :)
### Push commits to your repository
When you have completed your code changes, you can now push your code to your origin repository.
```bash
git push origin fix_setup_page_180
```
Your code is now in your origin repository and ready to send to AppFlowy.
### Create your PR
Finally, go to the [AppFlowy repository](https://github.com/AppFlowy-IO/appflowy) on GitHub and click on "Pull Request".
Upon doing this, you will be presented with a page that will show you the differences of the changes you made. Double check them to make sure you are making right pull request against the correct branch.
Things to check here are that the base fork is the upstream repo and the branch for the upstream repo is main, and that the head fork is your fork and the branch is the branch you wish to make the pull request from (fix\_setup\_page\_180).
Enter a descriptive title in the title field. This is very important, as it is what will show up in the pull request listing and in email notifications to the people in the repo. Pull Requests with undescriptive titles are more likely to be passed by. If the pull request fixes an issue, put the issue number in the pull request description, not the title. People generally do not know issues by number, so a pull request that is just titled "fix for issue #180" is more likely to be passed by, as it is unclear what it does from the title.
If there is more description or discussion about the pull request than what fits in the title field use the description field.
If the pull request fixes an issue, you should add "fixes #180" (replace 180 with the actual issue number) in the pull request description. This exact format, "fixes #180" is important, as it will cause Github to automatically close the issue when the pull request is merged.
Your PR is now sent to AppFlowy where we will review your code and supply with you with any comments and suggestions that have to be applied to your code in order for it to be merged in the AppFlowy project.
### All PRs must be peer reviewed
Every PR that is submitted will be reviewed by one or more AppFlowy maintainers. This is to ensure that there aren't any typos or mishaps in the code as the benefits of code review are widely accepted as a quality improvement and control strategy. Peer review contributes a measure of quality control practices to software development by allowing teams to review their development artifacts early and often. Open source software projects such as AppFlowy know this first hand! As we deal with the constraints presented by tight budgets and constantly rotating staff of developers all based in different time zones. We consistently experience the development challenges exacerbated by geographically dispersed and virtual teams. In our situation, the ability to review our code collaboratively breaks down the silos of isolation and helps everyone better understand the state of the project.
### Keep the main branch prestine
AppFlowy is a Continuous Integration project which means that the anyone can clone the HEAD of the main branch at any time and the application must be in working order. Therefore, the main branch must never be in an error state, it must always be deployable and in running order. A PR that does not pass the CI tests as well as peer review will not be merged into the main branch.
### React to Pull Requests comments
Once you have created the pull request, it will likely be reviewed and some additional fixes will be necessary. **Do not create a new pull request**. Rather, simply make more commits to your branch and push them to your origin repo. They will be added to the pull request automatically. Here are the steps to follow if the AppFlowy project maintainers have made any comments on your code:
1. Update your local repository. Maybe a few days have passed since you worked on the project. So you want to make sure that your local repo is up to date.
* Make sure you are on the correct branch
```shell
git checkout fix_setup_page_180
```
* Get the changes from upstream.
```shell
git pull --rebase upstream main
```
2. Make the required changes in your branch, as normal.
3. Once you are happy with your changes, push them to your origin repository, this will automatically update your PR.
```shell
git push origin fix_setup_page_180
```
Repeat this process until the changes are accepted and merged.
### After your PR has been merged.
Congratulations!! And thank you for contributing to AppFlowy!
1. Now you can get rid of your old fix branches that have already been merged into the code (otherwise you'll have tons of useless branches in your project). You can take a look at your local branches by issuing the following command
```shell
git branch
```
2. If in that list you find a branch that has already been merged with the upstream project then you can delete it:
* Delete it locally
```shell
git branch -D fix_setup_page_180
```
* Delete it from your origin repository
```shell
git push origin --delete fix_setup_page_180
```
That's it. The complete story of how to work on code in separate branches, update repositories, make and finish PRs. You're now a PR PRo! :D
We hope that you have fun working on AppFlowy and we look forward to working together with you.
This document was heavily based on [this Stack Overflow article](https://stackoverflow.com/questions/20956154/whats-the-workflow-to-contribute-to-an-open-source-project-using-git-pull-reque)
# Coding Standards and Practices
# Rust Backend
## Implementing New Handlers with Data Validation
When implementing a new handler in Rust, particularly for data processing or API request handling, it is crucial to ensure that the input data is valid and meets the expected criteria. This is where data validation comes into play.
The `validator` crate in Rust is an excellent tool for this purpose. It offers a comprehensive suite of validators that can be readily used to enforce various constraints on your data structures. From checking string lengths to validating numerical ranges and patterns, `validator` covers a wide array of common validation needs.
### Utilizing the `validator` Crate
Here’s how you can integrate the `validator` crate into your Rust application:
1. **Integration**: Include the `validator` crate in your `Cargo.toml` to get started. This crate provides the `Validate` trait that you can derive for your structs.
2. **Applying Validators**: Use the provided validators to annotate your struct fields. For instance, to ensure a string field is not empty, you can use validators like `length(min = "1")`.
3. **Custom Validators**: For more specific or complex validation logic that isn't covered by the built-in validators, you can define custom validators. For example, `required_not_empty_str` is a custom validator defined in `lib_infra::validator_fn`.
### Example: Validating Handler Input Data
In the context of your Rust application, consider the following struct representing data to be imported into AppFlowy:
```rust
use flowy_derive::ProtoBuf;
use validator::Validate;
#[derive(ProtoBuf, Validate, Default)]
pub struct ImportAppFlowyDataPB {
#[pb(index = 1)]
#[validate(custom = "lib_infra::validator_fn::required_not_empty_str")]
pub path: String,
#[pb(index = 2, one_of)]
pub import_container_name: Option,
}
```
In this example:
* The `ImportAppFlowyDataPB` struct is defined with fields that need validation.
* The `path` field is validated using a custom validator `required_not_empty_str` to ensure it's a non-empty string.
* The `import_container_name` field is optional and does not require such strict validation.
### Handling the Validation in Handlers
When writing a handler function, such as `import_appflowy_data_folder_handler`, you should include validation logic to ensure that incoming data meets the expected criteria before proceeding with the handler’s core functionality:
```rust
pub async fn import_appflowy_data_folder_handler(
data: AFPluginData,
) -> Result<(), FlowyError> {
// Perform validation
let data = data.try_into_inner()?;
// Handler logic goes here
Ok(())
}
```
In the handler:
* The `try_into_inner` method is called on the `data` object. This method automatically performs all the validations defined in the struct.
* If validation fails, an error is returned. This error can be converted or logged according to your application's error handling strategy.
# AppFlowy
Welcome to the AppFlowy software development documentation. Here you will find all of the resources that you need to start developing the AppFlowy project.
These pages will guide you through the stages of setting up your development environment, connecting to our code base, learning how to code for AppFlowy, and finally submitting code to the project.
## Environment setup
In order to start developing you will need to set up your environment. We have set up instructions for Linux, MacOS, and Windows.
{% content-ref url="/pages/reM5WrqTPe1QcLS8EeLL" %}
[Building on Linux](/docs/documentation/appflowy/from-source/environment-setup/building-on-linux)
{% endcontent-ref %}
{% content-ref url="/pages/aChlxW6lI7bvFqOExjbX" %}
[Building on macOS](/docs/documentation/appflowy/from-source/environment-setup/building-on-macos)
{% endcontent-ref %}
{% content-ref url="/spaces/vs4LQcuzr0JR34ApS5sM/pages/Eq5Ta3tUwioCOO7AHFrn" %}
[Building on Windows](/docs/documentation/appflowy/from-source/environment-setup/building-on-windows)
{% endcontent-ref %}
## Coding Conventions
{% content-ref url="/pages/46722ohYHV2Vx4Xa9zX6" %}
[Git Conventions](/docs/documentation/software-contributions/conventions/git-conventions)
{% endcontent-ref %}
{% content-ref url="/pages/BC2AGL4wWD2E45UHlukO" %}
[Code Conventions](/docs/documentation/software-contributions/conventions/code-conventions)
{% endcontent-ref %}
{% content-ref url="/pages/QysOXXB4qLN3JYgYWEpD" %}
[Naming Conventions](/docs/documentation/software-contributions/conventions/naming-conventions)
{% endcontent-ref %}
## Architecture documentation
{% content-ref url="/pages/5dlAz5QqJLm8v1okJ0tf" %}
[Architecture](/docs/documentation/software-contributions/architecture)
{% endcontent-ref %}
* [How we built AppFlowy with Flutter and Rust](https://blog-appflowy.ghost.io/tech-design-flutter-rust/)
* [How we built a highly customizable rich-text editor for Flutter](https://blog-appflowy.ghost.io/how-we-built-a-highly-customizable-rich-text-editor-for-flutter/)
## How-tos
{% content-ref url="/pages/IEHViTtabpOP2kxI1rW6" %}
[Translate AppFlowy](/docs/documentation/appflowy/translation)
{% endcontent-ref %}
{% content-ref url="/pages/jEPs8tRXM5VHl1092w2x" %}
[Submitting your first Pull Request](/docs/documentation/software-contributions/submitting-code/submitting-your-first-pull-request)
{% endcontent-ref %}
# How to contribute to AppFlowy
Table of Contents
1. [Introduction](#introduction)
2. [Before You Get Started](#before-you-get-started)
3. [How to Connect With the Team](#how-to-connect-with-the-team)
4. [How to Identify and Open Your First PR](#how-to-identify-and-open-your-first-pr)
5. [How to Propose New Features for Appflowy (Via Github Issues)](#how-to-propose-new-features-and-changes-for-appflowy)
6. [My Experience Handling First PR](<#my experience-handling-my-first-pr>)
7. [How to Best Engage With the Community](#how-to-best-engage-with-the-community)
8. [Resources for Getting Started With Technical Contributions](#resources-for-getting-started-with-technical-contributions)
9. [Other Initiatives by Appflowy](#other-initiatives-by-appflowy)
10. [Conclusion](#conclusion)
## Introduction
AppFlowy is a productivity tool that streamlines note-taking and task management. This is an open-source project, which means that its code is available to everyone for development and customization!
Whether you're an aspiring developer, a seasoned programmer, or someone genuinely interested in technology, this guide is here to help you navigate the exciting world of open-source development with AppFlowy!
### Overview
We will explore the process of contributing to AppFlowy and provide practical tips on how to make your first contribution.
We'll demystify the process, highlight the benefits, and equip you with the essential tools and resources to get started on your open-source journey with AppFlowy.
Throughout this guide, we'll address common questions you may have, such as:
1. How do I contribute to AppFlowy?
2. How do I connect with the team?
3. How do I identify and open my first Pull Request?
4. How do I propose new features for AppFlowy?
5. How can I best engage with the community?
Let's dive in!
([back to top](#introduction))
## Before You Get Started
If you are new to open-source development, this document will guide you through the process.
If you've worked on open-source projects before, much of this will seem familiar to you. However, we still recommend you review this guide to make sure you are adhering to our processes and conventions.
AppFlowy is managed via GitHub, a popular version control system.
You'll need a [GitHub account](https://docs.github.com/en/get-started/signing-up-for-github/signing-up-for-a-new-github-account) to get started.
We recommend getting familiar with GitHub's features, especially [GitHub Workflows](https://docs.github.com/en/actions/using-workflows), before starting with contributions.
Please also familiarize yourself with the AppFlowy [Code & style conventions](https://docs.appflowy.io/docs/documentation/software-contributions/conventions) and [Code cubmission guidelines](https://docs.appflowy.io/docs/documentation/software-contributions/submitting-code) before you submit your code.
## How to Connect With the Team
The best ways to connect with the team are via **Discord** and **GitHub**.
### Using Discord to Connect With the Team
Create a Discord account and join the [AppFlowy Community Server](https://discord.com/invite/9Q2xaN37tV).
* Start by introducing yourself in the intros channel.
* Read carefully through the welcome channel. You must abide by the server's rules and regulations.
Don't be afraid to ask questions! If you have any questions, tag the AppFlowy Team or AppFlowy Contributors by sending a message with a tag (@AppFlowy Team ) for the same.
Welcome Page - AppFlowy Discord Server
### Using GitHub to Connect With the Team
You can get started by asking questions in the [GitHub Discussions](https://github.com/AppFlowy-IO/AppFlowy/discussions) section of AppFlowy.
GitHub Discussions provides a forum for AppFlowy contributors to ask questions, share ideas, engage with other community members, and subsequently welcome others who join in down the road.
The AppFlowy Discussions Page
* Navigate through the various categories, including announcements, ideas, polls, etc.
* Use the [General Help Wanted](https://github.com/AppFlowy-IO/AppFlowy/discussions/categories/general-help-wanted) and [Technical Help Wanted](https://github.com/AppFlowy-IO/AppFlowy/discussions/categories/technical-help-wanted) sections to find open projects for first-time contributors.
* Explore AppFlowy's [6 Month Technical Roadmap](https://github.com/AppFlowy-IO/AppFlowy/discussions/1715) to gain a better understanding of AppFlowy's current development goals over the course of the next 6 months.
### Using Email to Connect With the Team
You can get in touch with the team via email at .
## How to Identify and Open Your First PR
Contributions are made via Pull Requests (PRs).
We recommend getting familiar with the [GitHub flow](https://docs.github.com/en/get-started/quickstart/github-flow) for collaborating on projects and setting up your development environment.
Once you're ready, start looking for a PR to work on. If you need help getting started, look at [AppFlowy's documentation](https://appflowy.gitbook.io/docs/essential-documentation/contribute-to-appflowy/software-contributions).
### Finding an Issue to Work On
**Step 1:** Go to [AppFlowy's repository](https://github.com/orgs/AppFlowy-IO/repositories) section on GitHub. This is a list of all of AppFlowy's repositories open for contributions. For the purposes of this article, we shall be looking for *Issues* within the main [AppFlowy](https://github.com/AppFlowy-IO/AppFlowy) repository.
AppFlowy Github Page - With all open-source repositories that can be worked on
**Step 2:** Go to the *Issues* section of the repository. It should look something like this:
Issues Section
**Step 3:** Go to the label subsection, and type in "Good First Issue for Devs"
Label Subsections Within Issues
**Step 4:** Here, you can go through a list of *Issues* that can be worked on. They're fairly straightforward and can help you get accustomed to the development environment as well as the codebase.
Feel free to ask anyone from the AppFlowy team for suggestions or to assign you to an Issue.
Good First Issue for Devs
Issues are generally categorized into either a Feature \[FR] or a Bug \[Bug]. You can take a look at the description provided for the given issue.
Send a message down in the comments section to get the issue assigned to yourself. Once that's done, you are ready to begin coding!
Note:
* Don't worry about being assigned before starting work on it. Even if you aren't assigned, all pull requests that solve a GitHub issue are appreciated.
* However, please do understand that even though you can work on issues that haven't been assigned to you, there is an increased possibility that this will lead to merge conflicts should it end up being assigned to someone else.
* You are also free to suggest improvements on an issue assigned to someone else.
An example of an issue that can be worked on. Remember to message the maintainers first!
### Working on Your Issue
As mentioned previously, we expect you to make contributions using the [GitHub Workflow](https://docs.github.com/en/get-started/quickstart/github-flow).
That means following these standard steps:
1. Create your own branch within your forked repository
2. Set up your development [environment](https://docs.appflowy.io/docs/documentation/appflowy#environment-setup)
3. Make changes to the codebase in accordance with the requirements and tasks present in the *Issue* that you have chosen to work on
4. Add unit tests for any new features as necessary
5. Push the changes to your branch and create a Pull Request for the same
6. Ask for a code review for your PR and make changes as required
7. Pass all the automated tests that have been put in place
8. Handle merge conflicts
9. Wait for approval from the AppFlowy team. Once approved, merge your branch
10. Delete your branch once the PR has been merged
Congratulations on completing your first PR!
## How to Propose New Features and Changes for AppFlowy
You can propose your own ideas for improving AppFlowy. Below is a walkthrough on how to do so using GitHub Issues:
Step 1: Go to [AppFlowy's repository](https://github.com/orgs/AppFlowy-IO/repositories) section on GitHub. Here you can see all of Appflowy's Open-Source repositories to which you may contribute. For the purposes of this article, we shall be looking at the main [AppFlowy](https://github.com/AppFlowy-IO/AppFlowy) repository.
Step 2: Click on the "New Issue" section of the repository. The subsequent page should look something like this:
Create New Issues Page
Step 3: Here, you can choose either to propose a feature change, or address a bug. For the purpose of this article, we shall choose the "Create New Feature" option.
Step 4: On entering the type of issue, you will be redirected to a "Feature Request" form.
Fill in all the fields, including:
* the title
* a detailed description of what the feature aims to do
* its potential impact
* any other additional context needed to better understand the proposed feature.
Step 5: Click "Submit new issue" and you're done!
Feature Submit Form
Congratulations on submitting your first feature!
## My Experience Handling My First PR
In this section, I will highlight my personal experience with AppFlowy, from why I decided to contribute, the workflow that I followed, and the overall experience of going about Open-Source development.
### Why I Decided to Contribute to AppFlowy
My first contribution for AppFlowy came during the [GitHub Octernships](https://education.github.com/students/octernships) season. I had heard about the GitHub Octernships through a promotional video that I had found on YouTube.
Considering how similar it was to GSOC and other Open Source initiatives, I was interested in trying it out. I registered for the event, and after careful consideration, decided to choose AppFlowy as one of my four entries.
The initial appeal of AppFlowy was clear, it was a productivity tool suite, competing with heavyweights like Notion and Todoist, and most importantly, it was Open Source in nature. That meant a third-year junior like myself could have a shot at development experience, without much hassle.
AppFlowy is built out of Flutter and Rust, which were completely new to me. However, considering the pros of the Octernships program, I decided to enroll anyway. I joined the AppFlowy Discord Server, introduced myself, and quickly got down to completing the assignment.
This brought me to handling a PR for any first-time issue for Junior Devs. This was a compulsory part of the Octernships application, which officially started my Open Source journey with AppFlowy.
### Searching for My First Issue
I began by searching for issues on the main AppFlowy repository.
I had contributed to minor open-source projects before and knew how one generally went about contributing to open-source repositories. I entered the words "good-first-issue" in the label bar and selected the first option, i.e., good first issues for junior devs.
This was my first time working with Flutter, so I decided it was best that I started out with something easy. I decided to go ahead with issue [#1059 - Support markdown to italicize text](https://github.com/AppFlowy-IO/AppFlowy/issues/1059).
The requirements were fairly simple: *Add a function to enable italics via the use of single asterisks.*
After going through the codebase, I knew it would just involve copying and editing a pre-existing function that did the same for underscores, so I decided to go ahead with it.
A view of the issue that I decided to take on
I started by asking one of the moderators if I could work on the issue. The core team got back to me on what I could work on, specifically with respect to the given issue. Once I got assigned the issue, I was ready to get started.
Always Ask Questions - Clarify your thoughts, as well as your plans for implementation with the Team
### How I Solved It
As mentioned before, it was a fairly straightforward issue, with code already present in the codebase that could be reused for the same.
However, I had a lot of trouble setting up my development environment. This is a common issue for first-timers, so don't worry if you have trouble setting up your environment as well.
I had issues with the unpacking of the cargo files for the Rust backend. This mostly came down to my antivirus flagging all the incoming files needed for development.
It took a while of troubleshooting, and asking for help from the community, but I was eventually able to figure it out and get the environment up and running.
Some things that I did to smoothen my onboarding experience included:
* Read up on AppFlowy's documentation and search for cases where this bug has been encountered before, and how it was dealt with.
* Searching on online platforms for cases where such an error was encountered before. This included combing through popular sites like Stack Overflow, other GitHub repositories, BitBucket, etc. for any instances where this issue had occurred before, and any potential fixes for the same.
* Creating an issue in the Issues tab and highlighting the exact problem that I faced. I carefully detailed the exact issue that I was facing, including screenshots, error messages, and any other relevant information pertaining to the issue that I was facing. (You can have a look at Issue [#2045](https://github.com/AppFlowy-IO/AppFlowy/issues/2045). This is a fairly good example of how one can approach roadblocks on their development journey).
An example of an issue created to help gain feedback from the community on how to best tackle it
* Asking on Discord - you may do so on the flutter-101 and rust-101 channels.
Following these steps helped me successfully fix the issue that I was facing.
Also, *always document* everything that occurs during the lifecycle of an issue resolution within your Issue and PR. Doing so will help future contributors who might encounter the same issue down the road.
With the environment up and running, it was time to make the changes needed to fulfill the task at hand.
I added the function required, tested it manually in my local environment, and pushed the ensuing commit into my forked repository's branch. I then created a pull request for the same and awaited my first code review.
### Clarifying Doubts With Maintainers
As always, feel free to ask questions when you have doubts and seek suggestions from the maintainers and the core team. You can ask questions related to any feature you'd like to implement, any bug that you've encountered, and so on.
An example of a community member helping me resolve an issue
### How I Handled Code Reviews With the Team
As a first-time contributor to a repository, you will be asked to sign the CLA, i.e., the [Contributor License Agreement](https://en.wikipedia.org/wiki/Contributor_License_Agreement).
Once that's done, your Pull Request will be assigned to one or more reviewers. They are generally members of the core AppFlowy team or senior contributors. They know the codebase in and out, so feel free to ask for suggestions on how to tackle any developmental issue that you may face.
My reviewers left some suggested changes for the Pull Request, including changing keyboard conventions and other small changes.
An example of a suggested review left by reviewers during a dode review of a pull request
Another requirement that was put forward by the team was to make unit tests for the new feature.
Unit testing is important as it makes sure that individual changes made to a codebase function as intended. I had a horrid time writing these unit tests, as I was still very new to Flutter. But as always, feel free to ask for help.
Asking for help - just do it!
Always make sure you conform to the conventions put in place by the team such as:
* Pull Request naming conventions
* Following commit message guidelines
* Eliminating warnings and TODOs
For more information on the naming conventions used in AppFlowy, check out our [code submission guidelines](https://appflowy.gitbook.io/docs/essential-documentation/contribute-to-appflowy/software-contributions/submitting-code/code-submission-guidelines)
Make sure you use the naming conventions specified by the AppFlowy documentation
Ended up having trouble with squashing some commits as well. This really was quite the journey 😅
Overall, I think I made quite a mess with my first Pull Request. From horrible coding practices to terrible naming conventions, I had it all!
But thanks to the community, I was able to navigate the entire process with relative ease. A big thank you to [Xazin](https://github.com/Xazin) and [LucasXu0](https://github.com/LucasXu0) for all their help and support.
This really is what I admire the most at AppFlowy: the **Community**.
So stay hungry, always be open to suggestions, and you'll be surprised by just how much you can learn while working on a large-scale, open-source collaborative project like AppFlowy.
### The Final Merge Request
The first of many more Pull Requests!
### Things That I Learnt Through This Whole Experience
To summarize, here are my key takeaways from the entire experience:
* Be open to suggestions and constructive criticism. We can't learn if we close our minds to change.
* Learn the languages and frameworks of the codebase! I cannot stress this enough. Try to have a firm understanding of the basics of the frameworks and languages used, namely Flutter and Rust. Feel free to refer to the Section [Resources for Getting Started With Technical Contributions](#resources-for-getting-started-with-technical-contributions) below for the same.
* Follow the conventions and standards put in place. Be it coding or naming conventions, make sure you follow the conventions put in place by the community.
* Feel free to ask questions! But at the same time, make sure you've done your research. Whenever you encounter a roadblock, try Googling the issue first. Chances are, you'd be able to get an answer to your question without having to wait for a community member to respond. In case you're truly stuck, do not be afraid to reach out. The community is behind you every step of the way.
* Document everything! Make sure to document any bugs and issues that you encounter. These can be useful to future contributors down the road, who may encounter the same.
([back to top](#introduction))
## How to Best Engage With the Community
Here are some best practices to engage with the community here at AppFlowy:
* Use welcoming and inclusive language
* Be respectful of differing viewpoints and experiences
* Gracefully accept constructive criticism
* Focus on what is best for the community
* Show empathy towards other community members
You can report instances of abusive, harassing, or otherwise unacceptable behaviour by emailing the project team at .
All complaints will be reviewed and investigated, resulting in a response that is deemed necessary and appropriate to the circumstances. The project team is obligated to maintain confidentiality with regard to the reporter of an incident. Further details of specific enforcement policies may be posted separately.
([back to top](#introduction))
## Resources For Getting Started With Technical Contributions
This might be a lot to take in, especially if you're a newcomer.
We have curated some links to kickstart your journey with AppFlowy. These include documentation for the technologies and frameworks used for maintaining and developing AppFlowy.
Feel free to read up on anything that might be unfamiliar to you. It goes a long way!
* [Git](https://git-scm.com/)
* [GitHub Flow](https://docs.github.com/en/get-started/quickstart/github-flow)
* [Flutter](https://flutter.dev/learn)
* [Rust](https://www.rust-lang.org/learn)
* [AppFlowy Documentation](https://appflowy.gitbook.io/docs/essential-documentation/readme)
([back to top](#introduction))
## Other Initiatives by AppFlowy
Here at AppFlowy, we foster learning through various initiatives. It's our goal to help anyone who stops by in their developmental journey as much as possible.
With this in mind, here are some initiatives by AppFlowy for the same:
* The [AppFlowy Mentorship Program](https://appflowy.gitbook.io/docs/essential-documentation/contribute-to-appflowy/appflowy-mentorship-program/contributor-guidance) is aimed at creating a hands-on learning opportunity for new developers who may otherwise lack the opportunity to gain exposure to real-world software development and entry into the technical community.
* GitHub Octernships
* The [Write for Appflowy](https://appflowy.gitbook.io/docs/essential-documentation/contribute-to-appflowy/write-for-appflowy) initiative allows you to share your knowledge to benefit the entire AppFlowy community, whether you’re an AppFlowy power user, a software development expert, or just a student starting to get into open source.
([back to top](#introduction))
## Conclusion
You should now be well-equipped to embark on your own open source journey. By following the guidelines in this article, you will be able to successfully resolve pull requests and engage meaningfully with other project contributors.
We hope you participate in AppFlowy's development and make an impact either through coding, bug reporting, feature suggestions, documentation. Contributing to this project and building relationships within the AppFlowy community not only fosters collaboration but also offers opportunities for learning and growth.
We invite you to start contributing to AppFlowy right away by selecting an [issue to work on](https://github.com/AppFlowy-IO/AppFlowy/issues).
Happy Coding!
([back to top](#introduction))
# Building from Source
You can also build AppFlowy directly from the source code if you like. Maybe you want to suit it to your needs, or maybe you want to contribute your talents to the project.
You can find instructions for the supported operating systems :
* [Building on Linux](/docs/documentation/appflowy/from-source/environment-setup/building-on-linux)
* [Building on MacOS](/docs/documentation/appflowy/from-source/environment-setup/building-on-macos)
* [Building on Windows](/docs/documentation/appflowy/from-source/environment-setup/building-on-windows)
{% content-ref url="/pages/BaxVrQxAZjFSHzm2Sj4I" %}
[Flutter Setup](/docs/documentation/appflowy/from-source/environment-setup)
{% endcontent-ref %}
# Flutter Setup
We have set up instructions for Linux, MacOS, and Windows.
{% hint style="warning" %}
Flutter version 3.27.4 is the version that AppFlowy is built and tested on. If you installed Flutter before, make sure the version matches AppFlowy's. And don't forget to run the following command to activate the protoc plugin.
```dart
dart pub global activate protoc_plugin 21.1.2
```
{% endhint %}
{% hint style="warning" %}
Rust version updates regularly (currently 1.80.1). If you have installed Rust before, make sure the stable version matches AppFlowy's (see `RUST_TOOLCHAIN` in `.github/workflows`).
{% endhint %}
[Building on Linux](/docs/documentation/appflowy/from-source/environment-setup/building-on-linux)
[Building on MacOS](/docs/documentation/appflowy/from-source/environment-setup/building-on-macos)
[Building on Windows](/docs/documentation/appflowy/from-source/environment-setup/building-on-windows)
[Building on iOS](https://github.com/AppFlowy-IO/documentations/blob/main/essential-documentation/contribute-to-appflowy/software-contributions/environment-setup/building-on-ios.md)
# Building on Linux
**Notes:**
* The following steps are verified on
* [x] Lubuntu 20.04 - x86\_64
* [x] Linux Mint 20.3 - x86\_64
* [ ] Ubuntu 20.04 - aarch64
* [x] Ubuntu 22.04 - x86\_64
* [ ] Redhat Linux - x86\_64
* [x] Fedora 37 - x86\_64
* [x] Arch Linux - x86\_64
* [ ] Deepin - x86\_64
* [ ] Raspberry Pi OS - aarch64
* You may need to disable hardware 3D acceleration if you are running AppFlowy in a VM. Otherwise, certain GL failures will prevent the app from launching.
* This guide assumes that you are using the **bash** shell on Linux. You can however, replicate these steps on **zsh** or other alternative Linux terminal shells, with minor alterations.
{% hint style="warning" %}
**If you encounter any issues, have a look at** [**Troubleshooting**](https://appflowy.gitbook.io/docs/essential-documentation/contribute-to-appflowy/software-contributions/environment-setup/trouble-shotting) **first. If your issue is not included in the page, please create an** [**issue**](https://github.com/AppFlowy-IO/appflowy/issues/new/choose) **or ask on** [**Discord**](https://discord.gg/9Q2xaN37tV)**.**
{% endhint %}
{% hint style="danger" %}
**Attention:** There is an issue affecting Ubuntu 22.04, Fedora 37, and PopOS 22.04:
Failed to load dynamic library 'libdart\_ffi.so': libssl.so.1.1: cannot open shared object file: No such file or directory. The issue can be fixed by installing the required missing libraries:
**For Fedora Workstation:**
```shell
sudo dnf install openssl-devel
```
**For Fedora Silverblue:**
```shell
rpm-ostree upgrade
rpm-ostree install openssl1.1.x86_64
```
For Silverblue, it is necessary to perform both the upgrade and the installation.
**For Ubuntu & PopOS:**
1. Download the required package by executing the following command:
```shell
wget http://archive.ubuntu.com/ubuntu/pool/main/o/openssl/libssl1.1_1.1.0g-2ubuntu4_amd64.deb
```
2. Install the downloaded package using the following command:
```shell
sudo dpkg -i libssl1.1_1.1.0g-2ubuntu4_amd64.deb
```
If the provided link for Ubuntu & PopOS is expired or returns an error 404, you can search for "libssl1.1\_1.1.1" on the [page](http://nz2.archive.ubuntu.com/ubuntu/pool/main/o/openssl/?C=M;O=D).
{% endhint %}
### Step 1: Get the source code
Clone the source code from our Github project.
```shell
git clone https://github.com/AppFlowy-IO/AppFlowy.git
```
{% hint style="warning" %}
Ensure that git is installed in your system!! Use your package manager to install git if your distribution doesn't ship with git.
```bash
# Ubuntu
sudo apt install git
```
```bash
# Fedora
sudo dnf install git
```
```bash
# Arch
sudo pacman -S git
```
{% endhint %}
{% hint style="info" %}
You should fork the code instead if you wish to submit code to AppFlowy. You will find information on that in [Setting Up Your Repositories](/docs/documentation/software-contributions/submitting-code/setting-up-your-repositories).
{% endhint %}
Image: Cloning the source from the Github repository.
#### **Install flutter (three different methods):**
{% hint style="danger" %}
Flutter version 3.27.4 is the recent supported stable release used for building AppFlowy. Building with the latest stable Flutter release is not tested and might throw errors while building.
{% endhint %}
* **Method 1:** Install flutter according to . Make sure to install flutter in a directory that is appropriate for you.
* **Method 2:** You can use the code below to install flutter manually on your linux system.
```bash
git clone https://github.com/flutter/flutter.git --branch 3.27.4
cd flutter
echo -e "\nexport PATH=\$PATH:"`pwd`"/bin" >> ~/.bashrc
source ~/.bashrc
flutter
cd ..
```
Image: Installing flutter manually.
* **Method 3**: You can also use a runtime version manager like [asdf](https://asdf-vm.com/) or a flutter-specific version manager to install flutter on your system. Assuming you are using the **bash** shell, follow these steps:
1. Clone asdf.
```bash
git clone https://github.com/asdf-vm/asdf.git ~/.asdf --branch v0.11.1
```
2. Add the path to asdf and enable asdf auto-completion in your shell.
```bash
echo -e '\n# asdf configuration \n. "$HOME/.asdf/asdf.sh"\n. "$HOME/.asdf/completions/asdf.bash"' >> ~/.bashrc
source ~/.bashrc
```
{% hint style="warning" %}
If you are not using **bash**, check the official [asdf guide](https://asdf-vm.com/guide/getting-started.html) to learn how to set up asdf for your shell.
{% endhint %}
3. Install flutter via asdf and set it as your local runtime at the AppFlowy source directory (`xx/AppFlowy/`).
```bash
cd AppFlowy
asdf plugin-add flutter
asdf install flutter 3.27.4-stable
rm -rf .tool-versions
asdf local flutter 3.27.4-stable
cd ..
```
{% hint style="warning" %}
Some distributions might miss certain packages essential for asdf, such as `jq`, `curl`, or `wget`. Please make sure they are installed via your package manager.\
\
👉 **Ubuntu 22.04** does not come with the package `jq` installed by default, you will have to install by doing:
```bash
sudo apt install jq
```
{% endhint %}
Image: Installing flutter using asdf
#### **Setting up your development environment**:
Run the setup script from the base directory. (**Note:** You can skip this step if you installed rust using asdf and set it as the local runtime inside the`xx/AppFlowy/` source.)
```bash
cd AppFlowy
./frontend/scripts/install_dev_env/install_linux.sh
source ~/.bashrc
```
{% hint style="warning" %}
**If you get this warning:**
***
`Warning: Pub installs executables into $HOME/.pub-cache/bin, which is not on your path. You can fix that by adding this to your shell's config file (.bashrc, .bash_profile, etc.):`
`export PATH="$PATH":"$HOME/.pub-cache/bin"`\
\
Then run the following command to add the path inside your shell configuration dotfile (`.bashrc`, `.zshrc`, etc.). For **bash** users:
```bash
echo -e '\nexport PATH="$PATH":"$HOME/.pub-cache/bin"' >> ~/.bashrc
source ~/.bashrc
```
OR, alternatively run this in your shell every time you build AppFlowy:
```bash
export PATH="$PATH":"$HOME/.pub-cache/bin
```
{% endhint %}
Image: "Warning: Pub installs executables into $HOME/.pub-cache/bin, which is not on your path."
### Step 3: Build AppFlowy (Flutter GUI application)
Change your path to the `frontend` directory.
```bash
cd frontend
```
#### Building the AppFlowy binary:
{% tabs %}
{% tab title="Release binary" %}
```bash
cargo make --profile production-linux-x86_64 appflowy
```
{% endtab %}
{% tab title="Debug binary" %}
```bash
cargo make --profile development-linux-x86_64 appflowy-dev
```
{% endtab %}
{% endtabs %}
You will find the binary in `frontend/appflowy_flutter/product/[version in x.x.x]/linux/[Binary type (Release/ Debug)]/AppFlowy/`.
Image: Building AppFlowy
### Step 4: Run the application
#### For running the release binary:
```bash
cd appflowy_flutter/product/[version number in x.x.x]/linux/Release/AppFlowy
./app_flowy
```
#### For running the debug binary:
```bash
cd appflowy_flutter/product/[version number in x.x.x]/linux/Debug/AppFlowy
./app_flowy
```
{% hint style="info" %}
If you do not know the version number for the AppFlowy binary that you have built, please use your terminal shells' tab completion, or type and enter the`ls`(list) command to reveal the name of folder which is the version number you are building.
**The current version of AppFlowy is 0.1.0.**
{% endhint %}
A new window as shown below will show up after you run the application:
Image: AppFlowy window
If using a virtual machine, run the Linux GUI application through x11 on windows (use MobaXterm) for instance:
`export DISPLAY=localhost:10`
### Miscellaneous: Running the application without building (using VS Code)
{% hint style="warning" %}
**Do not use the flatpak distribution of VS Code!**\
\*\*\*\*The flatpak VS Code is sandboxed and uses an isolated shell environment, and cannot access any binaries or libraries installed in your system, including your default system shell.
{% endhint %}
1. Open the `frontend` folder located at `xx/AppFlowy/` with VS Code.
2. Go to the Run and Debug tab and then click AF-desktop: Clean + Rebuild All for the first time running.

# Building on macOS
**Note:**
* If you encounter any issues, have a look at [Troubleshooting](https://github.com/AppFlowy-IO/appflowy/wiki/Troubleshooting) first. If your issue is not included in the page, please create an [issue](https://github.com/AppFlowy-IO/appflowy/issues/new/choose) or ask on [Discord](https://discord.gg/9Q2xaN37tV).
## **Step 1: Get the source code**
{% hint style="warning" %}
You should fork the code instead if you wish to submit code to AppFlowy. You'll find information on that in [Setting Up Your Repositories](/docs/documentation/software-contributions/submitting-code/setting-up-your-repositories)
{% endhint %}
```shell
git clone https://github.com/AppFlowy-IO/AppFlowy.git
```
## **Step 2: Install Flutter**
{% hint style="info" %}
Skip this if flutter is already installed on your system.
{% endhint %}
* Follow the instructions [here](https://flutter.dev/docs/get-started/install) to install Flutter.
* It will ask you to run `flutter doctor` to check any dependencies you need to install to complete the setup.
* It is not necessary to install Android toolchain and Android studio to run AppFlowy.
* However, CocoaPods and VS Code are required.
* Make sure you also install the [Flutter](https://marketplace.visualstudio.com/items?itemName=Dart-Code.flutter) & [Dart](https://marketplace.visualstudio.com/items?itemName=Dart-Code.dart-code) extensions in VS Code.
## **Step 3: Install your build environment**
* Run the setup script from the base directory
* It will guide you through to install Rust, which is required by AppFlowy
```bash
./frontend/scripts/install_dev_env/install_macos.sh
```
> FYI, AppFlowy uses to construct the build scripts. It is important that you add (dart) `pub` to $PATH, otherwise VS Code may error out. Add the following to your `.bashrc` or `.zshrc` in `$HOME`:
>
> ```
> export PATH="$PATH":"$HOME/.pub-cache/bin"
> ```
>
> Make sure to restart your terminal and VS Code
## **Step 4: Edit and run the application**
1. Open the `frontend` folder located at `xx/AppFlowy/frontend` with VS Code. It is important *not* to open the root folder, as that will not give access to the appropriate debug commands.
2. Open `xx/AppFlowy/frontend/appflowy_flutter/lib/main.dart` and then check the device selection: 
3. Go to the Run and Debug tab and then click AF-desktop: Clean + Rebuild All for the first time running.

If you encounter any issues, have a look at [Troubleshooting](https://appflowy.gitbook.io/docs/essential-documentation/contribute-to-appflowy/software-contributions/environment-setup/trouble-shotting) first. If your issue is not included in the page, please create an [issue](https://github.com/AppFlowy-IO/appflowy/issues/new/choose) or ask on [Discord](https://discord.gg/9Q2xaN37tV).
## Building in release mode
1. Go to the AppFlowy/frontend/ directory.
2. Run the following command to build the binary depending on your architecture.
{% tabs %}
{% tab title="x86" %}
```shell
cargo make --profile production-mac-x86_64 appflowy
```
{% endtab %}
{% tab title="arm64" %}
```shell
cargo make --profile production-mac-arm64 appflowy
```
{% endtab %}
{% endtabs %}
The scripts are located in the AppFlowy/frontend/Makefile.toml file.
The resulting binary file is located in `AppFlowy/frontend/appflowy_flutter/product/x.x.x/[OS]/Release/AppFlowy/`.
# Building on Windows
**Notes:**
* The following steps are verified on
* [x] Windows 10 X86\_64
* [ ] Windows 10 arm64
* [x] Windows 11 X86\_64
* [ ] Windows 11 arm64
* Both Windows `cmd` and `powershell` can be used for running commands.
* If you encounter any issues, please have a look at [Troubleshooting](https://github.com/AppFlowy-IO/appflowy/wiki/Troubleshooting) first. If your issue is not included in the page, please create an [issue](https://github.com/AppFlowy-IO/appflowy/issues/new/choose) or ask on [Discord](https://discord.gg/9Q2xaN37tV).\\
**If you prefer a video tutorial click here:**
{% embed url="" %}
video tutorial for building on windows
{% endembed %}
## Step 1: Get the source code
{% hint style="warning" %}
You should fork the code instead if you wish to submit patches. You'll find information on that in [Setting Up Your Repositories](/docs/documentation/software-contributions/submitting-code/setting-up-your-repositories)
{% endhint %}
```shell
git clone https://github.com/AppFlowy-IO/appflowy.git
```
## Step 2: Install your build environment
* Install Visual Studio 2022 build tools. Download from
* In section "All Downloads" => "Tools for Visual Studio 2022" => "Build Tools for Visual Studio 2022".
* Launch `vs_BuildTools.exe` to install.
* Choose "Desktop Development with C++"
* Install vcpkg according to [this page](https://github.com/microsoft/vcpkg#quick-start-windows). Make sure to add vcpkg installation folder to your [PATH environment variable](https://helpdeskgeek.com/windows-10/add-windows-path-environment-variable/).
* Install flutter according to [this page](https://docs.flutter.dev/get-started/install/windows).
* Make sure to use the Flutter 3.27.4 version
```shell
flutter --version
Flutter 3.27.4 • channel stable • https://github.com/flutter/flutter.git
Framework • revision d8a9f9a52e (4 weeks ago) • 2025-01-31 16:07:18 -0500
Engine • revision 82bd5b7209
Tools • Dart 3.6.2 • DevTools 2.40.3
```
* Enable the specified platform first if you don't enable it before and then select the desktop device.
```
flutter config --enable-windows-desktop
```
* Fix any problems reported by flutter doctor
```shell
flutter doctor
```
* Install LLVM
* Based on your platform, install the LLVM using the [LLVM-16.0.0-win64(32)](https://github.com/llvm/llvm-project/releases/tag/llvmorg-16.0.0). Additionally, make sure to add it to the system path.

* Install rust
* Download `rustup.exe` from
* Call rustup.exe from powershell or cmd
```shell
.\rustup-init.exe --default-toolchain stable --default-host x86_64-pc-windows-msvc -y
```
It is a good idea to check your rustc version after this step, and compare it to the current supported one in AppFlowy. Run the command:
```
rustup --version
```
Look for `rustc 1.80.1` - You can find the supported version [here](https://github.com/AppFlowy-IO/AppFlowy/blob/0.5.6/.github/workflows/flutter_ci.yaml#L29).
In case you need to checkout/downgrade your version, you can replace the version number in this command:
```
rustup default 1.80.1
```
* Install cargo make
{% hint style="info" %}
You probably need to re-open your terminal to get the `cargo` command in your PATH
{% endhint %}
```shell
cd AppFlowy/frontend
```
```shell
cargo install --force cargo-make
```
* Install duckscript
```shell
cargo install --force duckscript_cli
```
* Add Powershell to the PATH
Add `C:\Windows\System32` to the PATH to prevent Powershell build commands crashing.
* Install openssl
* Download `openssl_1.1.1n_win32_complete.zip` from
* Run installer and install Openssl where you want
* Add `bin` folder to the PATH (ie: `G:\Compilation\OpenSSL\bin`)
* Create a new User variable (using the same window as the PATH editor): Name it `OPENSSL_DIR` with same value as bin folder (ie `G:\Compilation\OpenSSL\bin`)
*Note:* In cse the OpenSSL link resolves to a dead download, you can install OpenSSL from this [alternative source](https://slproweb.com/download/Win64OpenSSL-1_1_1w.exe). (From [https://slproweb.com/](https://slproweb.com/products/Win32OpenSSL.html))
* Install perl
* Download Perl for Windows (called Strawberry perl) from (choose x64 installer)
* Run installer
* Check Perl is installed with following command
```shell
perl --version
```
* Install Dart extension for Visual Studio Code
* Enable the Dart `protoc_plugin`
```shell
dart pub global activate protoc_plugin 21.1.2
```
* For Windows 11: Activate Developer Mode
* Go to Settings > Privacy & Security > switch ON Developer Mode
## Step 3: Edit and run the application
\[VS Code]
1. Open the `frontend` folder located at xx/AppFlowy/frontend with VS Code.
2. Go to the Run and Debug tab and then click AF-desktop: Clean + Rebuild All for the first time running.

If you encounter any issues, have a look at [Troubleshooting](https://appflowy.gitbook.io/docs/essential-documentation/contribute-to-appflowy/software-contributions/environment-setup/trouble-shotting) first. If your issue is not included in the page, please create an [issue](https://github.com/AppFlowy-IO/appflowy/issues/new/choose) or ask on [Discord](https://discord.gg/9Q2xaN37tV).
## Building in release mode
1. Go to the AppFlowy/frontend/ directory.
2. Run the following command to create the binary.
```bash
cargo make --profile production-windows-x86 appflowy
```
The scripts are located in the AppFlowy/frontend/Makefile.toml file.
The resulting binary file is located in `AppFlowy/frontend/appflowy/product/x.x.x/Windows/Release/AppFlowy/`.
If using a virtual machine
* Run Linux GUI application through x11 on windows (use MobaXterm) for instance:
`export DISPLAY=localhost:10`
# Web Setup
### 🌟 Introduction
Welcome to the AppFlowy Web project! This project aims to bring the powerful features of AppFlowy to the web. Whether you're a developer looking to contribute or a user eager to try out the latest features, this guide will help you get started.
AppFlowy Web is built with the following technologies:
* **React**: A JavaScript library for building user interfaces.
* **TypeScript**: A typed superset of JavaScript that compiles to plain JavaScript.
* **Bun**: A fast all-in-one JavaScript runtime.
* **Nginx**: A high-performance web server.
* **Docker**: A platform to develop, ship, and run applications in containers.
Let's dive in and get the project up and running! 🚀
### 🛠 Getting Started
#### Prerequisites
Before you begin, make sure you have the following installed on your system:
* [Node.js](https://nodejs.org/) (v18.6.0) 🌳
* [pnpm](https://pnpm.io/) (package manager) 📦
* [Jest](https://jestjs.io/) (testing framework) 🃏
* [Cypress](https://www.cypress.io/) (end-to-end testing) 🧪
#### Clone the Repository
First, clone the repository to your local machine:
```bash
git clone https://github.com/AppFlowy-IO/AppFlowy-Web.git
```
#### Install Dependencies
Install the required dependencies using pnpm:
```bash
## ensure you have pnpm installed, if not run the following command
# npm install -g pnpm@8.5.0
pnpm install
```
#### Configure Environment Variables
Create a `.env` file in the root of the project and add the following environment variables:
```bash
AF_BASE_URL=http://localhost:8080
AF_GOTRUE_URL=http://localhost:9999
AF_WS_URL=ws://localhost:8080/ws/v1
```
#### Start the Development Server
To start the development server, run the following command:
```bash
pnpm run dev
```
#### Usage
1. Create a `.env` file in the root of the project and add the following environment variables:
```bash
AF_WS_URL=wss://test.appflowy.cloud/ws/v1
AF_BASE_URL=https://beta.appflowy.cloud
AF_GOTRUE_URL=https://beta.appflowy.cloud/gotrue
```
2. Install **CORS Unblock** extension in your browser to bypass CORS issues. [Chrome](https://chrome.google.com/webstore/detail/cors-unblock/lfhmikememgdcahcdlaciloancbhjino)
3. Open [http://localhost:3000](http://localhost:3000/) to view the application in your browser.
#### 🚀 Building for Production(Optional)
if you want to run the production build, use the following commands
```bash
pnpm run build
pnpm run start
```
This will start the application in development mode. Open to view it in the browser.
### 🧪 Running Tests
#### Unit Tests
We use **Jest** for running unit tests. To run the tests, use the following command:
```bash
pnpm run test:unit
```
This will execute all the unit tests in the project and provide a summary of the results. ✅
#### Components Tests
We use **Cypress** for end-to-end testing. To run the Cypress tests, use the following command:
```bash
pnpm run cypress:open
```
This will open the Cypress Test Runner where you can run your end-to-end tests. 🧪
Alternatively, to run Cypress tests in the headless mode, use:
```bash
pnpm run test:components
```
Both commands will provide detailed test results and generate a code coverage report.
### 🔄 Development Workflow
#### Linting
To maintain code quality, we use **ESLint**. To run the linter and fix any linting errors, use the following command:
```bash
pnpm run lint
```
### 🚀 Production Deployment
Our production deployment process is automated using GitHub Actions. The process involves:
1. **Setting up an AWS EC2 instance**: We use an EC2 instance to host the application.
2. **Installing Docker and Docker Compose**: Docker is installed on the AWS instance.
3. **Configuring SSH Access**: SSH access is set up with a user and password.
4. **Preparing Project Configuration**: We configure `Dockerfile`, `nginx.conf`, and `server.cjs` in the web project.
5. **Using GitHub Actions**: We use the easingthemes/ssh-deploy\@main action to deploy the project to the remote server.
The deployment steps include building the Docker image and running the Docker container with the necessary port mappings:
```bash
docker build -t appflowy-web-app .
docker rm -f appflowy-web-app || true
docker run -d -p 80:80 -p 443:443 --name appflowy-web-app appflowy-web-app
```
The Web server runs on Bun. For more details about Bun, please refer to the [Bun documentation](https://bun.sh/).
# Tauri Setup
## Clone AppFlowy
Clone [AppFlowy](https://github.com/AppFlowy-IO/AppFlowy)
```shell
git clone git@github.com:AppFlowy-IO/AppFlowy.git
```
## Install prerequisites
1. Follow the instructions [here](https://tauri.app/v1/guides/getting-started/prerequisites) to install Tauri
2. Install cargo-make
```shell
# AppFlowy use cargo-make to run the scripts
cargo install cargo-make
```
3. Install AppFlowy dev tools
```shell
# install development tools
cd AppFlowy/frontend
cargo make appflowy-tauri-deps-tools
cd appflowy_tauri
npm install -g pnpm
pnpm install
```
## IDE setup
### VSCode
You can run from VSCode: Open the [**frontend**](https://github.com/AppFlowy-IO/AppFlowy/tree/main/frontend) folder located at `AppFlowy/frontend` with VSCode.

This option enable debugging the [core process](https://tauri.app/v1/references/architecture/process-model#the-core-process) directly. Or you can run manually:
```shell
cd frontend
cargo make tauri_dev
```
### WebStorm
Open the **appflowy\_tauri** folder located at `AppFlowy/frontend/appflowy_tauri` and then run the `tauri:dev`.

## Clean
Remove the build artifacts first when facing compiler errors.
```shell
cd frontend
cargo make tauri_clean
```
# Debugging with AppFlowy Cloud
## Localhost
This guide outlines how to debug the AppFlowy application using AppFlowy Cloud. Start by setting up AppFlowy Cloud on your local machine, as detailed in the [development guide](https://github.com/AppFlowy-IO/AppFlowy-cloud). Once AppFlowy Cloud is running, build the AppFlowy application from its source code and launch it. Navigate to the settings page in the application and choose `AppFlowy Cloud` as your cloud provider. For the server address, enter `http://localhost`. Click `Restart` to save your changes and reinitialize the application.
### Desktop

After restarting, you can log in to the application.

### Mobile


After restarting the application, you'll need to log in. To do this, navigate to the `Setting` page and select `Logout`. This action will redirect you to the login page.

During this process, AppFlowy Cloud will generate logs in the console, allowing you to monitor and debug interactions between the application and the cloud service. Keep an eye on these logs to troubleshoot any issues or to understand how the application communicates with AppFlowy Cloud.
## Self-Hosted Server
Please refer to this [Self-Hosting AppFlowy Cloud](broken://pages/QHG81xxAgRg6WMamzIcF) for more information.
# Debugging in VS Code
Multiple launch configurations and tasks are defined for AppFlowy. These are used in the build process in order to generate needed files, clean up temporary files, and compile the source code.
## Launch Configurations
A launch configuration is what is used when you type `F5` or `Ctrl-F5`to launch the application.
You can select your preferred launch configuration by going to the `Run and Debug` tab in VS Code.
| Name | Description |
| ------------------------------- | ------------------------------------------------------------------------------------------------------------------------------------------------------------------------------------------------------------------------------------------------------------------------------------------------------------------------------------------------------------------------------------- |
| AF-desktop: Build All | This will build the Rust and Dart code of AppFlowy. |
| AF-desktop: Build Dart Only | This will only build the Dart code of AppFlowy. This should be your default when you are working on Flutter code. |
| AF-desktop: Clean + Rebuild All |
This task will:
call the "AF: Clean" task,
rebuild all the generated Files (including freeze and language files)
rebuild the the Rust and Dart code of AppFlowy.
This launch configuration is a convenience. A better way to do this would be to directly trigger the "AF-desktop: Clean + Rebuild All" task.
|
| AF-desktop: Debug Rust | This will show the `lldb` attach menu, in which you should select the `app_flowy` program to debug rust. Please note that this task is only valid when `app_flowy` is running and the `codellb` plugin for VS Code is installed. |
| AF-tauri: Debug backend | Run the tauri application and enable debugging the backend |
Launch configurations are defined in the `/frontend/.vscode/launch.json` file
## Tasks
Tasks are be launched manually (although you are free to keybind them locally). You can see a list of all tasks available by initiating the command palette (`Ctrl-Shift-P`) and then typing "run task".

You can now type "AF:" to see a list of all AppFlowy provided tasks. Click on the desired task to trigger it.

{% hint style="info" %}
We recommend binding the `Alt-T key combination to the "Tasks: Run Task" command. This is done by initiating the command palette (Ctrl-Shift-P`) and then typing "`Open Keyboard Shortcuts`".
{% endhint %}
{% hint style="info" %}
Note that `Ctrl-Shift-B` will trigger the default build task. We have configured `AF: Code Gen` as the default build task.
{% endhint %}
In order to make them easy to identify, all AppFlowy defined tasks are prefixed with "AF: "
| Name | Description | Depend On |
| --------------------------- | ------------------------------------------------------------------------------------------------------------------------------------------------------------------------------------------------------------------------------------------------------------------------------------------------------------ | ---------------------------------------------------------------------------------------------------------------------------------------------------------------------------------------- |
| AF: Clean + Rebuild All | This task will clean the code base, regenerate all needed files, and then build the Rust and Dart code of AppFlowy. |
AF: Clean
AF: Flutter Pub
AF: Flutter Package Get
AF: Generate Language Files
AF: Generate Freezed Files
AF: build\_flowy\_sdk
|
| AF: Build Appflowy Core | This task builds only the Rust code of AppFlowy. | |
| AF: Code Gen |
This task will regenerate the required files to build AppFlowy. This includes the language translations, freezed files. It does not include the protobuf files.
Note: This is the "default build task", this can be executed at any time by typing Ctrl-Shift-B.
|
AF: Flutter Pub
AF: Flutter Package Get
AF: Generate Language Files
AF: Generate Freezed Files
|
| AF: Flutter Pub Get | This will execute the `flutter pub get` command in the `/frontend/app_flowy` directory | |
| AF: Flutter Package Get | This will execute the `flutter packages pub get` command in the `/frontend/app_flowy` directory | |
| AF: Generate Freezed Files | This will generate all the required freezed files. | |
| AF: Generate Language Files | This will generate all the required language translation files | |
| AF: flutter build aar | This will build AppFlowy in .aar format | |
Tasks are defined in the `/frontend/.vscode/tasks.json` file.
# Translate AppFlowy
We'd like AppFlowy to be usable by people from all over the globe. You can help us reach that goal by contributing to our translation efforts. See below on how to fill out missing translations, modify existing translations, or add a language that isn't supported yet.
## Modify an Already-Supported Language
### Using the inlang no-code editor
1. Open the [inlang-editor](https://inlang.com/editor/github.com/AppFlowy-IO/AppFlowy)
2. Edit translations (filter & search can help)
3. From the `frontend` directory, run `sh ./scripts/code_generation/language_files/generate_language_files.sh` on Linux and macOS, or `.\scripts\code_generation\language_files\generate_language_files.cmd` on Windows to generate.
4. Alternatively, run the `AF: Generate Language Task` from VSCode by hitting `F1`, selecting `Tasks: Run Task`, then searching for the task.
5. Verify that the translation has changed appropriately by compiling and running the app.
### Directly in the source code
1. Modify the specific translation file located at: `frontend/resources/translations/-.json`
2. From the `frontend` directory, run `sh ./scripts/code_generation/language_files/generate_language_files.sh` on Linux and macOS, or `.\scripts\code_generation\language_files\generate_language_files.cmd` on Windows to generate.
3. Alternatively, run the `AF: Generate Language Task` from VSCode by hitting `F1`, selecting `Tasks: Run Task`, then searching for the task.
4. Verify that the translation has changed appropriately by compiling and running the app.
## Add an Unsupported Language
> Adding new languages from within the inlang editor is not supported yet, but you can add the language and then do the translations in inlang. (Adding via inlang is coming soon)
1. Create a JSON file that contains the translation tokens and values. You can simply copy `frontend/resources/translations/en.json` and edit it from there.
2. The name of the file should be `-.json`, where `language_code` follows the [ISO-639-1 standard](https://en.wikipedia.org/wiki/List_of_ISO_639-1_codes) and the `country_code` is a valid [ISO3166 alpha2 country code](https://www.iso.org/obp/ui/#search/code/). For example, Spanish in Venezuela would be `es-VE.json`. If the language doesn't change much between countries that use it, you can simply use the language code instead, e.g. `pl.json`.
3. From the `frontend` directory, run `sh ./scripts/code_generation/language_files/generate_language_files.sh` on Linux and macOS, or `.\scripts\code_generation\language_files\generate_language_files.cmd` on Windows to generate.
4. Alternatively, run the `AF: Generate Language Task` from VSCode by hitting `F1`, selecting `Tasks: Run Task`, then searching for the task.
5. In `frontend/appflowy_flutter/lib/startup/tasks/app_widget.dart`, search for the `InitAppWidgetTask` class and add the new language (e.g. `Locale('en', 'IN')`) to the `supportedLocales` list :
```
runApp(
EasyLocalization(
supportedLocales: const [
Locale('am', 'ET'),
Locale('ar', 'SA'),
Locale('ca', 'ES'),
Locale('de', 'DE'),
Locale('en'),
... // <---- Add locale to this list
],
path: 'assets/translations',
fallbackLocale: const Locale('en'),
child: app),
);
```
6. Add the name of the language in that language to the list of language names in `frontend/appflowy_flutter/packages/flowy_infra/lib/language.dart`.
String languageFromLocale(Locale locale) {
     switch (locale.languageCode) {
       case "en":
         return "English";
       case "zh":
         return "简体中文";
       case "de":
         return "Deutsch";
       case "es":
         return "Español";
       case "fr":
         return "Français";
       ...                   // <- add your language here.
       default:
         return locale.languageCode;
     }
   }
## How to test your changes
Once you are pleased with your translations, compile AppFlowy, select the language and see your work come to life! If everything is working fine, don't forget to create a PR on Github so that others can also benefit from your effort.
Change your language in the settings page of AppFlowy
# Troubleshooting
## ❓ Troubleshooting
First of all, make sure the version of flutter and rust is the version specified in [here](https://appflowy.gitbook.io/docs/essential-documentation/contribute-to-appflowy/software-contributions/environment-setup)
### 1. Protobuf Generation Errors
1. Ensure the protoc-gen is installed
```shell
which protoc-gen-dart
```
2. Ensure the $HOME/.pub-cache/bin is shown in your $PATH.
```shell
echo $PATH
```
3. Ensure VS Code uses bash as the default terminal You can check out this [link](https://github.com/AppFlowy-IO/AppFlowy/issues/413) for more information.
### 2. Remove outdated files
AppFlowy uses `CodeGen` to generate some files that are ignored by git. So remove these files if there are some errors, warnings, and reference errors.
Here are the files are safe to remove
1. `AppFlowy/frontend/app_flowy/packages/flowy_sdk`
2. `AppFlowy/frontend/app_flowy/packages/appflowy_backend/lib/dispatch/dart_event`
3. `AppFlowy/frontend/app_flowy/packages/appflowy_backend/lib/protobuf`
### 3. Error: Not found: 'dart:ffi'
[issue #38](https://github.com/AppFlowy-IO/appflowy/issues/38)
Flutter Web / Android / iOS is not supported yet. Please switch to macOS or other supported devices.
### 4. How to use sql-data.json
Q: How to use sql-data.json
A: Check the offline mode section:
### 5. How to create a pull request
A:
### 6. Permission denied
A:
### 7. Failed to load dynamic library 'libdart\_ffi.so'
[issue #112](https://github.com/AppFlowy-IO/appflowy/issues/112) Q: Hello, when I run app with vs code\&android\&mac m1, it gave error:
ArgumentError (Invalid argument(s): Failed to load dynamic library 'libdart\_ffi.so': dlopen failed: library "libdart\_ffi.so" not found)
A: Are you trying to build for android? Appflowy only supports desktops as of now
[issue #191](https://github.com/AppFlowy-IO/appflowy/issues/191) Q. Unhandled Exception: Invalid argument(s): Failed to load dynamic library 'libdart\_ffi.so' on Ubuntu.
A: I append ubuntu 21.04 source.list's content to `/etc/apt/source.list`, and then upgrade `libc6`.
```shell
# Append the ubuntu 20.04's source.list to its tail.
$ sudo vim /etc/apt/source.list
$ sudo apt upgrade libc6
```
### 8. Build failed on Ubuntu 20.04
[issue #106](https://github.com/AppFlowy-IO/appflowy/issues/106)
Q: I follow the BUILD\_ON\_LINUX.md and failed on step 10 cargo make --profile development-linux-x86 flowy-sdk-dev
To Reproduce Just follow the BUILD\_ON\_LINUX.md
A: There are some issues in protobuf generation of appflowy on linux. If you skip that step, you can get it working. Protobuf has already been generated and is tracked in the repository. So it will work without regeneration as of now.
### 9. The document data could not be saved on Ubuntu
[issue #1306](https://github.com/AppFlowy-IO/AppFlowy/issues/1306)
### 10. Can't build development environment
Q. While executing install\_linux.sh script at compiling diesel\_cli i'm getting following error:
```
error: linking with `cc` failed: exit status: 1
...
= note: /usr/bin/ld: cannot find -lsqlite3
collect2: error: ld returned 1 exit status
error: could not compile `diesel_cli` due to previous error
error: failed to compile `diesel_cli v2.0.0`, intermediate artifacts can be found at `/tmp/cargo-install4xWPP3`
```
[issue #1076](https://github.com/AppFlowy-IO/AppFlowy/issues/1076)
### 11. Docker Hub (app\_flowy:1): Gtk-WARNING \*\*: 10:44:25.079: cannot open display
[issue #389](https://github.com/AppFlowy-IO/AppFlowy/issues/389)
### 12. Failed to start Flutter renderer: Unable to create a GL context
```
⋊> ./app_flowy
** (app_flowy:21547): WARNING **: 03:05:10.061: Failed to start Flutter renderer: Unable to create a GL context
** (app_flowy:21547): WARNING **: 03:05:12.733: Unable to retrieve framework response: No engine to send to
```
[issue #295](https://github.com/AppFlowy-IO/AppFlowy/issues/295)
### 13. Cannot run on Macbook M1 chip
\[issue #255] ()
### 14. Windows Build Failed
[issue #210](https://github.com/AppFlowy-IO/AppFlowy/issues/210)
### 15. Malicious software warning on install- MAC-OS
[issue #18](https://github.com/AppFlowy-IO/AppFlowy/issues/18) [issue #1313](https://github.com/AppFlowy-IO/AppFlowy/issues/1313)
### 16. Cannot run on Ubuntu 22.04
```
[ERROR:flutter/lib/ui/ui_dart_state.cc(198)] Unhandled Exception: Invalid argument(s): Failed to load dynamic library 'libdart_ffi.so': libssl.so.1.1: cannot open shared object file: No such file or directory
#0 _open (dart:ffi-patch/ffi_dynamic_library_patch.dart:12)
#1 new DynamicLibrary.open (dart:ffi-patch/ffi_dynamic_library_patch.dart:23)
#2 _open (package:flowy_sdk/ffi.dart:23)
#3 _dl (package:flowy_sdk/ffi.dart:10)
#4 _set_stream_port (package:flowy_sdk/ffi.dart)
#5 set_stream_port (package:flowy_sdk/ffi.dart)
#6 FlowySDK.init (package:flowy_sdk/flowy_sdk.dart:32)
#7 InitRustSDKTask.initialize. (package:app_flowy/startup/tasks/rust_sdk.dart:13)
#8 InitRustSDKTask.initialize. (package:app_flowy/startup/tasks/rust_sdk.dart:12)
#9 _rootRunUnary (dart:async/zone.dart:1434)
#10 InitRustSDKTask.initialize (package:app_flowy/startup/tasks/rust_sdk.dart:12)
#11 AppLauncher.launch (package:app_flowy/startup/startup.dart:99)
```
[issue #566](https://github.com/AppFlowy-IO/AppFlowy/issues/566)
### 17. Run appyflowy in docker,but it not work: cannot open display: 0
**Q:**
Bug Description
xhost + docker run --rm -v $HOME/.Xauthority:/root/.Xauthority:rw -v /tmp/.X11-unix:/tmp/.X11-unix -v /dev/dri:/dev/dri -v /var/run/dbus/system\_bus\_socket:/var/run/dbus/system\_bus\_socket -v appflowy-data:/home/appflowy -e DISPLAY=${DISPLAY} appflowyio/appflowy\_client:main
(app\_flowy:1): Gtk-WARNING \*\*: 01:27:57.247: cannot open display: :0
**A:**
I add the param\
\&#xNAN;**--network=host**
and it works
[issue: #2458](https://github.com/AppFlowy-IO/AppFlowy/issues/2458)
## 18. Can't run tests on windows "Failed to load dynamic library"
If you're trying to run tests on windows, but they're failing due to this message:
```
Invalid argument(s): Failed to load dynamic library
'C:\Users\mathias\AppFlowy\frontend\appflowy_flutter/.sandbox/dart_ffi.dll': error code 126
dart:ffi
open
...
```
Run this command from the frontend directory: `cargo make dart_unit_test`
*Optionally you can run this in bash instead of the above one, but you must be inside the appflowy\_flutter directory:* `flutter test --dart-define=RUST_LOG=INFO -j, --concurrency=1 --coverage`
# Licenses
# AppFlowy Editor
\[WIP]: The editor documentation is under construction!
# How to Implement Markdown Syntax To Style Text In AppFlowy Editor
Customizing hotkeys to format text
# How to Create a Plugin for AppFlowy Editor
https\://pub.dev/packages/appflowy\_editor
# Licenses
**Q1:** What is the Mozilla Public License (the MPL)?
[**A**](https://www.mozilla.org/en-US/MPL/2.0/FAQ/#what-is-the-mpl)**:** “The MPL is a simple [copyleft](http://en.wikipedia.org/wiki/Copyleft) license. The MPL’s “file-level” copyleft is designed to encourage contributors to share modifications they make to your code while still allowing them to combine your code with code under other licenses (open or proprietary) with minimal restrictions.”
**Q2:** How ‘viral’ is the MPL? If I use MPL-licensed code in my proprietary application, will I have to give all the source code away?
[**A**](https://www.mozilla.org/en-US/MPL/2.0/FAQ/#virality)**:** No. As long as MPL-licensed code is in a separate file from your proprietary code, you do not need to open-source your proprietary code.
**Q3:** How does the scope of the MPL’s copyleft compare with the LGPL and GPL’s copyleft?
[**A**](https://www.mozilla.org/en-US/MPL/2.0/FAQ/#copyleft-scope)**:** MPL is less restrictive than LGPL and GPL. MPL’s copyleft applies to any files containing MPLed code. LGPL’s copyleft applies to any library based on LGPLed code. GPL’s copyleft applies to all software based on GPLed code. To better understand how the LGPL and GPL define “based on,” please read the licences and consult with your legal. [Here](https://fossa.com/blog/open-source-software-licenses-101-mozilla-public-license-2-0/#:~:text=Using%20the%20Licensed%20Code\&text=MPL'd%20code%20can%20be,Distribute%20the%20code.) is an article that explains the differences between these weak copyleft licenses.
**Q4:** I want to use appflowy\_editor, which is under the MPL. What do I have to do?
[**A**](https://www.mozilla.org/en-US/MPL/2.0/FAQ/#use)**:** “Nothing. Like all other free and open source software, software available under the MPL is available for anyone (including individuals and companies) to use for any purpose. The MPL only creates obligations for you if you want to distribute the software outside of your organization.”
**Q5:** I want to distribute appflowy\_editor, which is available under the MPL, either changed or unchanged, within my organization. What do I have to do?
[**A**](https://www.mozilla.org/en-US/MPL/2.0/FAQ/#distribute-within-organization)**:** “Nothing. The right to private modification and distribution (and inside a company or organization counts as ‘private’) is another right guaranteed by free and open-source software licenses, including the MPL.”
**Q6:** I want to distribute (outside my organization) a version of appflowy\_editor that I have modified. What do I have to do?
[**A**](https://www.mozilla.org/en-US/MPL/2.0/FAQ/#distribute-modified-source)**:** “To see the complete set of requirements, read the license. However, generally:
* You must inform the recipients that the source code is made available to them under the terms of the MPL (Section 3.1), including any Modifications (as defined in Section 1.10) that you have created.
* You must make the grants described in Section 2 of the license.
* You must respect the restrictions on removing or altering notices in the source code (Section 3.4).”
**Q7:** I want to distribute (outside my organization) an executable program based on appflowy\_editor that I have modified. What do I have to do?
[**A**](https://www.mozilla.org/en-US/MPL/2.0/FAQ/#distribute-binaries-from-modified-source)**:** “You must make available the MPL-licensed portions of the source code as described in the previous question and inform the recipients how they can obtain such source code (Section 3.2).”
**Q8:** I want to use appflowy\_editor in a commercial application. May I do that?
**A:** Yes, appflowy\_editor, which is available under the MPL, can be included in software that is sold commercially
This FAQ is mostly based on [MPL 2.0 FAQ](https://www.mozilla.org/en-US/MPL/2.0/FAQ/)
\
# AppFlowy Cloud
## OpenAPI Specification
[Documentation](https://github.com/AppFlowy-IO/documentations/blob/main/documentation/appflowy-cloud/openapi/README.md)
# Architecture
* This articles goes through self-host AppFlowy Cloud's architecture after deployment.
* For the rest of the article, we will `myhost` as the hostname/ip of the machine where AppFlowy Cloud is deployed in.

From the diagram, there are 5 entrypoints for end user usage, we categorized them into the following
* Client Usage
* Observability Tools
## Client Usage
This is where regular AppFlowy Cloud users should spend most of their time in.
### AppFlowy Native Application
* Dependencies: GoTrue, AppFlowy-Cloud
* Client Application specific to various Operating System(Windows, Mac, Linux)
### User Admin Web UI
* Dependency: GoTrue, Redis
* Account management for both Admin and Non-Admin users.
* Accessible at
* Admin capabilities
* User creation, deletion, password change
* Generating sign in link for users
* Non-Admin capabilities
* Password Change
* User Invitation (via email)
## Observability Tools
Strictly speaking, the following are not essentially for cloud functionality, but recommended to have for various reasons including:
* Resource Usage
* Database performance
Usernames and password are generated during the initialization phase. Kindly refer to environmental variables for login credentials.
### PgAdmin
* Dependency: Postgres
* Postgres database administration tool
* Accessible at [https://myhost/pgadmin](https://myhost/web)
### Minio Web UI
* Depdency: None
* File storage management
* Accessible at [https://myhost/minio](https://myhost/web)
### Portainer
* Depdency: None
* Docker container management
* Accessible at
## Services
Core services that AppFlowy Native Application would need
### AppFlowy-Cloud
* Dependencies: GoTrue, Postgres, Redis, Minio
* Provides core functionalities to AppFlowy Native Application
### GoTrue
* Dependencies: Postgres
* Authentication Server for Native Application, User Admin, and AppFlowy-Cloud
* Source of truth for user creation/deletion/verification
## Data Storage
### Postgres
* Essential data storage for AppFlowy Cloud and Gotrue
### Redis
* Used as cache for AppFlowy Cloud and User Admin Web for session management.
### Minio
* S3 API Compatible File Storage
* Refer to deployment guide if you want to configure to switch to your S3 Storage instead
# Deployment
## ☀ Deployment
## Background
* This deployment architecture is designed to make self-hosting AppFlowy-Cloud as easy as possible.
* Deployment can be done in a single machine which only needs `docker` to be installed.
* [Cloud Deployment Guide](https://github.com/AppFlowy-IO/AppFlowy-Cloud/blob/main/doc/DEPLOYMENT.md)
## Deployment Architecture

### Routing
* After `docker compose up -d` is ran, AppFlowy-Cloud will be serving in [localhost](http://localhost) at both port 80 and 443
* Host Machine should expose either HTTP(80) or HTTPS(443) port.
* AppFlowy Native Application should then be configured to connect to Host Machine through IP or hostname.
* `/gotrue` → GoTrue Auth Server
* `/api` → AppFlowy-Cloud HTTP
* `/ws` → AppFlowy-Cloud Web Socket
* `/web` → AppFlowy User Admin Frontend
* `/pgadmin` → Postgres database control panel
* `/minio` → Minio Web UI
* `/portainer` → Container Management
---
[Next Page](/docs/llms-full.txt/1)





